5-Minute Chili Cheese Dip – Ultimate Party Appetizer
The Ultimate Warm and Cheesy **Chili Cheese Dip** Recipe
There are some dishes that just scream comfort, joy, and good times. A truly spectacular **Chili Cheese Dip** is undeniably one of them. Imagine a rich, savory chili base, simmered to perfection, then generously combined with an irresistible blend of melted, gooey cheeses. Whether you are hosting a game day party, planning a cozy movie night, or simply craving an indulgent snack, this **Chili Cheese Dip** is your ticket to a flavor fiesta that everyone will adore. Forget the store-bought versions; making your own homemade **Chili Cheese Dip** is surprisingly simple and yields a result that’s infinitely more satisfying and flavorful. It’s a dish that brings people together, sparking conversations and smiles with every scoop. Get ready to become the MVP of your next gathering, because this recipe for **Chili Cheese Dip** is about to become your new secret weapon. Let’s dive into creating a dip so good, it might just disappear before you even have a chance to grab your second chip!
Ingredients for Your Perfect **Chili Cheese Dip**
Crafting the best **Chili Cheese Dip** starts with selecting quality ingredients that build layers of flavor. This list focuses on a classic, hearty version, but feel free to adjust to your personal taste. These are the core ingredients you will need to create this incredibly popular dip.
- 1 tablespoon olive oil
- 1 pound ground beef (80/20 lean, or ground turkey for a lighter option)
- 1 medium yellow onion, finely chopped
- 2 cloves garlic, minced
- 1 (15-ounce) can tomato sauce
- 1 (14.5-ounce) can diced tomatoes, undrained
- 1 (4-ounce) can diced green chilies, undrained
- 1 (1.25-ounce) packet chili seasoning mix (or 2 tablespoons homemade blend)
- 1 teaspoon ground cumin
- ½ teaspoon smoked paprika
- ¼ teaspoon cayenne pepper (optional, for extra heat)
- 8 ounces cream cheese, softened and cut into cubes
- 16 ounces Velveeta cheese (or similar processed cheese block), cubed
- 1 cup shredded sharp cheddar cheese (for extra cheesiness, optional)
- Salt and freshly ground black pepper to taste
- Optional garnishes: chopped fresh cilantro, sliced green onions, diced jalapeños, sour cream
Preparation Instructions: Creating Your Incredible **Chili Cheese Dip**
Making this incredible **Chili Cheese Dip** is a straightforward process, ensuring a smooth and creamy texture with rich, savory chili flavor. Follow these step-by-step instructions for the ultimate homemade dip.
- Brown the Meat: Heat olive oil in a large skillet or Dutch oven over medium-high heat. Add the ground beef (or turkey) and cook, breaking it apart with a spoon, until it is fully browned. Drain any excess grease thoroughly. This step is crucial for developing a flavorful base for your **Chili Cheese Dip**.
- Sauté Aromatics: Add the chopped onion to the skillet with the cooked meat. Cook for about 5-7 minutes, until the onion softens and becomes translucent. Stir in the minced garlic and cook for another minute until fragrant. Do not let the garlic burn.
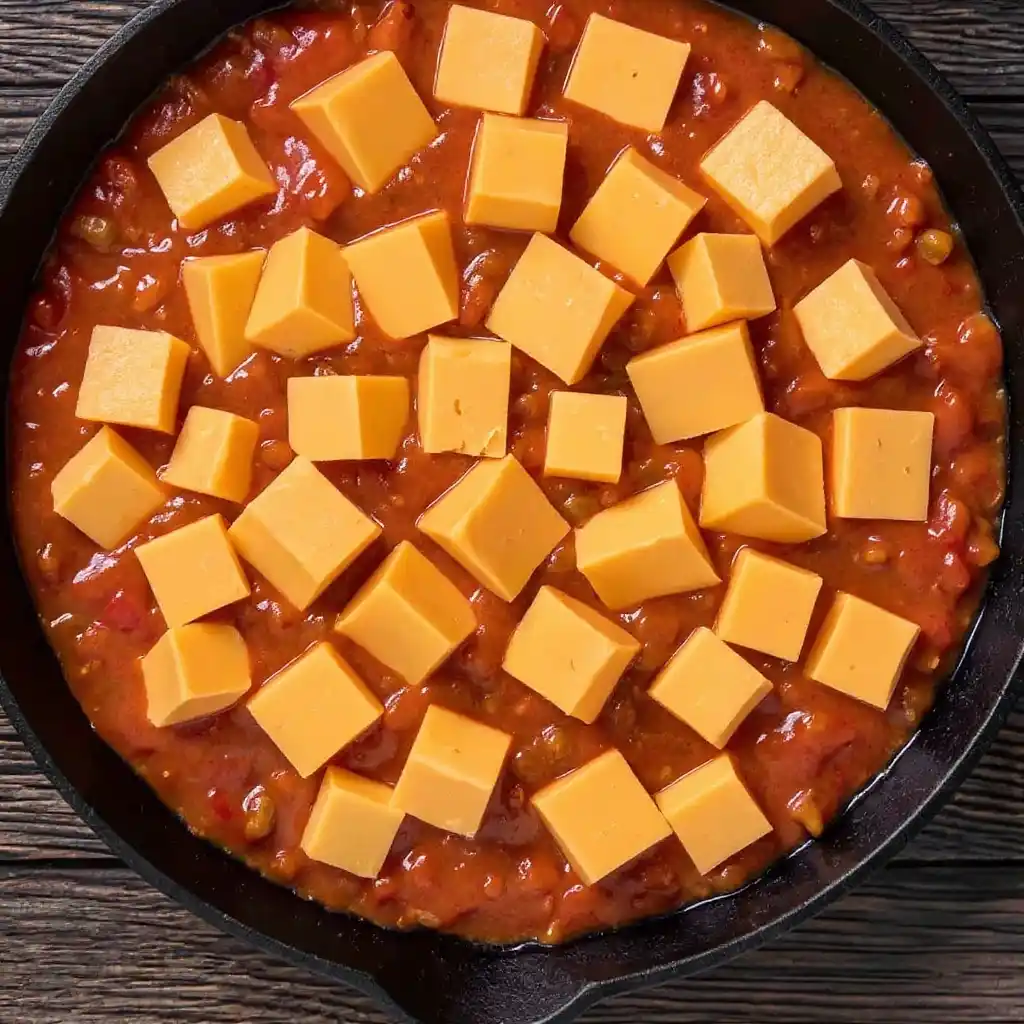
- Build the Chili Base: Pour in the tomato sauce, diced tomatoes (with their liquid), and diced green chilies (with their liquid). Stir in the chili seasoning mix, ground cumin, and smoked paprika. If you like a little extra kick, now is the time to add the cayenne pepper. Bring the mixture to a gentle simmer, then reduce the heat to low, cover, and let it cook for at least 15-20 minutes. This allows the flavors to meld beautifully, creating a robust chili for your **Chili Cheese Dip**. Stir occasionally to prevent sticking.
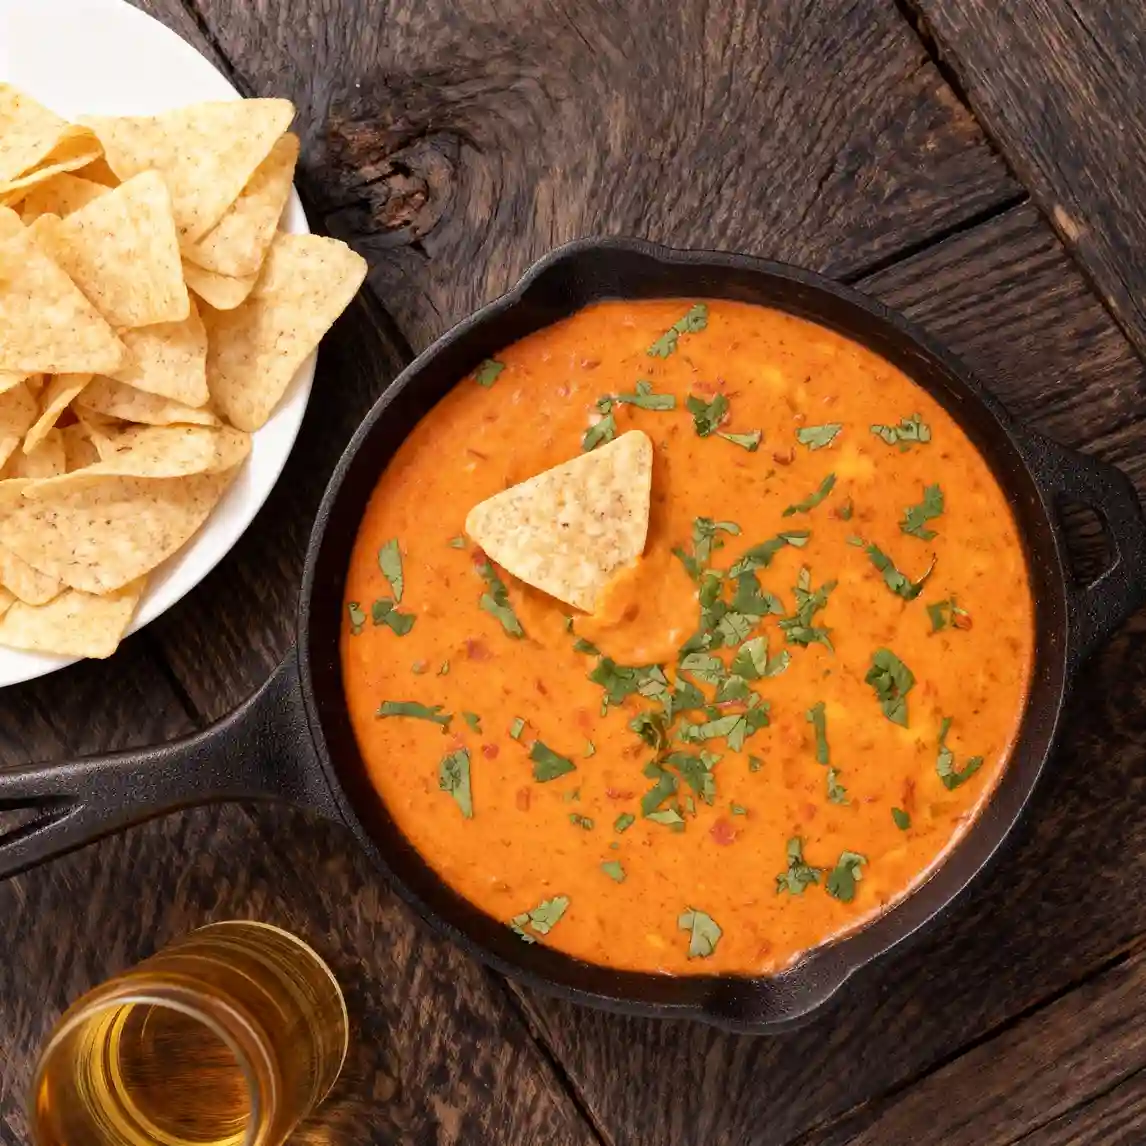
- Incorporate the Cheeses: Once the chili has simmered and the flavors have deepened, add the cubed cream cheese and Velveeta cheese to the skillet. Stir continuously over low heat until both cheeses are completely melted and the mixture is smooth and creamy. The Velveeta provides that classic, super-smooth dip consistency that makes a **Chili Cheese Dip** so irresistible.
- Add Extra Cheddar (Optional): If you want an even cheesier dip, stir in the shredded sharp cheddar cheese until it melts and fully incorporates into the **Chili Cheese Dip**.
- Season and Serve: Taste the **Chili Cheese Dip** and adjust seasoning with salt and pepper as needed. Remember that processed cheeses can be salty, so add slowly.
- Keep Warm: Transfer the finished **Chili Cheese Dip** to a slow cooker set to “warm” if you plan to serve it at a party for an extended period. This keeps it perfectly melty and delicious throughout your event.
Serving Suggestions for Your Delicious **Chili Cheese Dip**
The beauty of a fantastic **Chili Cheese Dip** lies not only in its taste but also in its versatility as a party dish. Once your **Chili Cheese Dip** is ready, the fun truly begins with how you present and serve it. Here are some creative ideas to make your dip the star of any spread:
- Classic Dippers: You can never go wrong with a generous basket of sturdy tortilla chips. Corn chips (like Fritos) are another excellent choice, offering a salty crunch that complements the creamy dip perfectly. Even classic potato chips or hearty crackers can be delightful.
- Fresh Veggie Sticks: For a lighter, healthier option, offer an array of fresh vegetable sticks. Carrots, celery, bell pepper strips (red, yellow, orange), and even cucumber slices provide a refreshing contrast and a satisfying crunch with your **Chili Cheese Dip**.
- Bread Dippers: Slices of crusty baguette, pita bread, or even soft pretzel bites make for a fantastic pairing. The bread soaks up all that cheesy chili goodness, turning it into a truly decadent experience.
- Build-Your-Own Topping Bar: Elevate your **Chili Cheese Dip** experience by setting up a mini topping bar. Offer bowls of chopped fresh cilantro, sliced green onions, diced red onions, pickled or fresh jalapeños, a dollop of sour cream or Greek yogurt, and even a sprinkle of extra shredded cheese. This allows guests to customize their perfect bite.
- Loaded Potatoes or Nachos: Turn your **Chili Cheese Dip** into a mini meal! Spoon it over baked potatoes or sweet potatoes for a hearty side. Alternatively, layer it over a bed of tortilla chips with extra toppings to create an epic plate of nachos.
- Hot Dog Topper: This dip isn’t just for dipping! Use it as an incredible topping for hot dogs or chili dogs, transforming a simple meal into something extraordinary.
Frequently Asked Questions About **Chili Cheese Dip**
Q1: Can I make this **Chili Cheese Dip** ahead of time?
Absolutely! **Chili Cheese Dip** is fantastic for making in advance, which makes it perfect for parties. Prepare the dip as instructed, let it cool completely, and then store it in an airtight container in the refrigerator for up to 3-4 days. When you’re ready to serve, reheat it gently on the stovetop over low heat, stirring frequently, or in a slow cooker set to low until it is warm and bubbly again. You might need to add a splash of milk or water if it seems too thick after reheating.
Q2: What kind of chili should I use if I want to speed up the process?
While this recipe includes making a chili base from scratch, you can certainly use canned chili for a quicker version of **Chili Cheese Dip**. Opt for a good quality, hearty canned chili (no beans or with beans, depending on your preference). Just make sure to drain any excess liquid if the canned chili seems too watery before combining it with the cheeses. You’ll still get a delicious, satisfying dip with less prep time.
Q3: Can I make this **Chili Cheese Dip** vegetarian?
Yes, you can easily make a vegetarian version of this **Chili Cheese Dip**. Instead of ground beef, use a plant-based ground meat substitute, or simply omit the meat entirely and increase the amount of diced tomatoes, beans (like black beans or kidney beans), or even finely diced mushrooms to add more texture and substance to the chili base. Ensure all other ingredients are vegetarian-friendly.
Q4: What’s the best way to store leftover **Chili Cheese Dip**?
Store any leftover **Chili Cheese Dip** in an airtight container in the refrigerator for up to 3-4 days. To reheat, you can use the microwave in short bursts, stirring well in between, or gently warm it on the stovetop over low heat. If the dip has thickened too much in the fridge, a small amount of milk or chicken broth can help bring it back to its creamy consistency.
Q5: Is it possible to adjust the spice level of the **Chili Cheese Dip**?
Definitely! This recipe provides a mild to medium spice level. If you prefer a milder **Chili Cheese Dip**, you can omit the cayenne pepper and use mild diced green chilies. For those who love a fiery kick, increase the cayenne pepper, add a pinch of chili flakes, or include some finely diced fresh jalapeños or serrano peppers when you sauté the onions. You can also add a dash of your favorite hot sauce when serving.
Conclusion: Your New Favorite **Chili Cheese Dip** Awaits!
There you have it – a comprehensive guide to crafting the most irresistible, crowd-pleasing **Chili Cheese Dip** you will ever make. From the rich, savory chili base to the incredibly smooth and gooey cheese, every spoonful is pure comfort and flavor. This is more than just a dip; it’s a centerpiece that promises to bring warmth and joy to any gathering, big or small. The beauty of this **Chili Cheese Dip** recipe lies in its simplicity and the spectacular payoff in taste. It’s truly an experience that lingers, leaving everyone asking for the recipe.
We encourage you to roll up your sleeves, gather your ingredients, and give this amazing **Chili Cheese Dip** a try tonight. Whether you’re making it for a special occasion or just to treat yourself, you won’t be disappointed. Once you’ve experienced the magic of homemade **Chili Cheese Dip**, we’d love to hear about it! Share your photos, tell us about your favorite dippers, or let us know if you added any unique twists in the comments section below. Your culinary adventures inspire us all!
For more delicious and easy-to-follow recipes that add a little magic to your kitchen, be sure to explore MagicInKitchen.com. We’re constantly cooking up new ideas to help you create memorable meals and incredible moments. Happy cooking!
Chili Cheese Dip
Cook Time: 20-25 minutes
Total Time: 30-35 minutes
Servings: 8-12
Calories: 400 calories (estimated per serving)
Ingredients
- 8 oz cream cheese, softened
- 1 (15 oz) can no-bean chili (such as Hormel or your favorite brand)
- 2 cups shredded cheddar cheese (or Mexican blend cheese)
- Optional: 1/4 cup chopped green onions, for garnish
- Optional: Tortilla chips, Fritos, or crackers, for serving
Instructions
- Preheat oven to 375°F (190°C).
2. In a medium baking dish (an 8×8 inch square or similar size), spread the softened cream cheese evenly across the bottom.
3. Carefully spoon the no-bean chili over the cream cheese layer, spreading it gently to cover.
4. Sprinkle the shredded cheddar cheese evenly over the chili.
5. Bake for 20-25 minutes, or until the dip is hot and bubbly, and the cheese is melted and slightly golden.
6. Remove from oven. If desired, garnish with chopped green onions.
7. Serve immediately with tortilla chips, Fritos, or your favorite dippers.
Chef’s Notes: Serve hot with tortilla chips, crackers, or Fritos. For an extra kick, add a pinch of cayenne pepper to the chili layer or some sliced jalapeños before baking. You can also use chili with beans if preferred.