Burnt Basque Style Cheesecake
The Ultimate Homemade Burnt Basque Style Cheesecake Recipe
There are some desserts that simply transcend expectations, offering a culinary experience that’s both rustic and refined. The **Burnt Basque Style Cheesecake** is undeniably one of them. Forget everything you thought you knew about cheesecake; this isn’t your traditional, perfectly smooth, water-bath-baked affair. Instead, imagine a cheesecake with a gloriously caramelized, almost burnt top, a creamy, custard-like interior that’s incredibly light, and a rich, slightly tangy flavor that will have everyone asking for more. It’s the kind of dessert that looks impressive with minimal fuss, making it a dream come true for home bakers who want to create something truly special without spending hours in the kitchen.
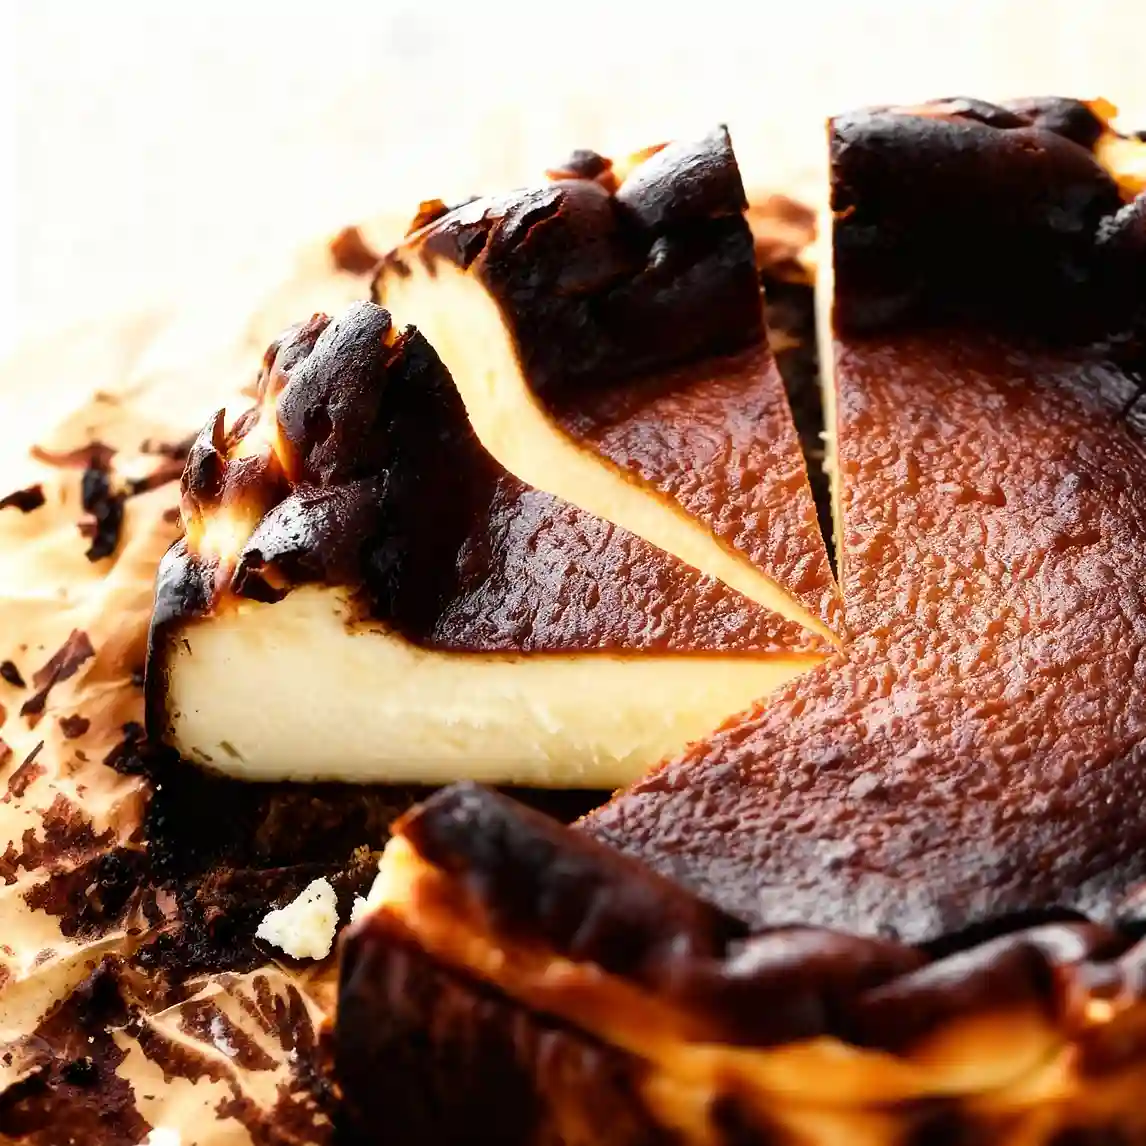
Originating from La Viña, a small restaurant in San Sebastián, Spain, this unique cheesecake has taken the world by storm, and for good reason. Its beauty lies in its simplicity and its embrace of imperfection. There’s no crust to press, no fiddly water bath, and certainly no need to worry about cracks. In fact, a dark, deeply browned surface is not just desired, but essential to its iconic flavor profile. The high baking temperature creates that distinct “burnt” exterior, which delivers an incredible smoky, caramel note that beautifully contrasts with the silky, barely-set interior. If you’ve been searching for a show-stopping dessert that’s surprisingly easy to make and guaranteed to impress, then our **Burnt Basque Style Cheesecake** recipe is exactly what your kitchen needs. Get ready to bake a masterpiece that tastes as good as it looks!
Ingredients for Your Perfect Burnt Basque Style Cheesecake
Crafting this incredible dessert requires just a few simple, high-quality ingredients. For the best results, ensure all your dairy ingredients are at room temperature before you begin. This helps create that perfectly smooth, lump-free batter essential for a truly decadent **Burnt Basque Style Cheesecake**.
- 2 lbs (about 4.5 standard 8-ounce packages) cream cheese, full-fat, softened
- 1 ½ cups granulated sugar
- 6 large eggs, room temperature
- 2 tsp vanilla extract
- ¼ tsp fine sea salt
- 2 cups heavy cream (also known as whipping cream), room temperature
- 3 tbsp all-purpose flour
Step-by-Step Preparation: Crafting Your Burnt Basque Style Cheesecake
Get ready to create a truly magical dessert with these straightforward instructions. Making a **Burnt Basque Style Cheesecake** is much simpler than you might imagine, and the results are consistently stunning.
- Preheat Oven & Prepare Pan: Adjust your oven rack to the middle position and preheat your oven to a blazing 400°F (200°C). This high temperature is crucial for achieving that signature “burnt” top. Line a 9-inch springform pan with two sheets of parchment paper, ensuring the paper extends several inches above the rim of the pan. Crinkle the parchment paper first, then smooth it into the pan; this makes it easier to fit and gives the finished cheesecake its charming rustic edge.
- Cream the Cream Cheese and Sugar: In the bowl of a stand mixer fitted with the paddle attachment (or using a large bowl and a hand mixer), beat the softened cream cheese on medium speed until completely smooth, about 2-3 minutes. Scrape down the sides of the bowl. Gradually add the granulated sugar and continue to beat until light and fluffy, about another 3-4 minutes. Ensure there are no lumps remaining in the cream cheese mixture for a truly smooth **Burnt Basque Style Cheesecake**.
- Add Eggs and Flavorings: Add the eggs one at a time, beating well after each addition until just combined. Overmixing the eggs can incorporate too much air, which we want to avoid. Stir in the vanilla extract and salt. Scrape down the bowl thoroughly after adding the eggs.
- Incorporate Cream and Flour: With the mixer on low speed, slowly pour in the heavy cream until just combined. Finally, sprinkle in the flour and mix on low speed until no streaks of flour remain. Be careful not to overmix; we’re aiming for a smooth, uniform batter.
- Pour and Bake: Pour the cheesecake batter into your prepared springform pan. Give the pan a gentle tap on the counter a few times to release any large air bubbles.
- Bake to Perfection: Place the pan on a baking sheet (to catch any potential drips, though it’s rare with parchment extending high) and bake for 60-70 minutes. The top should be deeply browned, almost black in places, puffed up, and jiggly in the center when gently shaken. This extreme browning is the hallmark of a delicious **Burnt Basque Style Cheesecake**.
- Cool and Chill: Once baked, remove the cheesecake from the oven and let it cool completely at room temperature in the pan. As it cools, it will deflate significantly, creating its characteristic sunken center. Once it’s fully cooled (this can take 2-3 hours), transfer the cheesecake, still in the pan, to the refrigerator and chill for at least 4 hours, or preferably overnight, to allow it to set completely.
- Serve: When ready to serve, carefully remove the springform pan sides and peel away the parchment paper. Slice with a sharp knife and enjoy this truly unique dessert!
Serving Suggestions for Your Burnt Basque Style Cheesecake Dish
The beauty of the **Burnt Basque Style Cheesecake** is that it’s absolutely perfect on its own, showcasing its rich flavors and unique textures. However, a few simple additions can elevate this dessert even further. A dusting of powdered sugar adds a delicate touch, while fresh berries like raspberries, strawberries, or blueberries provide a lovely tart counterpoint to the creamy sweetness. A light drizzle of honey or a simple fruit coulis made from your favorite seasonal fruits can also enhance the experience. Some even enjoy a small scoop of vanilla bean ice cream on the side, but honestly, the simplicity of this incredible dish truly shines without much adornment. Serve slightly chilled for the best texture and flavor.
Frequently Asked Questions About Burnt Basque Style Cheesecake
When it comes to such a distinctive dessert, it’s natural to have questions. Here are some common queries about the **Burnt Basque Style Cheesecake**.
Q: Why is it called “Burnt” Basque Style Cheesecake?
A: The name comes from its characteristic dark, caramelized, almost burnt exterior. This high-temperature baking creates a smoky, bitter-sweet crust that contrasts beautifully with the creamy interior, delivering a truly unique flavor profile. It’s an intentional “burn”!
Q: Do I really need to use parchment paper that high?
A: Yes, the parchment paper extending high above the rim is crucial. The cheesecake will puff up significantly during baking, and the paper helps contain it, preventing spills and creating those lovely rustic, crinkled edges that are part of its charm.
Q: My cheesecake cracked. Is that okay?
A: Absolutely! Unlike traditional cheesecakes where cracks are seen as a flaw, a **Burnt Basque Style Cheesecake** embraces imperfections. Cracks are completely normal and contribute to its rustic appeal. Don’t worry about them at all!
Q: How long does Burnt Basque Style Cheesecake last?
A: When stored properly in an airtight container in the refrigerator, your **Burnt Basque Style Cheesecake** will last for 3-5 days. It often tastes even better the day after it’s made, as the flavors have more time to meld.
Embrace the Magic: Your Burnt Basque Style Cheesecake Awaits!
You’ve now unlocked the secrets to creating one of the most talked-about desserts in the culinary world. This **Burnt Basque Style Cheesecake** is more than just a recipe; it’s an experience—a delightful journey of contrasting textures and flavors that will captivate anyone lucky enough to try a slice. Its rustic charm and incredible taste make it perfect for any occasion, from a casual family dinner to an elegant gathering. Don’t hesitate to dive in and bake this phenomenal dessert. We guarantee you’ll be amazed by how simple it is to achieve such extraordinary results. Once you’ve made your own, we’d love to hear about it! Share your baking triumphs in the comments below, and don’t forget to visit MagicInKitchen.com for more delightful and easy-to-follow recipes that bring magic to your table every day.
Burnt Basque Style Cheesecake
Cook Time: N/A
Total Time: 6-8 hours (including chilling)
Servings: 8-12
Calories: Approximately 380 calories per serving (estimate)
Ingredients
- 2 lbs (900g) full-fat cream cheese, softened to room temperature
- 1 ½ cups (300g) granulated sugar
- 6 large eggs, room temperature
- 2 cups (480ml) heavy cream (full-fat), room temperature
- 1 teaspoon vanilla extract
- ½ teaspoon salt
- ¼ cup (30g) all-purpose flour
Instructions
- Preheat your oven to 400°F (200°C). Line a 9 or 10-inch springform pan with two pieces of parchment paper, crinkling them up first, then smoothing them into the pan so they extend several inches above the rim. This helps create the rustic, high-sided look.
2. In a large bowl, beat the softened cream cheese and granulated sugar with an electric mixer on medium speed until smooth and creamy, about 2-3 minutes. Scrape down the sides of the bowl as needed.
3. Add the eggs one at a time, mixing well after each addition until just combined. Be careful not to overmix; you want to incorporate air, but not too much.
4. Pour in the heavy cream, vanilla extract, and salt. Mix on low speed until just incorporated and the batter is smooth.
5. Sift the all-purpose flour over the batter and mix on low speed until just combined and no lumps of flour remain. Do not overmix.
6. Pour the batter into the prepared springform pan. Give the pan a gentle tap on the counter a few times to release any large air bubbles.
7. Bake for 50-60 minutes, or until the top is deeply caramelized and almost burnt-looking, and the edges are set but the center is still very wobbly when gently shaken. The high heat creates the ‘burnt’ crust and creamy interior.
8. Remove the cheesecake from the oven and let it cool completely at room temperature, which can take 2-3 hours. The center will sink slightly as it cools.
9. Once cooled to room temperature, transfer the cheesecake to the refrigerator and chill for at least 4-6 hours, or preferably overnight, to allow it to fully set.
10. When ready to serve, carefully remove the springform ring and peel away the parchment paper. Serve at room temperature for the best texture.
Chef’s Notes: The characteristic ‘burnt’ top is intentional and adds a wonderful caramelized flavor. Don’t worry if the center is very wobbly when it comes out of the oven; it will set as it cools and chills. Using room temperature ingredients is crucial for a smooth batter.