Easy Homemade Peppermint Marshmallows
Homemade Peppermint Marshmallows: A Cloud of Winter Delight

Prepare to transcend the ordinary with a confection that whispers of winter wonder and festive cheer – homemade peppermint marshmallows. Forget the store-bought variety; once you experience the ethereal texture and vibrant flavor of these pillowy delights, there’s no turning back. Imagine biting into a soft, airy cloud infused with the cool, invigorating essence of peppermint, melting delicately on your tongue. This isn’t just a treat; it’s an experience, a little piece of edible magic that elevates a simple cup of hot cocoa into an extraordinary indulgence. Embrace the joy of creating something truly special and infuse your home with the sweet aroma of pure holiday enchantment.
Quick Glance Summary
⏱️ Prep Time: 30 minutes (plus 4 hours setting time), 🍽️ Servings: 25-36 pieces, 💥 Vibe: Festive, Cloud-like, Indulgent
Jump Ahead
- What You’ll Need
- How to Make Homemade Peppermint Marshmallows
- Fun Twists & Serving Ideas
- Reviews
- FAQ
- Conclusion
What You’ll Need to Craft Homemade Peppermint Marshmallows
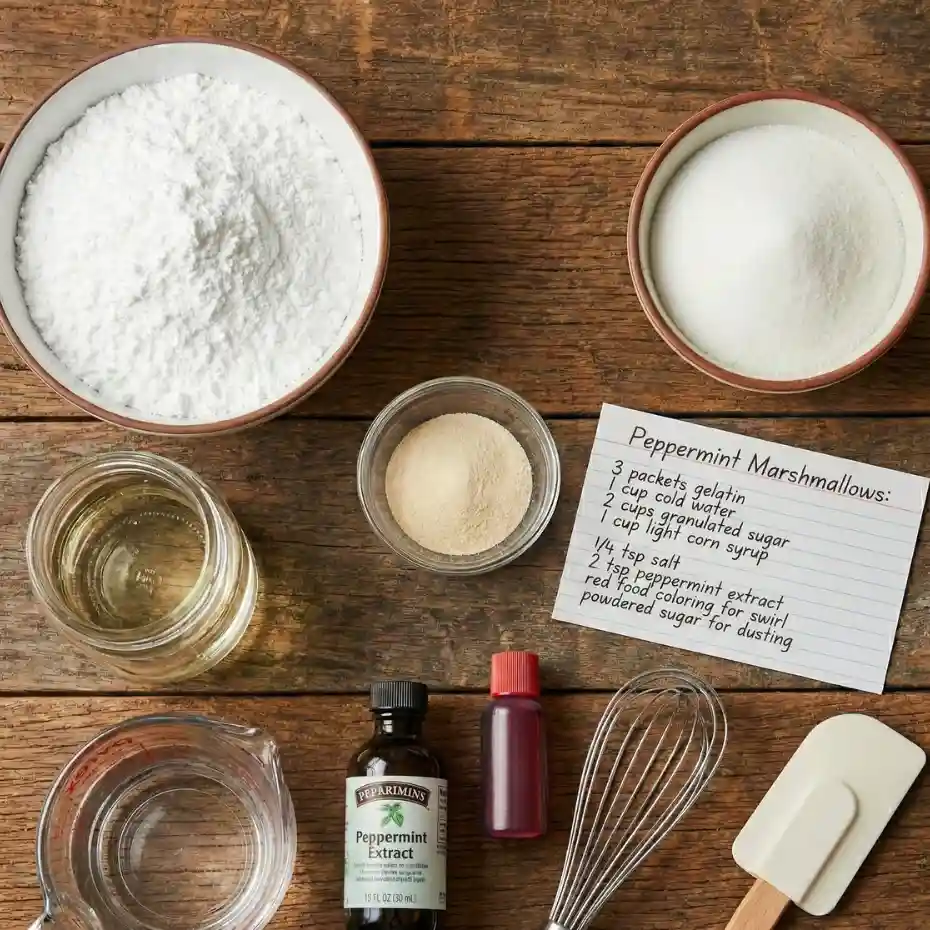
Crafting the perfect homemade peppermint marshmallows begins with gathering the right ingredients. Each component plays a crucial role in achieving that signature fluffy texture and unmistakable peppermint kick. You’ll find most of these staples readily available, ensuring your journey to marshmallow mastery is smooth and delightful.
- 1/2 cup cold water, divided
- 3 envelopes (about 2 1/4 tablespoons) unflavored gelatin powder
- 2 cups granulated sugar
- 2/3 cup light corn syrup
- 1/4 teaspoon salt
- 1 teaspoon vanilla extract
- 1 1/2 teaspoons pure peppermint extract (adjust to taste)
- 1/2 cup powdered sugar
- 1/4 cup cornstarch
- Non-stick cooking spray
- Optional: Crushed candy canes or peppermint candies for garnish
How to Make Homemade Peppermint Marshmallows

The process of creating these exquisite homemade peppermint marshmallows is surprisingly straightforward, yielding results that far surpass any store-bought alternative. Follow these detailed steps to achieve perfect, pillowy delights every time. Mastery of this recipe will make you a holiday hero!
- Prepare Your Pan: Lightly grease a 9×13-inch baking pan with non-stick cooking spray. In a small bowl, whisk together the powdered sugar and cornstarch. Dust the prepared pan generously with about half of this mixture, tapping out any excess. Set aside.
- Bloom the Gelatin: In the bowl of a stand mixer fitted with the whisk attachment, combine 1/4 cup of the cold water with the unflavored gelatin powder. Stir briefly and allow to sit for 5-10 minutes, or until the gelatin has bloomed and thickened.
- Create the Syrup: In a medium saucepan, combine the remaining 1/4 cup cold water, granulated sugar, light corn syrup, and salt. Cook over medium-high heat, stirring occasionally, until the sugar dissolves. Once dissolved, stop stirring. Bring the mixture to a rolling boil and continue to cook until it reaches 240°F (115°C) on a candy thermometer. This is the “soft ball” stage.
- Combine and Whip: Carefully remove the hot syrup from the heat. With the mixer running on low speed, slowly and steadily pour the hot syrup into the gelatin mixture. Once all the syrup is added, increase the mixer speed to high. Beat for 12-15 minutes, or until the mixture is very thick, glossy, and has quadrupled in volume. It should resemble a fluffy cloud and hold stiff peaks.
- Flavor and Pour: Reduce the mixer speed to low and add the vanilla extract and pure peppermint extract. Mix just until combined. Immediately pour the marshmallow mixture into your prepared pan, spreading it evenly with an offset spatula or greased rubber spatula. Work quickly, as the mixture sets rapidly.
- Dust and Set: Generously dust the top of the marshmallow with the remaining powdered sugar and cornstarch mixture. Gently press it down to adhere. If desired, sprinkle with crushed candy canes for an extra festive touch. Allow the marshmallows to set at room temperature for at least 4 hours, or preferably overnight.
- Cut and Store: Once fully set, invert the marshmallow slab onto a clean cutting board dusted with more powdered sugar. Using a sharp, greased knife or a pizza cutter (grease frequently to prevent sticking), cut the slab into desired shapes – squares are classic, but fun cookie cutters can be used too! Toss the cut marshmallows in additional powdered sugar to prevent sticking. Your homemade peppermint marshmallows are ready to enjoy!
Fun Twists & Serving Ideas
These homemade peppermint marshmallows are incredible on their own, but their versatility makes them perfect for creative enhancements and serving suggestions.
- Chocolate-Dipped Indulgence: Melt your favorite dark or white chocolate. Dip half of each marshmallow into the melted chocolate, then sprinkle with more crushed candy canes before the chocolate sets. Pure decadence!
- Ultimate Hot Cocoa Topper: Elevate your hot chocolate game! Place a few fluffy homemade peppermint marshmallows on top of a steaming mug of cocoa. Watch them slowly melt into a creamy, minty layer of bliss.
- Peppermint S’mores: For a unique twist on a classic, sandwich a peppermint marshmallow between graham crackers and a piece of chocolate. Toast lightly over a flame or under a broiler for a gooey, minty s’mores experience.
- Coffee Stirrers: Cut marshmallows into long, narrow strips and use them to stir your morning coffee or espresso. The subtle peppermint flavor will infuse your drink beautifully.
- Festive Gifting: Package these beautiful homemade peppermint marshmallows in cellophane bags with a festive ribbon. They make a thoughtful and delicious homemade gift for friends, family, or teachers during the holidays.
Reviews
These homemade peppermint marshmallows have quickly become a staple in many kitchens!
Sarah L. ⭐⭐⭐⭐⭐
“I can’t believe how easy these were to make, and the taste is out of this world! So much better than anything from a bag. The peppermint flavor is just right, not too overwhelming. My kids absolutely adored them in their hot cocoa!”
Mark T. ⭐⭐⭐⭐⭐
“I was intimidated by making marshmallows from scratch, but this recipe made it so simple. The texture is unbelievably light and fluffy. I gifted a batch of these homemade peppermint marshmallows, and everyone raved about them!”
Jessica R. ⭐⭐⭐⭐⭐
“A truly magical recipe! I added a touch of red food coloring to half the batch for a swirl effect. These homemade peppermint marshmallows are now a yearly tradition for my holiday baking.”
FAQ
Q: How long do homemade peppermint marshmallows last?
A: Stored in an airtight container at room temperature, these marshmallows will stay fresh for up to 2-3 weeks. Avoid refrigeration, as it can make them tough.
Q: Can I make these without peppermint?
A: Absolutely! Simply omit the peppermint extract and perhaps increase the vanilla extract to 2 teaspoons, or substitute with other flavor extracts like almond, orange, or lemon for different variations.
Q: Why are my marshmallows not fluffy?
A: This usually happens if the sugar syrup didn’t reach the correct temperature (240°F) or if the mixture wasn’t whipped long enough. Ensure your candy thermometer is accurate and whip until the mixture is very thick, glossy, and holds stiff peaks.
Q: Can I use a hand mixer instead of a stand mixer?
A: While possible, a stand mixer is highly recommended due to the long whipping time required for homemade marshmallows. A hand mixer might struggle and require significant arm strength.
Conclusion
There’s an undeniable joy that comes from creating something truly special with your own hands, and these homemade peppermint marshmallows embody that feeling perfectly. From the moment the intoxicating scent of peppermint fills your kitchen to the first bite of their airy, cloud-like texture, you’ll understand why this recipe is destined to become a cherished tradition. These aren’t just sweet treats; they are moments of pure, unadulterated happiness, perfect for sharing, gifting, or simply savoring in a quiet moment. Embrace the magic of homemade and let these festive delights bring a touch of enchantment to your holiday season. Discover more culinary wonders and bring magic into your kitchen at magicinkitchen.com.
Recipe Note
For perfectly clean cuts and to prevent sticking, lightly grease your knife or cookie cutters with a flavorless oil (like vegetable or canola) or cooking spray before each cut. Re-grease as needed, especially after cutting a few pieces.
Homemade Peppermint Marshmallows
Cook Time: N/A
Total Time: 5 hours (including setting time)
Course: Dessert, Candy
Servings: 30-40 marshmallows
Calories: 130 calories per 2 marshmallows
Ingredients
- 3 envelopes (about 2.5 tbsp) unflavored gelatin powder
- 1/2 cup cold water (for gelatin)
- 2 cups granulated sugar
- 3/4 cup light corn syrup
- 1/2 cup water (for syrup)
- 1/4 teaspoon salt
- 1.5 teaspoons peppermint extract
- 1 teaspoon vanilla extract (optional, but recommended)
- 2-3 drops red food coloring (optional, for festive swirl)
- 1 cup powdered sugar (for dusting)
- 1/2 cup cornstarch (for dusting, mixed with powdered sugar)
Instructions
1️⃣ Prepare Pan
Line a 9×13-inch pan with parchment paper. Dust with powdered sugar.
2️⃣ Bloom Gelatin
Place ½ cup cold water in the mixer bowl. Sprinkle gelatin over the top and let sit.
3️⃣ Make Sugar Syrup
In a saucepan, combine:
-
1 ½ cups sugar
-
1 cup corn syrup
-
½ cup water
-
¼ tsp salt
Bring to a boil and heat to 240°F (soft-ball stage).
4️⃣ Whip Marshmallow Base
Carefully pour hot syrup into the mixer bowl.
Beat on high for 10–12 minutes until thick, white, and fluffy.
5️⃣ Add Peppermint
Beat in 1 tsp peppermint extract.
6️⃣ Optional Red Swirl
Add 3–5 drops red gel dye.
Swirl gently with a spatula (do not fully mix).
7️⃣ Spread & Set
Transfer mixture to prepared pan. Smooth top.
Let rest uncovered for at least 4 hours.
8️⃣ Cut & Coat
Dust with powdered sugar.
Turn out onto a board. Cut into squares and toss with more powdered sugar.
Chef’s Notes: Store homemade marshmallows in an airtight container at room temperature for up to 2 weeks. For an extra festive touch and crunch, roll the finished marshmallows in finely crushed candy canes before serving. Ensure your candy thermometer is accurate for best results in syrup consistency.