Homemade Twix Candy Bars – Crunchy, Gooey & Chocolatey
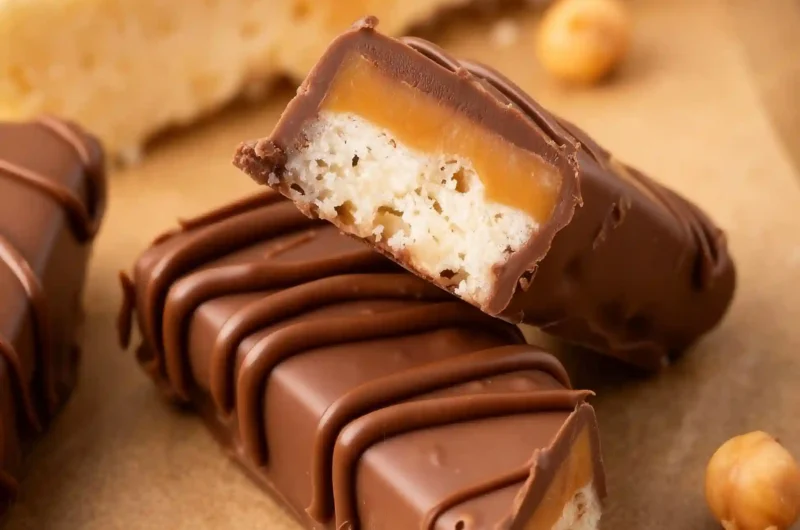
🍫 Homemade Twix Candy Bars: Your Dreamy Shortbread, Caramel & Chocolate Creation

⭐️⭐️⭐️⭐️⭐️ (4.9 from 1,900 fans)
📸 700+ photo shares | ☀️ Updated [October 2025]
There’s something truly magical about recreating your favorite candy bar right in your own kitchen. And when it comes to a classic like the Twix Candy Bars, the homemade version is an absolute revelation! Imagine a buttery, crumbly shortbread base, topped with a luscious, chewy caramel layer, and all enrobed in a generous coating of rich, melted chocolate. Each bite of these homemade Twix Candy Bars is a symphony of textures and flavors that will transport you straight back to childhood, but with the added satisfaction of knowing you crafted this masterpiece yourself.
These Twix Candy Bars are not just a dessert; they’re an experience. Perfect for gifting, holiday gatherings, or simply treating yourself after a long week, they bring a smile to everyone’s face. The distinct snap of the chocolate, the tender give of the caramel, and the crispness of the shortbread make these homemade Twix Candy Bars an utterly irresistible sweet treat. Get ready to embark on a delicious journey that culminates in the best homemade Twix Candy Bars you’ve ever tasted!
Recipe Card will be inserted here
Quick Glance Summary
⏱️ Prep Time: 45 minutes
🍽️ Servings: 12 bars
💥 Vibe: Decadent, Nostalgic, Irresistible
Jump Ahead Section
- What You’ll Need
- How to Make Twix Candy Bars
- Fun Twists & Serving Ideas
- Reviews
- FAQ
- Conclusion
- Recipe Note
What You’ll Need
Gathering your ingredients for these delightful homemade Twix Candy Bars is the first step to sweet success. Most of these are pantry staples, but ensure your butter is good quality for that authentic shortbread flavor. Here’s everything you’ll need to create these heavenly Twix Candy Bars:
For the Shortbread Base:
- 1 cup (2 sticks) unsalted butter, softened
- ½ cup granulated sugar
- 2 cups all-purpose flour
- ¼ teaspoon salt
For the Caramel Layer:
- 1 cup (2 sticks) unsalted butter
- ½ cup granulated sugar
- ½ cup light brown sugar, packed
- ½ cup heavy cream
- 1 teaspoon vanilla extract
- Pinch of salt
For the Chocolate Coating:
- 16 oz milk chocolate or semi-sweet chocolate, chopped (high quality for best melt)
- 1 tablespoon coconut oil (optional, for smoother coating)
How to Make Twix Candy Bars
Crafting your own Twix Candy Bars is an enjoyable process, and watching the layers come together is incredibly satisfying. Follow these detailed, step-by-step instructions to create perfect homemade Twix Candy Bars every time.
- Prepare the Shortbread: Preheat your oven to 350°F (175°C). Line a 9×13 inch baking pan with parchment paper, leaving an overhang on the sides for easy lifting. In a large bowl, cream together the softened butter and granulated sugar until light and fluffy. Gradually add the flour and salt, mixing until just combined and a soft dough forms. Press the dough evenly into the prepared pan. Bake for 20-25 minutes, or until the edges are lightly golden. Let it cool completely in the pan.
- Make the Caramel: In a medium saucepan over medium heat, combine the butter, granulated sugar, brown sugar, heavy cream, and salt. Stir constantly until the butter is melted and sugars are dissolved. Bring the mixture to a gentle boil, then reduce heat to low and simmer, stirring occasionally, for about 5-7 minutes, or until the caramel thickens slightly and turns a rich amber color. Remove from heat and stir in the vanilla extract.
- Assemble the Layers: Once the shortbread base is completely cool, pour the warm caramel evenly over the top, spreading it to the edges. Ensure the caramel layer is smooth and covers the shortbread entirely.
- Chill Thoroughly: Place the pan in the refrigerator for at least 2-3 hours, or until the caramel is firm and set. This step is crucial for easy cutting and handling of your Twix Candy Bars.
- Cut and Coat: Once chilled, use the parchment paper overhang to lift the entire block of shortbread and caramel from the pan. Place it on a cutting board. Using a sharp knife, carefully cut the slab into individual bars – typically long, narrow rectangles, just like classic Twix Candy Bars.
- Melt the Chocolate: In a microwave-safe bowl or a double boiler, melt the chopped chocolate with the coconut oil (if using), stirring until smooth and glossy.
- Dip the Bars: Dip each Twix bar into the melted chocolate, ensuring it’s fully coated. Use a fork or a dipping tool to gently lift the bar, allowing any excess chocolate to drip off. Place the coated Twix Candy Bars on a wire rack set over parchment paper to catch drips.
- Set the Chocolate: Refrigerate the chocolate-coated Twix Candy Bars for about 15-20 minutes, or until the chocolate is firm and set. Once set, your delightful homemade Twix Candy Bars are ready to enjoy!
Fun Twists & Serving Ideas
While the classic Twix Candy Bars are perfect as they are, there’s always room for a little creative flair! Here are a few ideas to customize your homemade Twix Candy Bars or enhance your serving experience:
- Dark Chocolate Delight: For a more sophisticated flavor, use dark chocolate for the coating. The slight bitterness beautifully complements the sweet caramel and shortbread in these Twix Candy Bars.
- Sea Salt Sprinkle: Immediately after dipping your Twix Candy Bars in chocolate, sprinkle a tiny pinch of flaky sea salt on top. This enhances the caramel flavor and adds a delightful textural contrast.
- Nutty Crunch: Before the chocolate sets, sprinkle some finely chopped toasted almonds or peanuts onto the chocolate coating for an added layer of flavor and crunch to your Twix Candy Bars.
- White Chocolate Drizzle: Once your milk or dark chocolate coating is set, melt some white chocolate and drizzle it decoratively over the bars for an elegant finish.
- Miniature Bites: Instead of traditional bar shapes, cut your shortbread and caramel into smaller squares for bite-sized Twix Candy Bars, perfect for dessert platters or parties.
Reviews
Don’t just take our word for it! Here’s what some of our amazing readers have to say about these homemade Twix Candy Bars:
Emma R. ⭐️⭐️⭐️⭐️⭐️
“I can’t believe how much these taste like the real thing, maybe even better! The shortbread is unbelievably tender, and that caramel… wow. My family devoured these Twix Candy Bars in a flash. This recipe is a keeper!”
David S. ⭐️⭐️⭐️⭐️⭐️
“Making these homemade Twix Candy Bars was so much fun, and the result was phenomenal. My colleagues at work were begging for the recipe. They’re surprisingly simple to make, and the steps are very clear. Highly recommend!”
Sophia L. ⭐️⭐️⭐️⭐️⭐️
“I’ve always wanted to try making candy bars from scratch, and these Twix Candy Bars were the perfect introduction. They taste incredibly fresh and homemade. I loved adding a sprinkle of sea salt!”
FAQ
Got questions about making these incredible Twix Candy Bars? We’ve got answers!
Q: Can I make these Twix Candy Bars ahead of time?
A: Absolutely! These bars are excellent for making in advance. You can store the finished Twix Candy Bars in an airtight container at room temperature for up to a week, or in the refrigerator for up to two weeks. They also freeze well for longer storage.
Q: What kind of chocolate is best for coating?
A: We recommend using a good quality milk or semi-sweet chocolate for the best flavor and melt. Chocolate chips will work, but a chopped baking bar will generally give you a smoother, shinier coating for your Twix Candy Bars.
Q: My caramel didn’t set properly, what happened?
A: Caramel not setting is usually due to not cooking it long enough. Ensure you bring it to a gentle boil and let it simmer until it visibly thickens. Using a candy thermometer to reach 245°F (118°C) will guarantee a perfect, chewy caramel for your Twix Candy Bars.
Q: Can I use gluten-free flour for the shortbread?
A: While we haven’t tested it with gluten-free flour, a 1:1 gluten-free baking blend that contains xanthan gum should work. The texture of the shortbread might be slightly different, but the delicious flavor of your homemade Twix Candy Bars will still shine through.
Conclusion
There you have it – the ultimate guide to creating your very own batch of heavenly homemade Twix Candy Bars. This recipe isn’t just about baking; it’s about bringing joy, creating memories, and savoring the simple pleasure of a truly exceptional sweet treat. From the first crumbly bite of shortbread to the rich, smooth chocolate, every layer of these Twix Candy Bars sings with flavor and homemade goodness. They truly are an indulgent masterpiece that will impress anyone lucky enough to try them.
So, why wait? Gather your ingredients, put on your apron, and get ready to bake some magic! Once you try these incredible homemade Twix Candy Bars, you’ll wonder why you ever bought them from the store. For more irresistible recipes and culinary inspiration, remember to visit us at magicinkitchen.com – your go-to source for delicious kitchen adventures.
Recipe Note
For the cleanest cuts when slicing your Twix Candy Bars, use a long, sharp knife. Dip the knife in hot water and wipe it clean between each cut. This will prevent the chocolate from cracking and ensure beautiful, professional-looking bars.
Twix Candy Bars
Cook Time: N/A
Total Time: 3 hours
Course: N/A
Servings: 24 bars
Calories: 220
Ingredients
- 1 cup (2 sticks) unsalted butter, softened (for shortbread)
- 1/2 cup granulated sugar (for shortbread)
- 1 teaspoon vanilla extract (for shortbread)
- 2 cups all-purpose flour
- 1/4 teaspoon salt (for shortbread)
- 1 cup (2 sticks) unsalted butter (for caramel)
- 1 cup light brown sugar, packed (for caramel)
- 1 (14 ounce) can sweetened condensed milk
- 1/2 cup light corn syrup
- 1 teaspoon vanilla extract (for caramel)
- 1/2 teaspoon salt (for caramel)
- 24 ounces (about 4 cups) milk chocolate chips or chopped milk chocolate bars
- 1 tablespoon shortening or coconut oil (optional, for smoother chocolate)
Instructions
- For the Shortbread Crust: 1. Preheat oven to 350°F (175°C). Line a 9×13 inch baking pan with parchment paper, leaving an overhang on the sides. 2. In a large bowl, cream together the softened butter and granulated sugar until light and fluffy. 3. Beat in the vanilla extract. 4. Gradually add the flour and 1/4 teaspoon salt, mixing until just combined and a dough forms. Do not overmix. 5. Press the dough evenly into the bottom of the prepared pan. 6. Bake for 20-25 minutes, or until the edges are lightly golden. 7. Remove from oven and let cool completely in the pan on a wire rack.
For the Caramel Layer: 1. While the shortbread cools, prepare the caramel. In a heavy-bottomed saucepan over medium heat, combine 1 cup butter, brown sugar, sweetened condensed milk, and corn syrup. 2. Bring to a boil, stirring constantly. Reduce heat to medium-low and continue to simmer, stirring frequently, for 10-15 minutes, or until the mixture thickens and reaches a golden brown color (or 240°F/115°C on a candy thermometer for soft ball stage). Be careful not to scorch the bottom. 3. Remove from heat and stir in 1 teaspoon vanilla extract and 1/2 teaspoon salt. 4. Pour the hot caramel evenly over the cooled shortbread crust. 5. Allow the caramel to cool and set completely at room temperature for at least 1-2 hours, or refrigerate for about 30-60 minutes to speed up the process.
For Assembly and Chocolate Coating: 1. Once the caramel is set, use the parchment paper overhang to lift the entire slab out of the pan and place it on a cutting board. 2. Using a sharp knife, cut the slab into individual candy bar shapes (e.g., about 1×3 inches). 3. Place the cut bars on a wire rack set over a baking sheet lined with parchment paper (to catch chocolate drips). 4. In a microwave-safe bowl, melt the milk chocolate chips (and optional shortening/coconut oil) in 30-second intervals, stirring well after each, until smooth. Alternatively, use a double boiler method. 5. Dip each candy bar completely into the melted chocolate, ensuring it’s fully coated. Use a fork or dipping tools to gently lift out, allowing excess chocolate to drip off. 6. Return the dipped bars to the wire rack. 7. Once all bars are dipped, transfer the baking sheet with the wire rack to the refrigerator for 20-30 minutes, or until the chocolate is fully set. 8. Store homemade Twix candy bars in an airtight container at room temperature for up to a week, or in the refrigerator for longer.
Chef’s Notes: Ensure each layer cools and sets properly before proceeding to the next step for best results. When cutting the bars, a lightly oiled sharp knife can help prevent sticking. For a smoother chocolate coating, you can add a small amount of shortening or coconut oil to the melting chocolate.