Crochet Holiday Light Garland: Free Pattern & Festive Decor Ideas
Learn how to Crochet Holiday Light Garland with this free, easy-to-follow pattern. Brighten up your Christmas tree and home decor with handmade cheer!
How to Crochet a Holiday Light Garland: Free Scrap-Buster Pattern (Vintage C9 Lights)
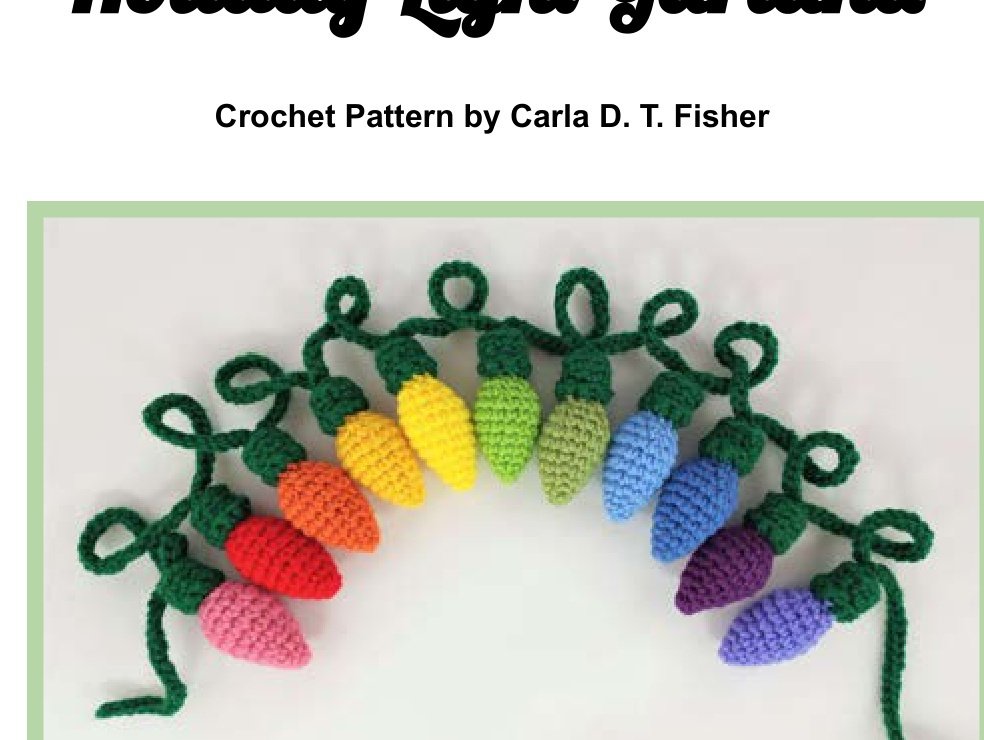
Bring nostalgic festive warmth into your home with this charming crochet holiday light garland! Created by Magic In Kitchen, this beginner-friendly scrap-buster pattern recreates the iconic proportions of vintage outdoor C9 Christmas light bulbs using simple stitches and leftover yarn odds and ends. Best of all: these cheerful lights will never shatter, tangle, or burn out!
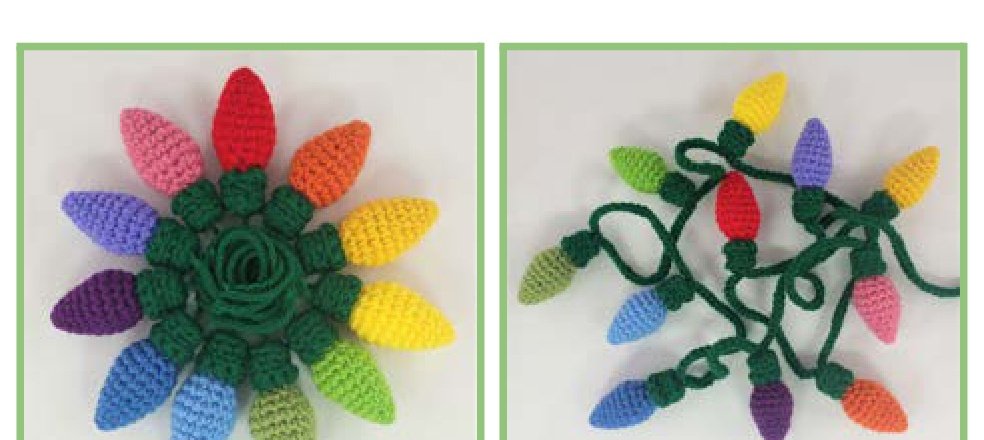
Table of Contents
Why You’ll Love This Crochet Holiday Light Garland
Whether you want to deck your fireplace mantel, brighten up a Christmas tree, or add festive whimsy to your kitchen window, this project delivers instant holiday charm:
- The Ultimate Stash-Buster: Each bulb requires only about 6 yards of worsted-weight scrap yarn—perfect for using up colorful yarn remnants!
- Vintage C9 Proportions: Carefully shaped to mirror classic outdoor retro light bulbs with pointed tips and realistic ribbed green sockets.
- Child & Pet Friendly: Completely soft, plush, and shatterproof. Safe for homes with curious toddlers and playful pets.
- Versatile Holiday Decor: String them into a long garland, make a festive wreath, or use individual bulbs as gift package toppers and tree ornaments!
Tools & Materials You’ll Need
Here is everything required to make your custom string of holiday lights:
| Item | Specification & Recommendations |
|---|---|
| Crochet Hook | US C / 2.75 mm hook (creates tight, neat stitches that keep stuffing hidden) |
| Yarn Type | #4 Worsted Weight Acrylic (such as Red Heart Super Saver, Caron Simply Soft, or scraps) |
| Socket & Cord Yarn | Dark Green, Classic Black, Chocolate Brown, or Snow White (approx. 50–70 yds) |
| Bulb Colors | Vibrant rainbow scraps: Cherry Red, Sunset Orange, Bright Yellow, Grass Green, Royal Blue, Purple, Magenta (~6 yds per bulb) |
| Stuffing | Polyester fiberfill (toy stuffing) — a small handful per bulb |
| Notions | Tapestry needle, scissors, and a stitch marker for working in continuous rounds |
Techniques & Abbreviations Key (US Terms)
- Rnd(s): Round / Rounds
- MR: Magic Ring (Magic Loop)
- St(s): Stitch / Stitches
- Sl st: Slip Stitch
- Ch: Chain
- Sc: Single Crochet
- BLO: Back Loop Only (insert hook only into the back loop of the stitch)
- FLO: Front Loop Only (insert hook only into the front loop of the stitch)
- Inv Dec (Invisible Decrease): Insert hook into front loops of next 2 stitches, yarn over, pull through 2 loops, yarn over, pull through remaining 2 loops.
- FO: Fasten Off
Step-by-Step Instructions: How to Crochet the C9 Bulb
Each bulb is worked in a continuous amigurumi spiral starting from the pointed tip and working downward toward the base. Do not join rounds with a slip stitch unless explicitly stated.
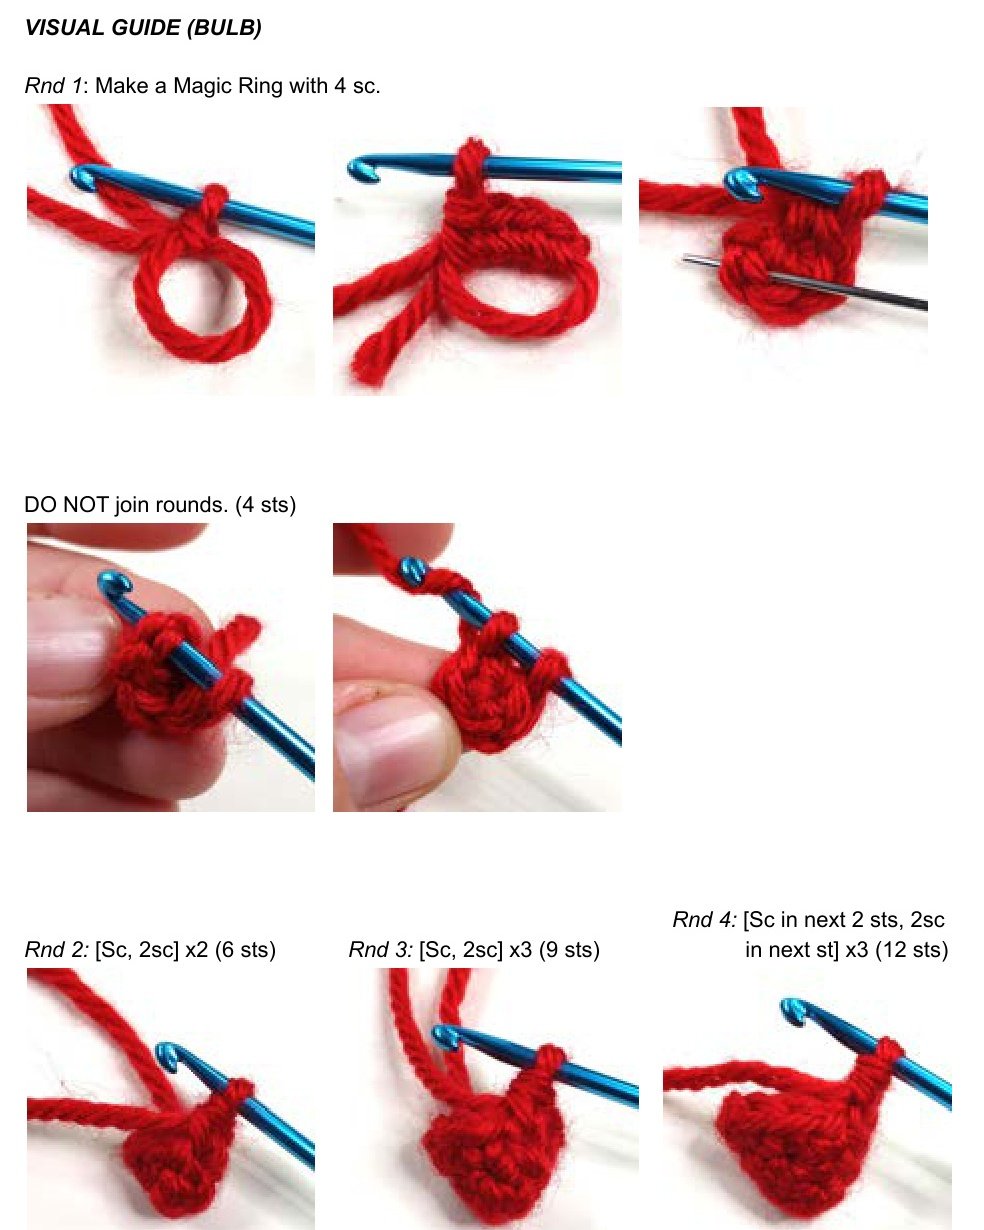
Rnd 1: Make a Magic Ring with 4 sc. DO NOT join rounds. (4 sts)
Rnd 2: [Sc, 2sc in next st] x2. (6 sts)
Rnd 3: [Sc, 2sc in next st] x3. (9 sts)
Rnd 4: [Sc in next 2 sts, 2sc in next st] x3. (12 sts)
Helpful Tip: Take the beginning yarn tail from your Magic Ring and tuck it neatly inside the pointed tip of the bulb now.
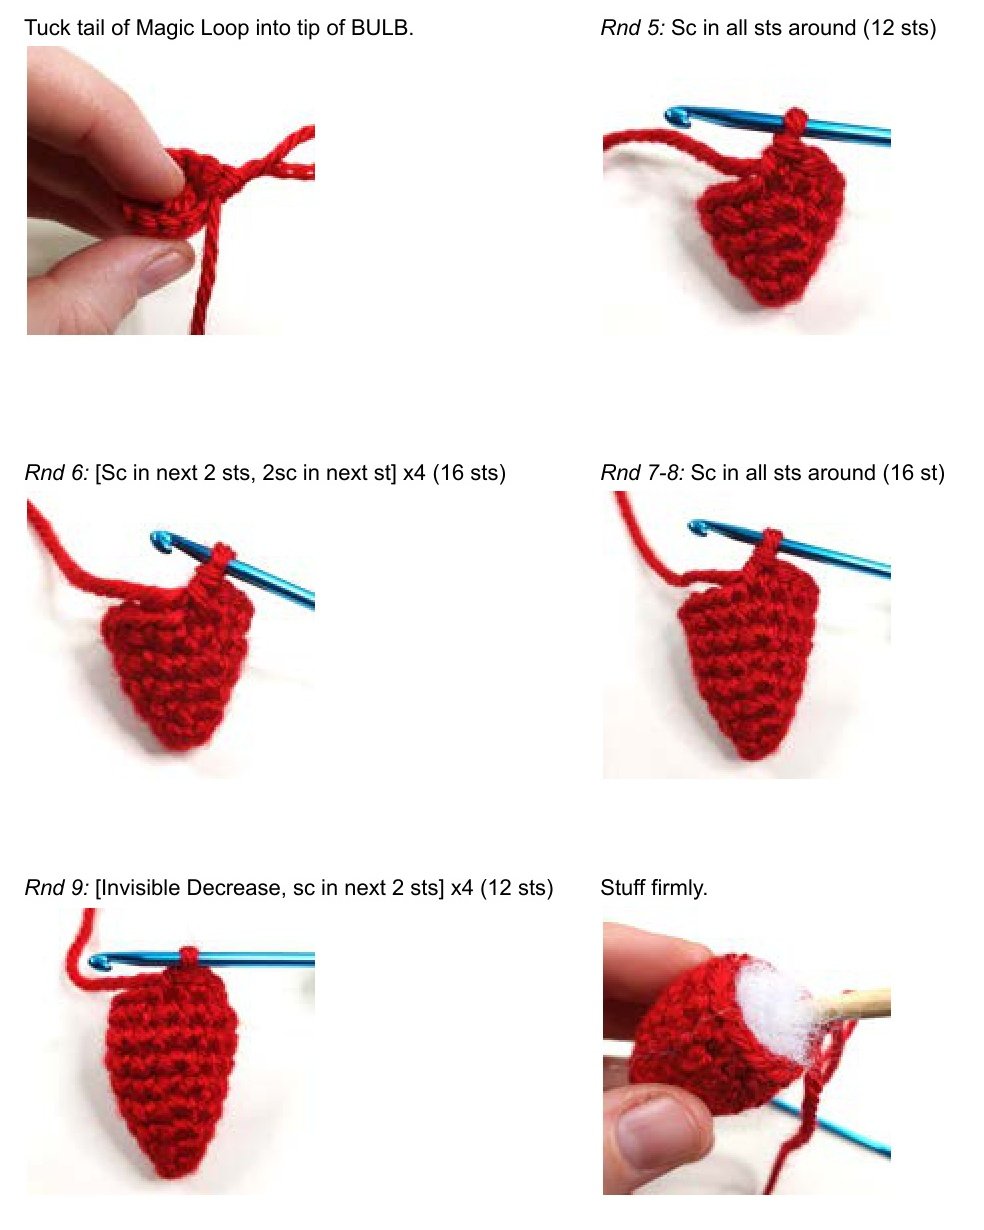
Rnd 5: Sc in all 12 sts around. (12 sts)
Rnd 6: [Sc in next 2 sts, 2sc in next st] x4. (16 sts)
Rnds 7 – 8: Sc in all 16 sts around. (16 sts)
Rnd 9 (Taper): [Invisible Decrease, sc in next 2 sts] x4. (12 sts)
Stuffing Step: Stuff the bulb firmly with polyester fiberfill, making sure the pointed tip holds its distinct cone shape!
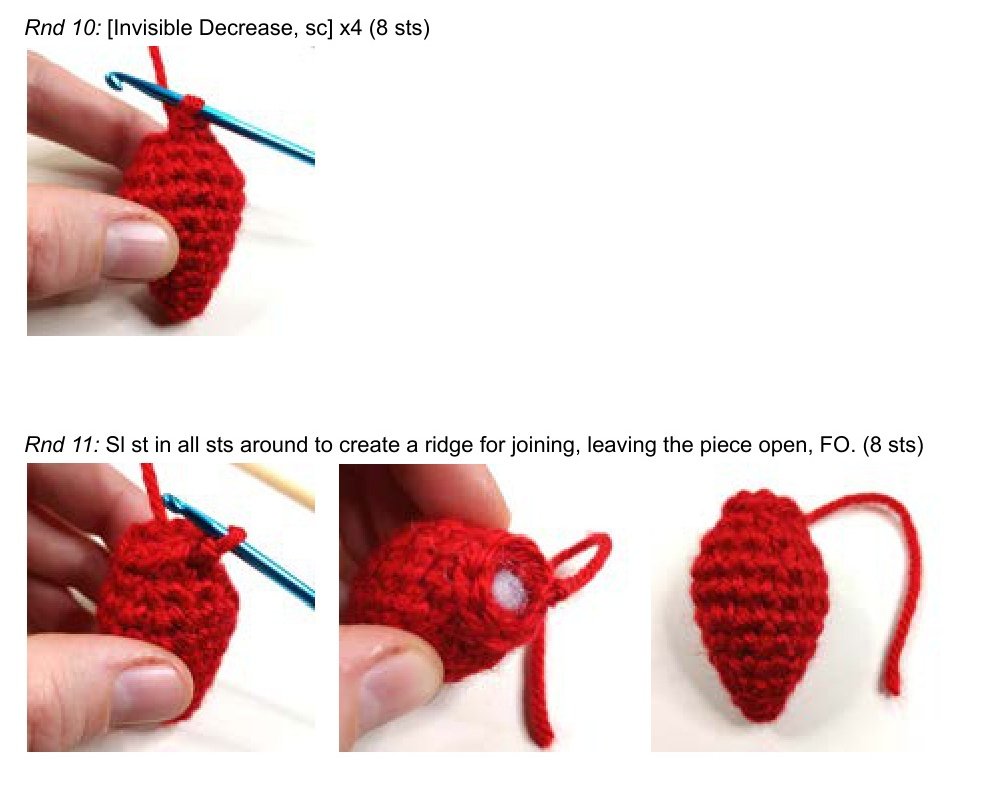
Rnd 10: [Invisible Decrease, sc] x4. (8 sts)
Rnd 11 (Joining Ridge): Sl st in all 8 sts around. This creates a neat structural ridge for joining the socket. Leave the piece open, Fasten Off (FO). (8 sts)
Add a final pinch of stuffing to fill the neck of the bulb completely, then tuck the remaining yarn tail into the center.
How to Crochet the Realistic Socket Base
Make one socket in dark green (or black) for each bulb you crocheted. The socket is worked from the back disc forward toward the join:
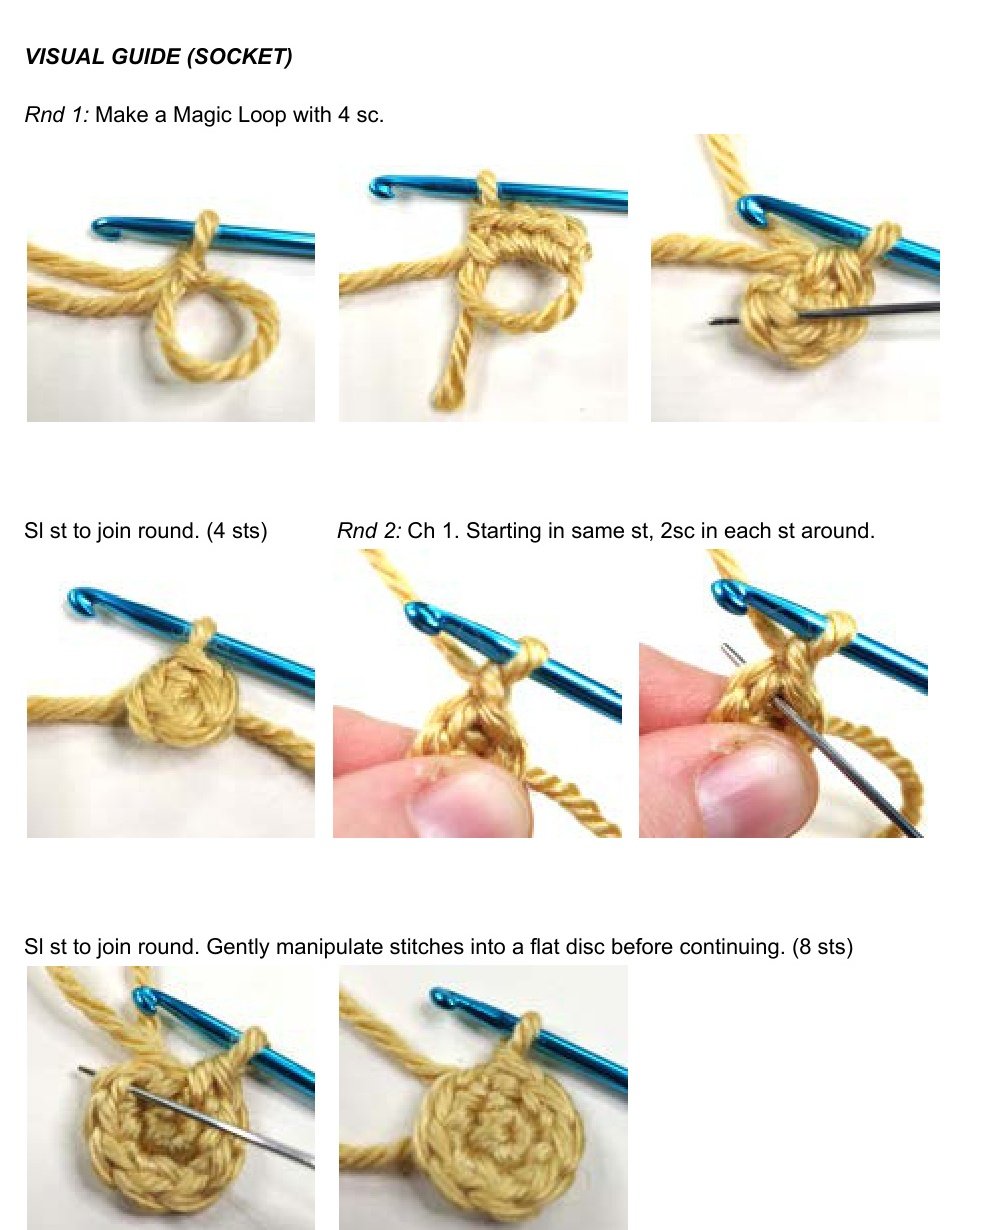
Rnd 1: With socket color, make a Magic Loop with 4 sc. Sl st into first sc to join the round. (4 sts)
Rnd 2: Ch 1. Starting in the exact same stitch, work 2 sc in each st around. Sl st into first sc to join. Gently press and flatten the stitches with your fingers into a neat flat disc before continuing. (8 sts)
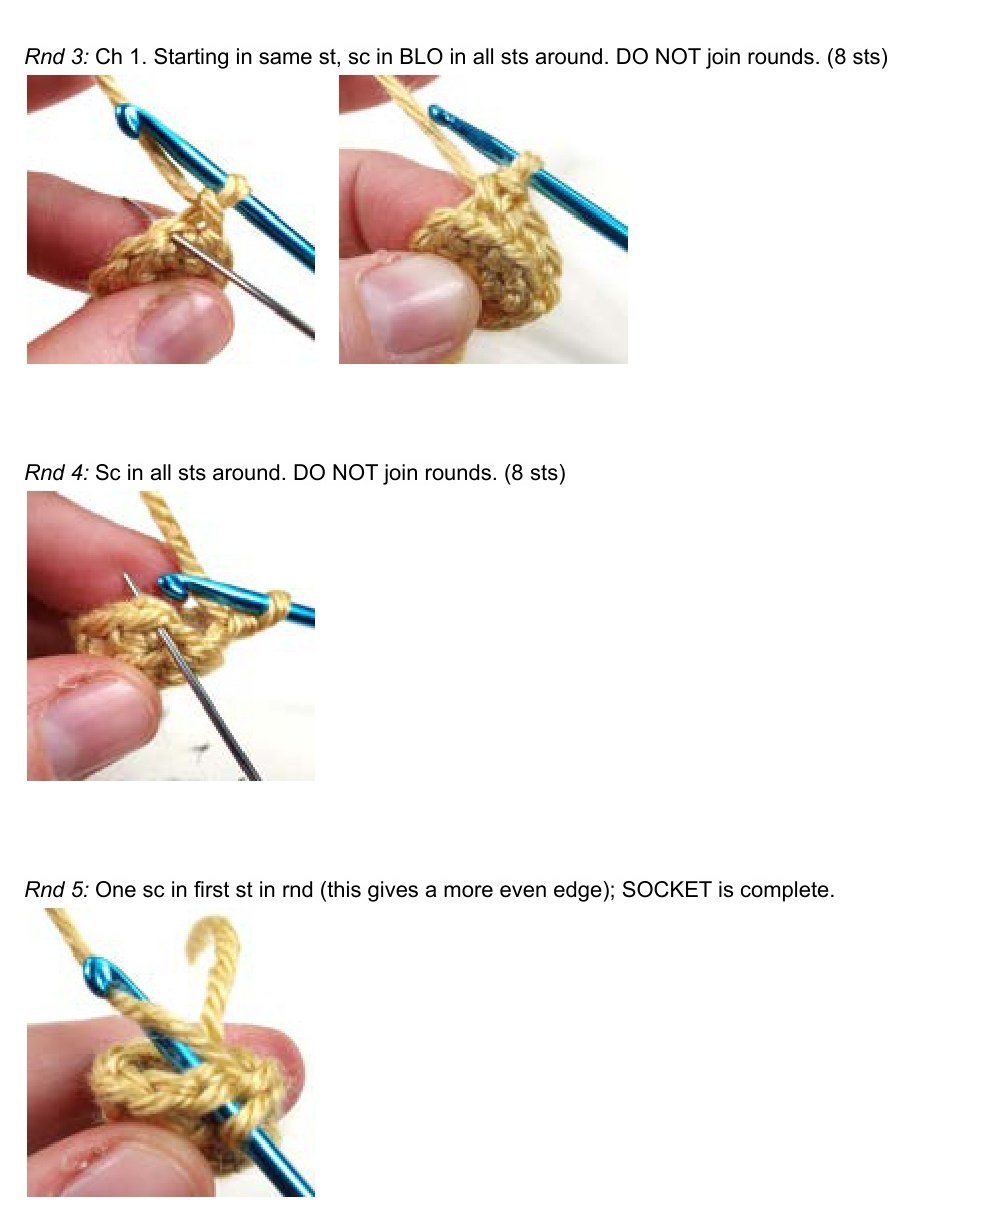
Rnd 3 (Ridge Wall): Ch 1. Starting in the same stitch, sc in BLO (Back Loop Only) in all 8 sts around. DO NOT join rounds. (8 sts)
Rnd 4: Sc in both loops of all 8 sts around. DO NOT join rounds. (8 sts)
Rnd 5: Work 1 single crochet in the first stitch of the round (this simple trick evens out the spiral edge). Your socket cup is complete!
DO NOT fasten off! We will use this active loop to seamlessly attach the bulb.
Seamlessly Joining Socket to Bulb
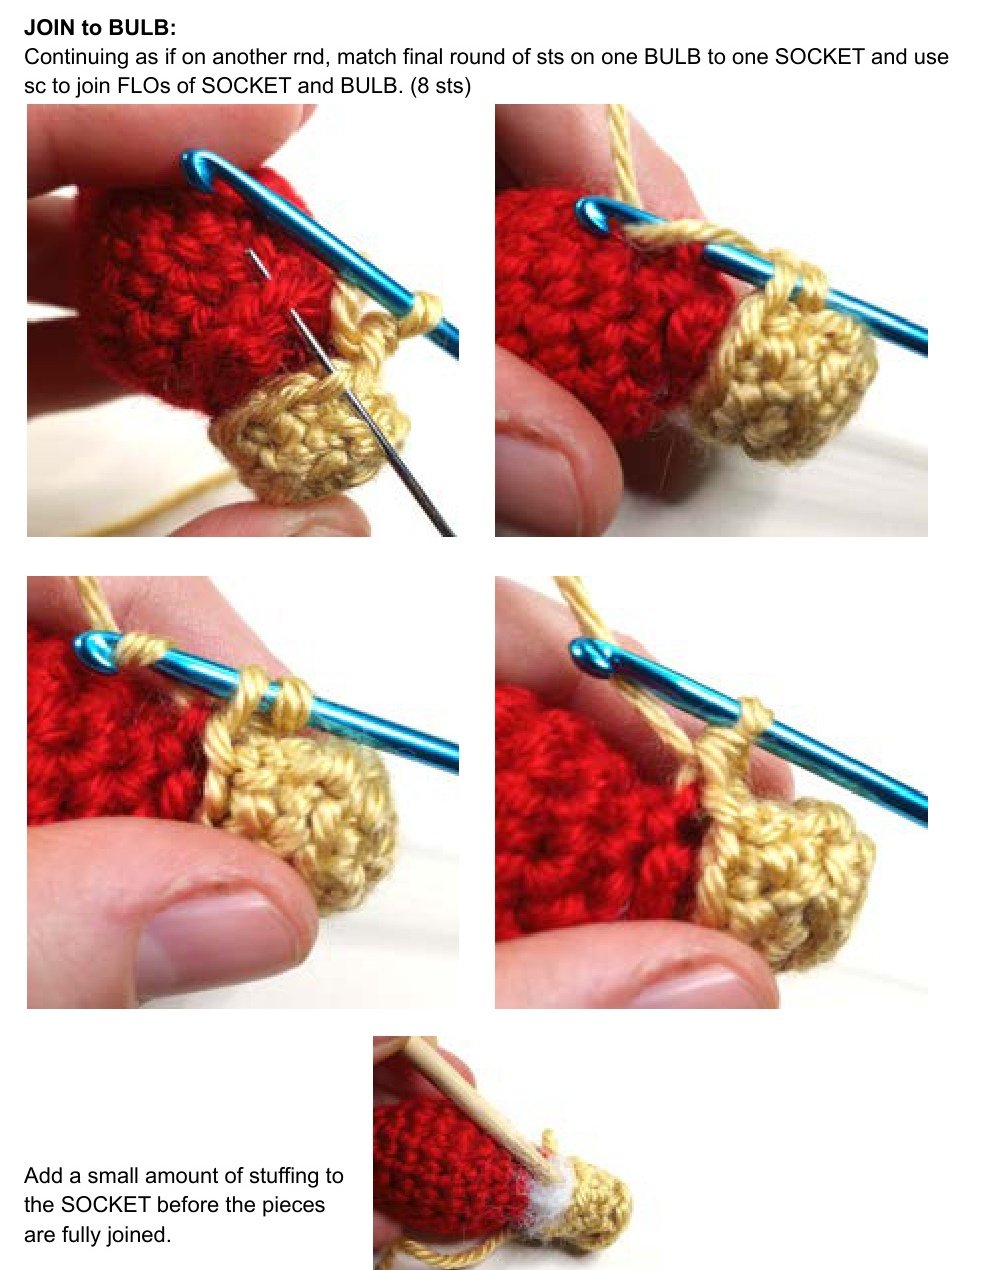
1. Hold the completed bulb and socket cup together so their 8 open stitches align.
2. Continuing directly from Round 5 of the socket, insert your hook through the Front Loop Only (FLO) of the socket stitch AND the Front Loop Only (FLO) of the corresponding bulb stitch.
3. Work a single crochet through both front loops. Repeat around for all 8 stitches.
4. Pro Tip: Just before finishing the last 2 stitches, push a tiny pinch of fiberfill into the socket cup to give it a plump, realistic shape.
5. Sl st into the first joining stitch. Fasten off, leaving a 10-inch long yarn tail for sewing onto the cord.
Garland Cord & Final Assembly
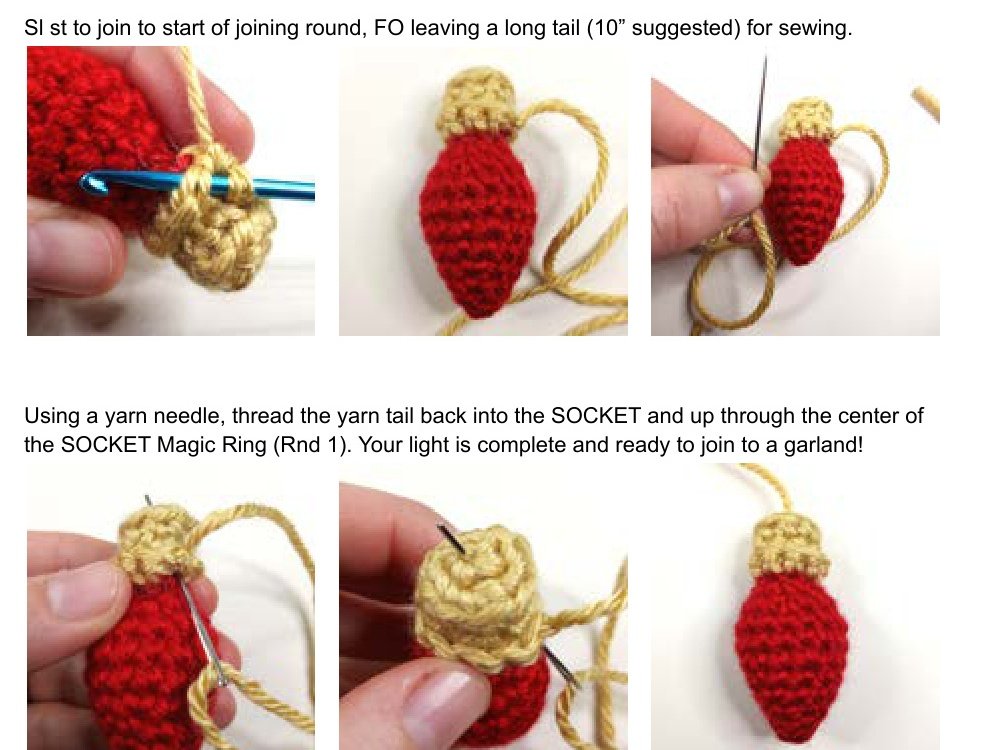
1. Prep the Hanging Tail: Thread your 10-inch yarn tail onto a tapestry needle. Pass the needle inside the socket cup and out through the very center hole of the socket’s original Magic Ring (Rnd 1). Your bulb is now perfectly prepped to attach!
2. Create the Garland Cord: Using your dark green or black yarn, crochet a cord to your desired length. A simple crochet i-cord or cord-in-the-round provides the perfect thickness to mimic an authentic green electrical wire.
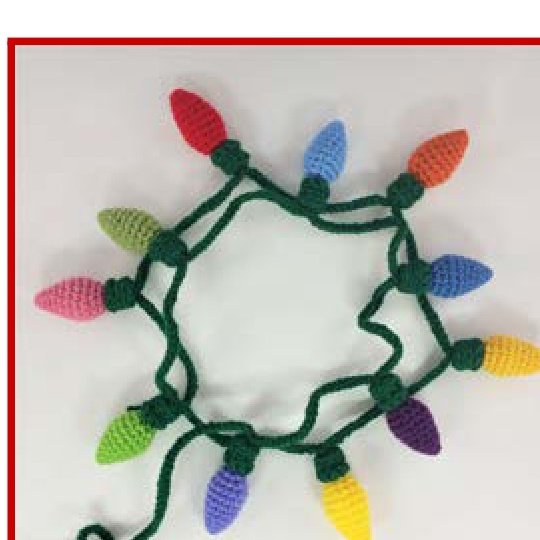
3. Assemble the Strand: Space your colorful finished lights evenly along the cord (around 4 to 6 inches apart). Use the tail protruding from each socket’s center to tie or stitch firmly around the cord. Knot securely, weave the tail into the cord, and snip clean!
Creative Display & Styling Ideas
- Mantel & Hearth: Drape across your holiday fireplace mantel intertwined with evergreen pine boughs and twinkling fairy lights.
- Kitchen Window Valance: Hang along your kitchen window frame or open shelving for cozy holiday cooking vibes.
- Individual Tree Ornaments: Instead of attaching to a cord, tie a hanging loop in the socket tail to make individual C9 bulb Christmas tree ornaments.
- Eco-Friendly Gift Accents: Tie a bulb onto brown kraft paper holiday gift boxes for unforgettable handmade wrapping!
Frequently Asked Questions (FAQ)
How much yarn does one crochet holiday light take?
Each bulb requires only approximately 6 yards of worsted-weight yarn for the colored bulb and about 3 yards for the green socket. You can easily make an entire 12-light strand from scrap yarn remnants!
Why use a 2.75 mm (C) hook with worsted-weight yarn?
Using a smaller hook than usual with worsted weight creates a dense, tight amigurumi fabric. This ensures the polyester fiberfill stays completely hidden and prevents the bulb from stretching out of shape.
Can I wash this crochet garland?
Yes! Because it is crafted from 100% acrylic yarn and polyfill stuffing, the garland can be gently hand-washed in lukewarm water with mild soap, reshaped, and laid flat to air dry.
Conclusion & Pattern Credits
Handmade holiday decor brings a heartwarming charm that store-bought plastics can never match. We hope you enjoy making this crochet holiday light garland for your home or gifting it to someone special this season!