
Mini Bear Amigurumi – Free Fluffy Teddy Bear Crochet Pattern with Brushed Texture
This Mini Bear is an absolutely adorable palm-sized amigurumi teddy bear that fits right in the palm of your hand. What makes this pattern special is the fluffy, brushed texture created with a pet brush or slicker brush after crocheting — it transforms ordinary yarn into a soft, cuddly plush finish that looks and feels like a real teddy bear.
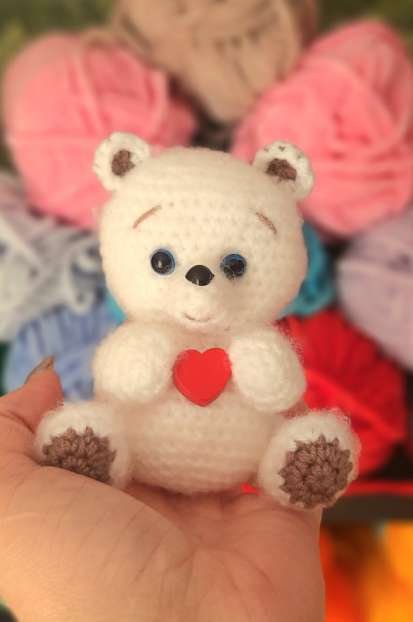
The mini bear features contrasting brown inner ears and paw pads, expressive blue safety eyes, a cute embroidered smile, and an optional red heart accessory. Perfect as a keychain, bag charm, or heartfelt handmade gift!
This free pattern is by Natalya Khodunova and is beginner-friendly, using only basic stitches. The head and body are worked as one continuous piece, making assembly quick and easy.
Table of Contents
At a Glance
| Finished Size | Approximately 8-10 cm (3-4 inches) tall when seated |
| Skill Level | Beginner (uses sc, inc, dec only) |
| Yarn | YarnArt Baby (or similar DK/light worsted acrylic) in white + accent color |
| Hook | 2.0 mm |
| Eyes | 10 mm plastic safety eyes |
| Nose | 10 mm plastic safety nose |
| Special Tool | Pet slicker brush or wire brush for creating fluffy texture |
| Time to Make | 2-3 hours + brushing time |
Materials

- Yarn: YarnArt Baby in white (main color) + your choice of accent color for inner ears and paw pads (brown, pink, gray, etc.)
- YarnArt Baby is a DK weight (light worsted) 100% acrylic yarn that brushes beautifully
- Approximately 50g total for one mini bear
- Hook: 2.0 mm crochet hook
- Eyes: 10 mm black plastic safety eyes
- Nose: 10 mm black plastic safety nose (triangle shape)
- Stuffing: Polyester fiberfill
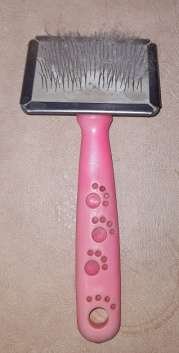
- Slicker brush (чесалка): A pet slicker brush or wire brush for fluffing the finished bear — this is essential for creating the signature fluffy texture!
- Yarn needle: For sewing parts together and embroidering details
- Optional: Small red felt heart, keychain ring or lanyard for bag charm attachment
Abbreviations (Russian → English)
| КА | Magic ring (кольцо амигуруми) |
| СБН | Single crochet (столбик без накида) |
| ПР | Increase — 2 sc in same stitch (прибавка) |
| УБ | Decrease — sc2tog (убавка) |
| (…)Nр | Repeat instructions in parentheses N times |
| [number] | Total stitch count at end of round |
Step 1: Head & Body (One Continuous Piece)
The mini bear is worked from the top of the head down to the bottom of the body in one continuous piece. This eliminates the need to sew the head to the body separately!

HEAD (Rounds 1-17)
- Round 1: 6 sc in magic ring — [6]
- Round 2: 6 inc — [12]
- Round 3: (sc, inc) × 6 — [18]
- Round 4: (sc 2, inc) × 6 — [24]
- Round 5: (sc 3, inc) × 6 — [30]
- Round 6: sc 2, inc, (sc 4, inc) × 5, sc 2 — [36]
- Round 7: (sc 5, inc) × 6 — [42]
- Rounds 8-13: sc 42 (work even for 6 rounds) — [42]
- Round 14: (sc 5, dec) × 6 — [36]
- Round 15: sc 2, dec, (sc 4, dec) × 5, sc 2 — [30]
- Round 16: (sc 3, dec) × 6 — [24]
⚠️ Insert 10mm safety eyes between rounds 11-12, spacing them about 6-7 stitches apart. Insert the 10mm safety nose between the eyes, slightly below them.
🧶 Stuff the head firmly now before continuing.
- Round 17: (sc 2, dec) × 6 — [18]
BODY (Rounds 18-32)
- Round 18: sc 18 — [18]
- Round 19: (sc 2, inc) × 6 — [24]
- Round 20: sc 24 — [24]
- Round 21: (sc 3, inc) × 6 — [30]
- Round 22: sc 30 — [30]
- Round 23: sc 2, inc, (sc 4, inc) × 5, sc 2 — [36]
- Rounds 24-27: sc 36 (work even for 4 rounds) — [36]
- Round 28: sc 2, dec, (sc 4, dec) × 5, sc 2 — [30]
- Round 29: (sc 3, dec) × 6 — [24]
- Round 30: (sc 2, dec) × 6 — [18]
🧶 Stuff the body firmly now.
- Round 31: (sc, dec) × 6 — [12]
- Round 32: 6 dec — [6]
Fasten off, leaving a tail. Thread the tail through the remaining 6 stitches and pull tight to close the opening. Weave in the end.
✨ BRUSH THE HEAD AND BODY NOW with your slicker brush or pet brush. Brush gently in all directions to fluff up the yarn fibers and create that signature fuzzy teddy bear texture.
Step 2: Ears (Make 2)
- With accent color (brown, pink, etc.), make a magic ring.
- Round 1: 6 sc in magic ring — [6] (Weave in the starting tail as you work)
- Change to main color (white).
- Round 2: 6 inc — [12]
- Fasten off, leaving a long tail for sewing.
✨ Brush each ear with the slicker brush to fluff them up.
Sew the ears to the top of the head, positioning them symmetrically on either side, slightly angled outward. The accent-colored center should face forward.
Step 3: Muzzle
- With main color (white), make a magic ring.
- Round 1: 6 sc in magic ring — [6]
- Round 2: 6 inc — [12]
- Round 3: sc 12 — [12]
- Fasten off, leaving a long tail for sewing.
Stuff the muzzle lightly as you sew it onto the face, positioned just below and between the eyes, covering the base of the nose. The muzzle should be slightly rounded and puffy.
Step 4: Tail
- With main color (white), make a magic ring.
- Round 1: 6 sc in magic ring — [6]
- Round 2: 6 inc — [12]
- Round 3: sc 12 — [12]
- Fasten off, leaving a long tail for sewing.
Stuff the tail lightly as you sew it onto the back of the body, centered and positioned low (near the bottom).
Step 5: Upper Paws / Arms (Make 2)

- Round 1: 6 sc in magic ring — [6]
- Round 2: 6 inc — [12]
- Round 3: (sc 5, inc) × 2 — [14]
- Round 4: 2 dec, sc 10 — [12]
- Round 5: dec, sc 10 — [11]
- Round 6: dec, sc 9 — [10]
- Rounds 7-9: sc 10 (work even for 3 rounds) — [10]
Stuff the paw lightly. Flatten the opening and single crochet through both layers to close (5 sc across). Fasten off, leaving a tail for sewing.
✨ Brush each arm with the slicker brush to fluff.
Sew the arms to the sides of the body at the shoulder area, angled slightly forward as if the bear is holding something.
Step 6: Lower Paws / Legs (Make 2)

- With accent color (brown, pink, etc.), make a magic ring.
- Round 1: 6 sc in magic ring — [6]
- Round 2: 6 inc — [12]
- Change to main color (white).
- Round 3: (sc, inc) × 6 — [18]
- Round 4: sc 18 — [18]
- Round 5: (sc 7, dec) × 2 — [16]
- Round 6: sc 5, 3 dec, sc 5 — [13]
- Round 7: sc 5, sc3tog (single crochet 3 together), sc 5 — [11]
- Rounds 8-10: sc 11 (work even for 3 rounds) — [11]
Stuff the paw/foot firmly. Flatten the opening and single crochet through both layers to close. Fasten off, leaving a tail for sewing.
Brush each leg with the slicker brush to fluff.
Sew the legs to the bottom of the body so the bear sits upright. Position the accent-colored paw pads facing forward.
Step 7: Finishing Touches

- Embroider the eyebrows: Using brown or black embroidery floss or yarn, stitch two small curved lines above each eye.
- Embroider the mouth: Stitch a small smile or simple line below the muzzle.
- Add a heart (optional): Cut a small heart shape from red felt and sew it onto the bear’s chest or have the bear “hold” it between the front paws.
- Add a keychain ring (optional): Attach a metal keychain ring or lanyard cord to the top of the head so your mini bear can become a bag charm or keychain.
Your Mini Bear is finished! Give it one final gentle brush all over to fluff up any flattened areas, and your adorable fluffy teddy is ready to bring smiles wherever it goes.
Pro Tips for the Fluffiest Bear
- Brush technique: Use short, gentle strokes with your slicker brush. Brush in all directions — up, down, side to side — to lift and separate the yarn fibers. Don’t press too hard or you might pull stitches apart.
- When to brush: Brush each piece individually after crocheting and stuffing, then give the fully assembled bear a final fluff at the end.
- Yarn choice matters: Acrylic yarns (like YarnArt Baby) brush up beautifully. Cotton and wool blends don’t fluff as well.
- Tight tension: Crochet with tight, even tension so no stuffing shows through after brushing.
- Color combinations: White with brown accents is classic teddy bear style, but try gray with pink, cream with caramel, or all one color for different looks!
Frequently Asked Questions
What is a slicker brush and where can I buy one?
A slicker brush (also called a pet brush or wire brush) is a grooming tool with fine wire bristles used for brushing pets. You can find them at pet stores, online, or in the pet section of department stores. They’re inexpensive (usually under $10) and are essential for creating the fluffy amigurumi texture.
Can I skip the brushing step?
You can, but the bear won’t have that signature soft, fluffy teddy bear look — it will look like a standard smooth amigurumi. The brushing is what makes this pattern special!
What yarn can I substitute for YarnArt Baby?
Any DK or light worsted weight 100% acrylic yarn will work. Look for yarns like Red Heart Super Saver, Bernat Super Value, Stylecraft Special DK, or similar acrylic craft yarns — they all brush up nicely.
Can I make it bigger?
Yes! Use a thicker yarn (worsted or bulky weight) and a larger hook (3.5-4.5mm). The proportions will stay the same, but the finished bear will be larger. Adjust the eye and nose size accordingly (12-15mm for a larger bear).
Is this safe for babies and toddlers?
Not with plastic safety eyes and nose — these are choking hazards for children under 3. For a child-safe version, embroider the eyes, nose, and all facial features with yarn instead of using plastic parts.
Conclusion
Ultimately, this Mini Bear Amigurumi is the quintessential pocket-sized project that proves great things truly do come in small packages. With its classic rounded ears, endearing little snout, and quick, scrap-yarn-friendly construction, it’s a delightful and rewarding make from start to finish. Whether you’re whipping up a whole family of tiny bears as thoughtful handmade gifts, keychains, or charming companions for market prep, this adorable little cub is guaranteed to steal your heart.
One Comment