
Crochet Hexie Bag Pattern – Easy & Stylish DIY Handbag | Magic In Kitchen
Discover how to make a trendy handmade purse with our free Crochet Hexie Bag Pattern. Fun, practical, and stylish. Click through to start stitching today!
Crochet Hexie Bag Pattern – Easy & Stylish DIY Handbag | Magic In Kitchen

This gorgeous crochet hexie bag is the perfect summer project — stylish, practical, and surprisingly easy to make! Designed by Di Scaysbrook for FibreFest 2023, it features 7 crocheted hexagons joined together, a simple border, and a pair of store-bought handles. The result is a chic, structured bag you’ll want to carry everywhere.
The best part? You can make it any size you like just by making the hexagons bigger or smaller. Di used luxurious Noro Silk Garden yarn — a beautiful blend of silk, mohair and wool — but any thick 8-ply or worsted weight yarn works perfectly. Variegated yarns look especially gorgeous as they add natural colour variation across the hexagons.
Table of Contents
What You’ll Need
- 5 balls of Noro Silk Garden yarn (or equivalent thick 8-ply / worsted weight) — approx. 250g / 500m total
- 50g of plain contrast yarn for joining hexies and top edging
- 3mm or 3.5mm crochet hook (Di used 3.5mm — tension must be firm so the bag holds its shape)
- A pair of store-bought bag handles (from craft shops or eBay, or crochet your own)
- Beads and a button for decoration (optional but beautiful!)
- Fabric for lining (optional — adds structure and a pop of colour inside)
- Tapestry needle for sewing in ends
💡 Tip: Tension is key! Keep your stitches firm so the bag holds its shape. If your tension is too loose, go down a hook size.
Abbreviations (English / UK Terms)
- ch — chain
- dc — double crochet
- tr — treble crochet
- ss — slip stitch
📌 Note: This pattern uses English (UK) crochet terms. If you’re used to US terms: UK dc = US sc, UK tr = US dc.
📌 Important: Every round starts with 3 chain (counts as the 1st treble) and finishes with a slip stitch into the 3rd chain of that first pretend treble.
How to Make the Hexagons
You need to make 7 hexagons in total. Each finished hexagon measures 24cm wide (point to point). The hexagon is worked like a granny square but with 6 corners instead of 4.

Starting the Hexagon
Ch4 and join with a slip stitch to form a ring — or use a magic loop if you prefer.
Round 1
3ch (counts as 1st treble), 11tr into the ring. Join with ss into 3rd ch. (12 tr)
Round 2
Ss into the space between trebles. 3ch (counts as 1st tr), 1tr into same space. Continue around doing 2tr into each space. Join with ss into 3rd ch. (24 tr)

Round 3 — Creating the 6 Corners
Do 2 ss across the 2tr into the next main space. For each corner: (3ch, 1tr, 2ch, 2tr) into corner space. Between corners: 2tr into each space. Repeat around all 6 corners. Join with ss. (6 corners established)
Rounds 4–9 — Building Out the Hexagon
Each round follows the same principle — ss across 2tr into the corner space, then work the corner as (3ch, 1tr, 2ch, 2tr), and fill in the spaces between corners with 2tr into each space, adding one more space per round:
- Round 4: 2 spaces between corners
- Round 5: 3 spaces between corners
- Round 6: 4 spaces between corners
- Round 7: 5 spaces between corners
- Round 8: 6 spaces between corners
- Round 9: 7 spaces between corners
Join each round with ss into 3rd ch. Fasten off after Round 9.
Repeat to make 7 hexagons in total.
Joining the Hexagons

Read all joining instructions before you begin — it helps to visualise the layout first!

Using your contrast yarn, join the hexies together with double crochet on the outside (so the joining seam becomes a decorative feature). Here’s how:
- Lay the centre hexagon flat in the middle.
- Place 5 hexagons around it so they are touching — one on each side except the top edge. Leave the top edge of the centre hexagon free (this becomes the bag opening).
- Dc around the 5 sides of the centre hexagon, joining one outer hexagon on each side. When doing the dc, put your hook through both the front and back loops of both edges — that’s 4 loops on the hook total.
- Work from the outside of the circle of hexies. Fasten off and turn the bag over.
- Fold the side hexies and bottom one in half, turn the bag over and you’ll see where the centre back hexagon goes.
- Using dc, join the 7th hexagon to the back the same way as the front.

Adding the Top Border
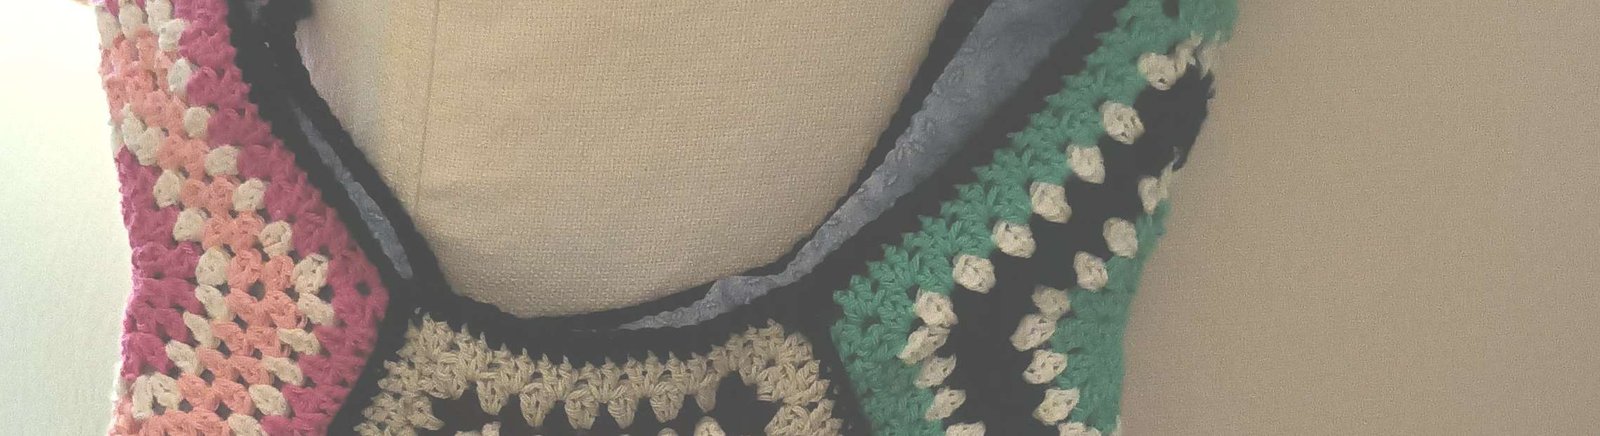
Using your contrast yarn, work a simple double crochet border around the top opening of the bag. This neaten the edges and adds a little structure to the bag opening. Work as many rounds as you like — 2 to 3 rounds gives a nice neat finish.
Attaching the Handles

Choose a pair of store-bought bag handles — these are widely available at craft shops or on eBay. Simply sew them securely to the inside top edge of the bag opening, spacing them evenly. If you prefer, you can also crochet your own handles — just make sure they’re sturdy enough to carry the weight of the bag.
Lining the Bag (Optional)

Adding a fabric lining isn’t strictly necessary, but Di loves the extra pop of colour it gives to the inside of the bag. To line your bag:
- Cut a piece of fabric to match the shape of the bag interior, adding a 1cm seam allowance all around.
- Fold and press the seam allowance under.
- Slip the lining inside the bag and hand stitch it neatly to the inside top edge.
Finishing Touches — Beads & Button

This is where you get to have fun! Di raided her bead box and found beautiful turquoise beads and a concho button to decorate the centre hexagon. You can use any beads, buttons, or charms you love — it’s a great way to personalise your bag and make it totally unique.
Simply sew the beads and button onto the centre front hexagon using a needle and thread. There are no rules here — go with what feels right!
Tips for Success
- Keep tension firm throughout — this is the most important thing for a bag that holds its shape.
- Read through the full pattern before you start, especially the joining section.
- Use stitch markers to keep track of your corners in each hexagon round.
- Variegated yarn like Noro Silk Garden is ideal — the colour shifts add beautiful variation across the hexagons.
- If you want a smaller bag, simply stop at an earlier round on each hexagon.
- Weave in ends as you finish each hexagon to save time at the end.
Frequently Asked Questions
What yarn is best for this bag?
Di used Noro Silk Garden (silk, mohair and wool blend), which equals a thick 8-ply. Any worsted weight or thick DK yarn works well. Variegated yarns are especially beautiful as they create natural colour variation across the hexagons.
How many hexagons do I need?
You need 7 hexagons — 3 for the front (centre + 2 sides), 3 for the back (centre + 2 sides), and 1 for the base. The layout becomes clear once you start joining them.
Can I make the bag smaller or larger?
Yes! Just work fewer rounds on each hexagon for a smaller bag, or more rounds for a larger one. The finished size of each hexagon in this pattern is 24cm point to point (approximately 9.5 inches).
Do I have to line it?
No — the lining is optional. But it does give the bag a more polished, structured look inside and prevents smaller items from slipping through the stitches.
Where can I find bag handles?
Store-bought handles are available at most craft shops and on eBay. Alternatively, you can crochet your own handles using the same yarn.
Conclusion
Crafting your own handmade accessories is a wonderful way to showcase your personal style and creativity. This hexagon-based bag project combines stunning geometric design with everyday practicality, making it an absolute joy to stitch for yourself or as a thoughtful gift. Grab your favorite yarn and hook, follow the easy steps, and enjoy bringing this unique piece to life. Click through to explore more wonderful crochet dress ideas and creative patterns to keep your handmade journey going!


One Comment