

Illusion Tiger Sweater – Free Knitting Pattern with Hidden Tiger Face Design
Meet the Illusion Tiger Sweater — a striking, high-contrast knit where a tiger’s face seems to appear and disappear as you move. This isn’t a printed graphic or an appliqué; the tiger is woven directly into the fabric using the illusion knitting technique, where black and white vertical stripes are strategically shifted to reveal a hidden image.
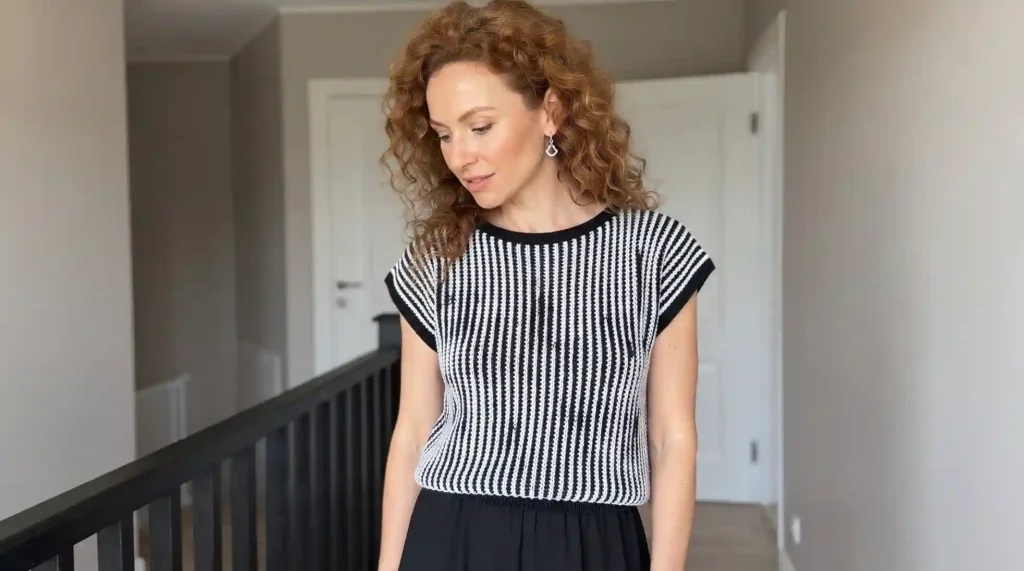
Designed by LaNa (pattern #illusion_top_jumper_byLana), this pattern works the garment sideways from right to left. The front features the tiger illusion motif at the center, the back is worked in stripes, and the piece is finished with seamed shoulders, a clean neckline, and optional sleeves. Choose between a sleeveless top, T-shirt, or full sweater version.
💡 How Illusion Knitting Works: The dark color forms the tiger pattern; the light color is the background. You change colors every 2 rows (at the start of every right-side row). On wrong-side rows, you knit the background and purl the pattern (or vice versa) — and the hidden image magically emerges!
Table of Contents
Materials & Tools
Yarn
- Original: Alize Cotton Gold (55% cotton, 45% acrylic), 100 g / 330 m (361 yd), colors 533 (dark) and 60 (light)
- Alternatives: YarnArt Jeans, Lana Grossa Elastico, or any smooth non-textured cotton blend of similar weight
- Color ratio: Approximately equal amounts of each color (e.g., if total is 200g, you need ~100g of each)
Yarn Requirements
| Version | XS–S | M–L | XL–2XL |
|---|---|---|---|
| Top (sleeveless) | 210 g | 240 g | 280 g |
| Sweater (long sleeves) | 370 g | 430 g | 490 g |
Needles
- Main needles: US 4 (3.5 mm) circular needles, 16–32″ (40–80 cm) long
- Smaller needles: US 1½–2 (2.5–2.75 mm) circular needles, 16–32″ long
Other Tools
- Stitch markers
- Scrap yarn or stitch holders
- Tapestry/yarn needle
- Scissors
- 3.5 mm crochet hook (for seaming)
Gauge
On US 4 (3.5 mm) needles, after washing: 21 sts × 38 rows = 4 × 4″ (10 × 10 cm)
Wash your swatch, lay it flat to dry, and check your gauge. If it doesn’t match, try a needle 0.5 mm smaller or larger.
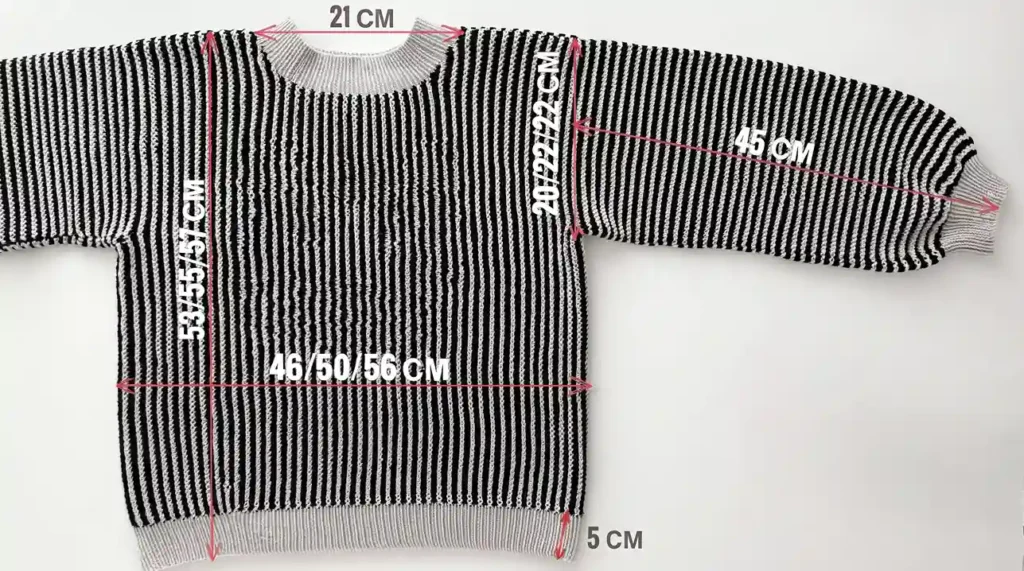
Sizes & Finished Measurements
| Size | XS–S (40–42) | M–L (44–46) | XL–2XL (48–50) |
|---|---|---|---|
| Bust circumference | 31½–35½” | 35½–39¼” | 39¼–43¼” |
Model: Height 164 cm (5’5″), bust 90 cm (35½”). Size shown: M–L (44–46).
The Illusion Knitting Technique
Before starting the garment, practice the illusion technique with a swatch:
Swatch Instructions (25 sts, US 4 / 3.5 mm needles)
- Cast on 25 sts with the dark color.
- Row 1 (RS): Join light color, knit all sts, purl edge st.
- Row 2 (WS): Edge st, knit all sts, purl edge st.
- Row 3 (RS): Join dark color, knit all sts, purl edge st.
- Row 4 (WS): Edge st, purl all sts, purl edge st.
- Row 5 (RS): Join light color, knit all sts, purl edge st.
- Row 6 (WS): Edge st, knit all sts, purl edge st.
Key Rules
- RS rows (all the same): Change color, knit all stitches, purl the edge stitch.
- WS rows (background color / light): Knit background stitches, purl pattern stitches.
- WS rows (pattern color / dark): Purl background stitches, knit pattern stitches.
- Edge stitches: Always slip the first stitch and purl the last stitch. When changing colors, knit the first edge stitch.
- Color changes: Every 2 rows, at the beginning of each RS row.
Step 1: Knit the Front Panel
Setup
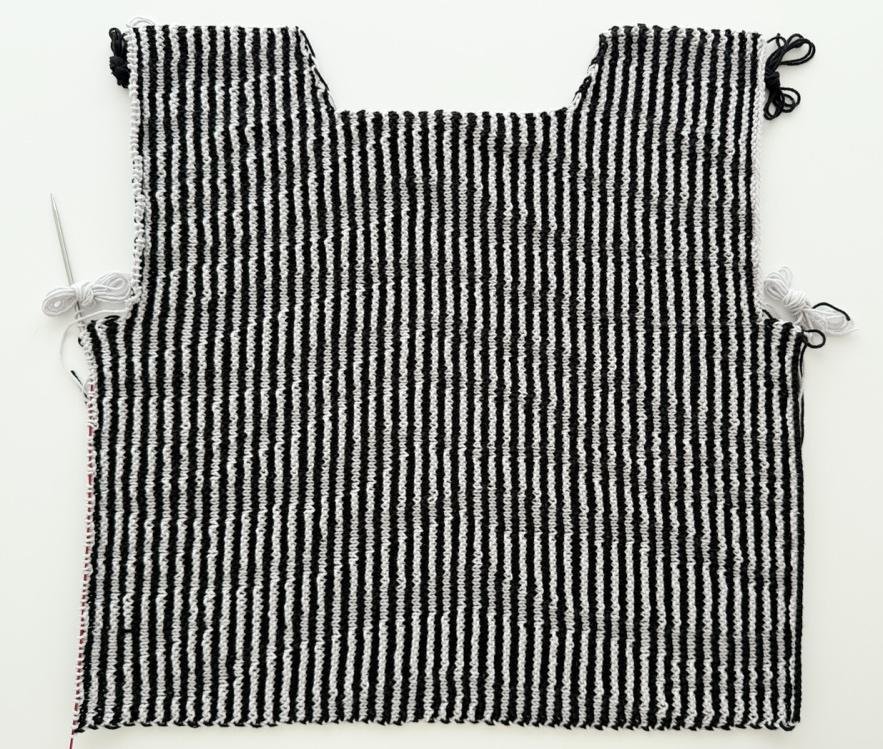
- Using US 4 (3.5 mm) needles, cast on 61/61/65 sts with scrap yarn in a contrasting color. Cut the yarn, leaving a short tail.
- Using the light color, cast on 40/44/44 sts onto the right-hand needle and work Row 9 (RS) in knit stitches; purl the edge st.
- Work 38/46/58 full rows from the cast-on edge (or 19/23/29 color changes, counting 1 color change = 1 row).
Mark the Pattern Section
Place markers to indicate the 49-stitch pattern section:
- From the top edge: count 25 sts, place a marker
- Work 49 sts, place a second marker
- Work 27/31/35 sts to the bottom edge
Work the Tiger Chart
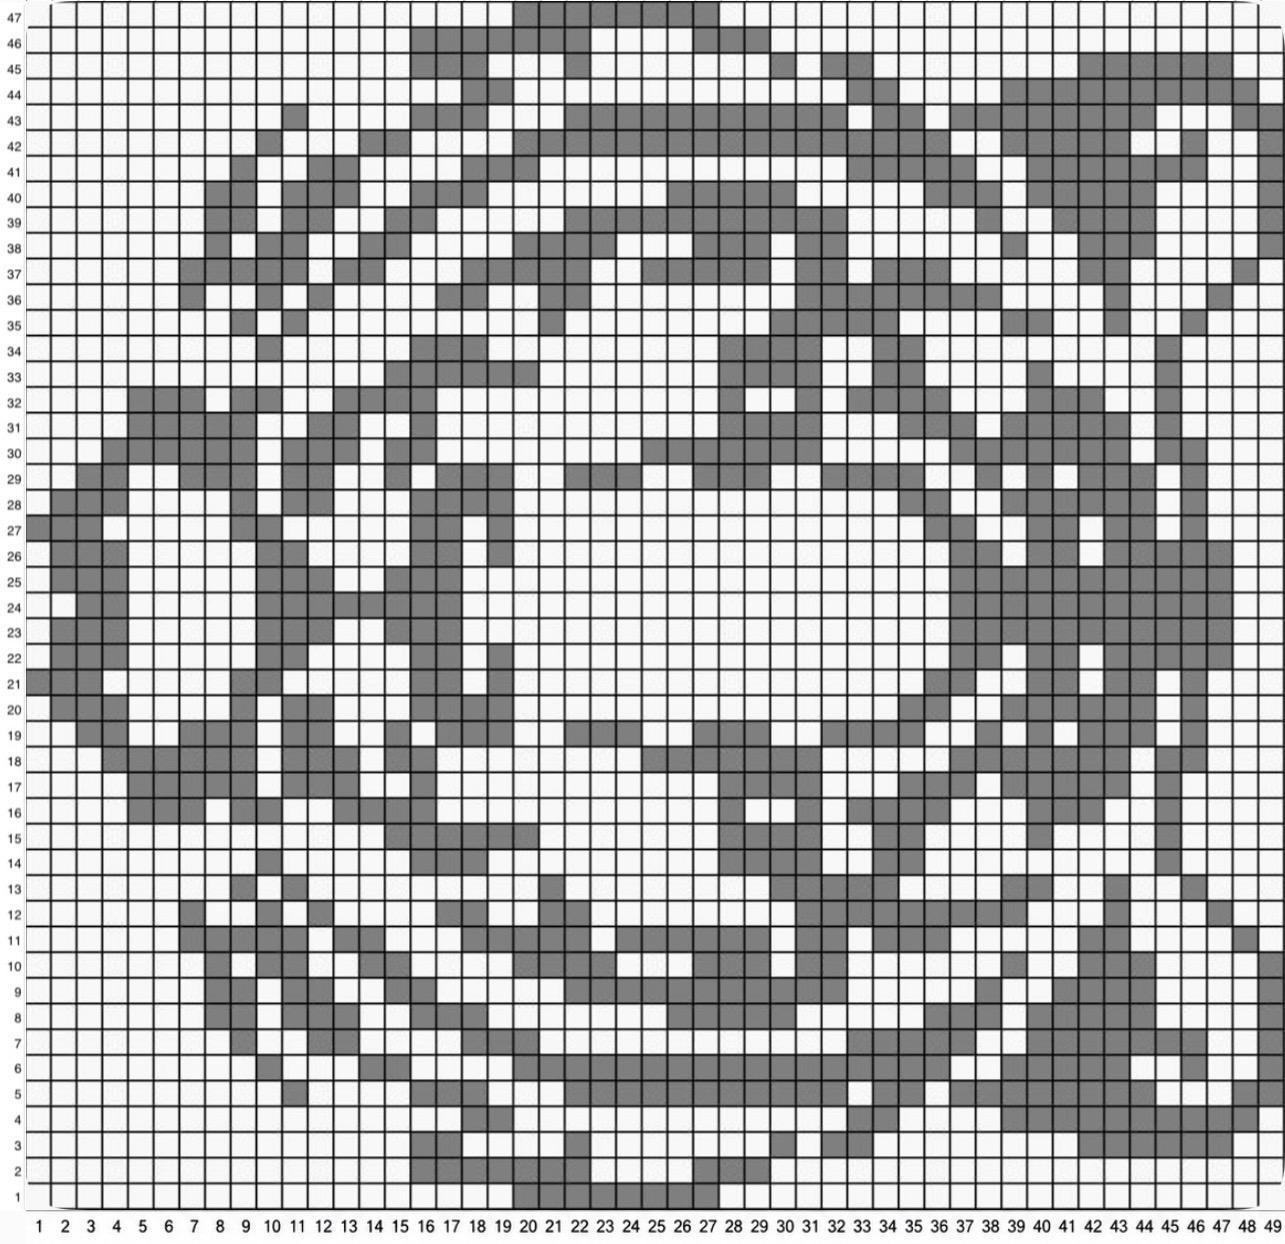
Work the center 49 sts according to the tiger chart. The chart is 49 sts × 47 rows.
- Reset row count: Count only WS rows — these form the pattern.
- All RS rows: Change color, knit all sts, purl edge st.
- WS rows: Background = knit sts; Pattern = purl sts (light color). Background = purl sts; Pattern = knit sts (dark color).
Pattern Chart Rows (WS rows, center 49 sts)
| Row | Instructions (within the 49-st section) |
|---|---|
| Row 1: | Edge st, purl to marker, 19 p, 8 k, purl all sts to end |
| Row 2: | Edge st, knit to marker, 15 k, 7 p, 4 k, 3 p, knit all sts to end, purl edge st |
| Row 3: | Edge st, purl all sts to marker, 15 p, 2 k, 4 p, 1 k, 7 p, 1 k, 1 p, 2 k, 8 p, 6 k, purl all sts to end |
| Row 4: | Edge st, knit all sts to marker, 17 k, 2 p, 13 k, 2 p, 4 k, 10 p, knit all sts to end, purl edge st |
| Row 5: | Edge st, purl all sts to marker, 19 p, 8 k, purl all sts to end |
| Row 6: | Edge st, knit all sts to marker, 15 k, 7 p, 4 k, 3 p, knit all sts to end, purl edge st |
| Row 7: | Edge st, purl all sts to marker, 15 p, 2 k, 4 p, 1 k, 7 p, 1 k, 1 p, 2 k, 8 p, 6 k, purl all sts to end |
| Row 8: | Edge st, knit all sts to marker, 17 k, 2 p, 13 k, 2 p, 4 k, 10 p, knit all sts to end, purl edge st |
| Continue through Row 39 following the same chart progression. | |
Neckline Shaping
- At the beginning of Row 5 (RS): bind off 4 sts
- At the beginning of Row 6 (RS): bind off 2 sts
- At the beginning of Row 7 (RS): bind off 3 sts
- At the beginning of Row 8 (RS): bind off 4 sts
- On WS rows, slip the last stitch purlwise with yarn held in front.
- Starting with WS Row 8, purl the last edge stitch.
Armhole Shaping

- At the end of WS Row 39: cast on 4 sts
- At the end of Row 40: cast on 3 sts
- At the end of Row 41: cast on 2 sts
- At the end of Row 42: cast on 4 sts
- Continue working straight according to the chart through Row 47.
- Work the same number of background rows before the armhole as at the beginning: 30/38/50 full rows (or 15/19/25 color changes).
- Count 40/44/44 sts for the armhole and transfer to scrap yarn or a stitch holder.
- Work the remaining stitches for another 8 full rows (4 color changes).
- Cut yarns, transfer remaining live stitches to scrap yarn.
The front is now complete!
Step 2: Knit the Back Panel
The back is worked in exactly the same way as the front — same cast-on, same row counts, same shaping — but with a striped pattern instead of the tiger motif.
Working from the Chart
- 1 chart row = 2 WS rows (work each chart row twice: once in light, once in dark)
- RS rows are not charted — knit all stitches on every RS row
- Edge stitches are not included in the chart
- Work the last chart row only once (finish with the light color)
- Blank squares in M–L and XL–2XL charts = background-color stitches
Back Options
If you find the striped back challenging, choose one of these simpler alternatives:
- Plain back — work the entire back in the background color only, no pattern
- Matching pattern — work the same tiger pattern on the back as on the front
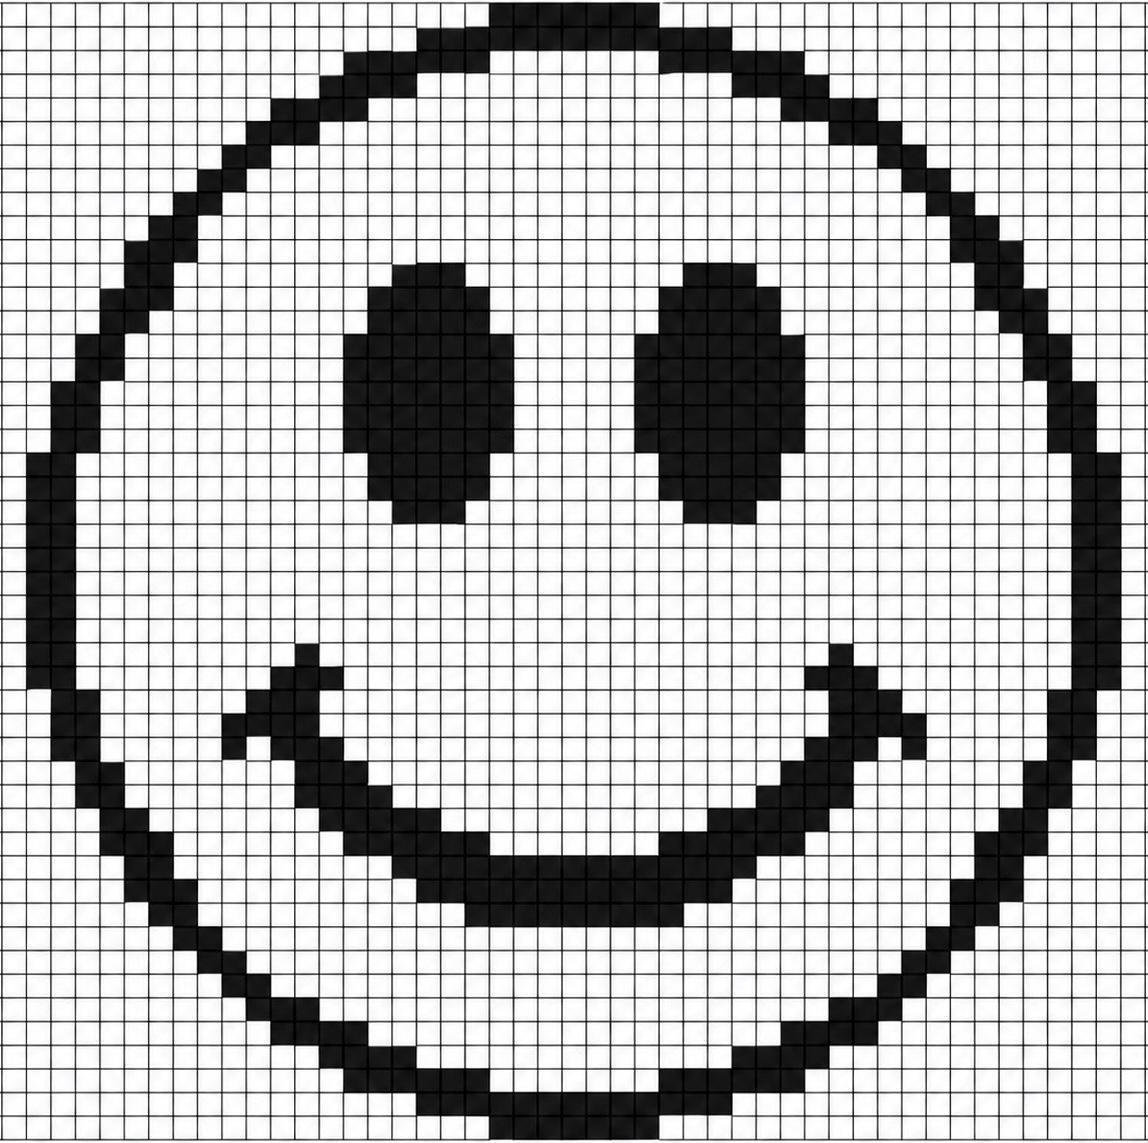
- Alternative pattern — choose a different chart (butterfly, rose, or smiley face provided below)


Step 3: Seam the Pieces
- Side seams: Sew through the live stitches using a 3.5 mm crochet hook.
- Shoulder seams: Sew through the bound-off stitches using a 3.5 mm crochet hook.
- Leave long yarn tails when working the back for sewing seams.
Step 4: Neckline Finishing
Pick up stitches around the neckline from the edge stitches. Choose one of two options:
Option A — Garter-Stitch Edging (US 2 / 2.75 mm needles)
- Row 1: Purl all sts
- Row 2: Knit all sts
- Repeat these 2 rows 2 more times, then bind off.
Option B — 1×1 Ribbing (US 1½ / 2.5 mm needles)
- Work k1, p1 around to desired height (approximately 18 rounds).
- Bind off using your preferred method.
Step 5: Armhole Finishing
Work the armhole edging the same way as the neckline:
- Transfer live stitches to working needles.
- At the underarm, pick up 8 sts, then pick up remaining stitches 1-for-1 along edge stitches.
- Work garter-stitch edging or 1×1 ribbing as desired.
Step 6: Sleeves (Optional — for Sweater Version)
Needles: US 4 (3.5 mm), 16″ (40 cm) circular needles.
- Join the dark color. Starting at the center of the underarm, pick up 4 sts, then pick up stitches 1-for-1 along the edge stitches, knit the live stitches, and pick up another 4 sts at the other side of the underarm.
- Work the next round knit.
- Change to the light color.
- Work 1 round knit, then 1 round purl.
- Repeat this 4-row sequence:
- Change to dark color, work 2 rows knit
- Change to light color, work 1 row knit, then 1 row purl
- Work a decrease every 5 repeats (20 rows).
- Change to dark color, work 1 row knit. On the next (2nd) row, work a right-leaning decrease (k2tog through front loops) at the beginning and end of the round.
- Continue to desired length (approximately 154 rows / 15¾”).
- Change to light color and switch to US 1½ (2.5 mm) needles.
- Work one decrease round: (k2, right-leaning decrease) repeat around.
- Work 1×1 ribbing to desired length. Bind off.
Make 2 sleeves.
Step 7: Bottom Hem (Optional)
The bottom edge can be left as-is or finished with 1×1 ribbing:
- Pick up 1 stitch from one edge stitch, then 2 stitches from the next edge stitch, repeating around.
- Work 1×1 ribbing to desired height. Bind off.
Finishing
- Carefully weave in all yarn ends.
- Hand-wash the finished garment in cool water (30°C / 86°F).
- Important: Shape the garment while damp — gently stretch and straighten it to the desired dimensions, smooth with your hands, and dry flat on a level horizontal surface.
You’re done! Share your finished projects using the hashtag #illusion_top_jumper_byLana.

Frequently Asked Questions
Is this a crochet or knitting pattern?
This is a knitting pattern worked with knitting needles (not a crochet hook), using the illusion knitting technique. The only crochet tool needed is a 3.5 mm hook for seaming the seams.
What is illusion knitting?
Illusion knitting (also called shadow knitting) uses two colors of yarn and strategic knit/purl placement to create an image that appears when viewed from an angle — the tiger face “emerges” from the stripes as you look at the sweater from different perspectives.
Can I use a different motif instead of the tiger?
Can I sell sweaters made from this pattern?
The pattern states “All rights reserved. Copying and distribution are prohibited.” Please check the designer’s terms before selling finished items.
Yes! The pattern includes alternative charts for a butterfly, rose, and smiley face, all using the same stitch counts as the tiger chart. You can also design your own motif using the same 49-stitch width.
What’s the difference between the top and sweater versions?
The top is sleeveless (210–280g yarn). The sweater adds long sleeves (370–490g yarn). Everything else — front, back, seams, neckline — is the same.
Conclusion
Ultimately, the Crochet Illusion Tiger Sweater is much more than just a cozy handmade garment—it’s a masterclass in modern fiber art. By cleverly blending optical illusion techniques with classic crochet stitches, it transforms a bold graphic design into a wearable statement piece that turns heads. Whether you’re an ambitious crafter looking to level up your colorwork skills or someone seeking a striking, one-of-a-kind addition to your handmade wardrobe, this sweater proves that crochet can be just as fierce, modern, and high-fashion as any runway knit.

2 Comments