

Luffy Doll Crochet Pattern – Free Amigurumi One Piece Guide
Discover the ultimate free crochet pattern for an adorable Luffy doll from One Piece! Create your own handmade amigurumi masterpiece with this step-by-step guide.
Luffy Doll Crochet Pattern – Free Amigurumi One Piece Guide
Bring your favorite anime captain to life with this complete, step-by-step luffy doll crochet pattern! Whether you are a fan of One Piece or love crafting cute amigurumi characters, this handmade Luffy doll makes a fantastic gift, keychain, or collectible display piece.
Monkey D. Luffy Doll Crochet – Free Amigurumi Pattern
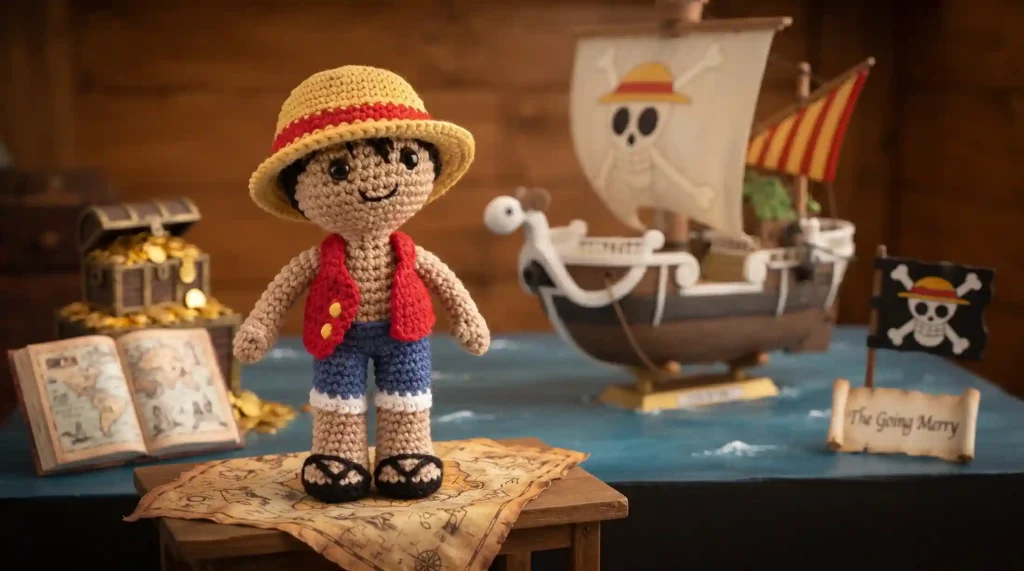
This project brings together classic amigurumi shaping techniques, simple color changes, and iconic details—from Luffy’s classic straw hat and bright red vest to his signature black hair and sandals. Below, you will find all the materials, stitch abbreviations, and step-by-step pattern rounds to create your very own pirate captain.
Table of Contents
Materials & Supplies
- DK Weight / 8-Ply Yarn in Black, Beige (skin tone), Red, Blue, White, and Yellow
- 3.0 mm Crochet Hook
- 2x 7.5mm Safety Eyes
- Yellow Felt (for shirt buttons) & Fabric Glue
- Polyester Fiberfill Stuffing
- Black Thread / Yarn (for embroidery)
- Tapestry Needle & Scissors
- Bobby Pins or Stitch Markers
💡 Pro Tip: Work continuous spiral rounds without joining at the end of each round unless specified. Use a bobby pin as a stitch marker—it slides out easily without snagging your yarn!

Stitch Abbreviations (US Terms)
- MR: Magic Ring
- sc: Single Crochet
- inc: Increase (2 sc in the same stitch)
- dec: Invisible Decrease
- hdc: Half Double Crochet
- dc: Double Crochet
- BLO: Back Loop Only
- FLO: Front Loop Only
- 4sc popcorn: Popcorn stitch worked with 4 single crochets (for thumbs)
Step 1: Crocheting the Head
Using Beige Yarn:
- Rnd 1: MR 6 sc (6)
- Rnd 2: [ inc ] x 6 (12)
- Rnd 3: [ inc, sc ] x 6 (18)
- Rnd 4: sc, inc, [ sc 2, inc ] x 5, sc (24)
- Rnd 5: [ inc, sc 3 ] x 6 (30)
- Rnd 6: sc 2, inc, [ sc 4, inc ] x 5, sc 2 (36)
- Rnds 7–12: sc 36 (36)
- Rnd 13: sc 2, dec, [ sc 4, dec ] x 5, sc 2 (30)
- Rnd 14: [ dec, sc 3 ] x 6 (24)
- Rnd 15: sc, dec, [ sc 2, dec ] x 5, sc (18)
Insert 7.5mm safety eyes between rounds 9 and 10, spaced approximately 4 stitches apart. Stuff firmly with fiberfill and leave a yarn tail for sewing. Embroider a simple smile using black thread.

Step 2: Crocheting the Arms (Make 2)
Using Beige Yarn:
- Rnd 1: MR 6 sc (6)
- Rnd 2: [ inc, sc 2 ] x 2 (8)
- Rnds 3–4: sc 8 (8)
- Rnd 5: 4sc popcorn, sc 7 (8) (The popcorn stitch creates the thumb!)
- Rnds 6–15: sc 8 (8)
Fasten off leaving a tail for sewing. Because the arms are slender, stuffing is optional!
Step 3: Crocheting the Legs & Sandals (Make 2)

Start with Black Yarn for the soles:
- Rnd 1: MR 6 sc (6)
- Rnd 2: [ inc ] x 6 (12)
- Rnd 3: [ inc, sc ] x 6 (18)
- Rnd 4: BLO sc 18 (18)
- Rnd 5: sc 18 (18)
- Rnds 6–7: Switch to Beige Yarn, sc 18 (18)
- Rnd 8: sc 3, dec 6, sc 3 (12)
- Rnd 9: sc 12 (12)
👟 Sandal Straps: At this stage, take a strand of black yarn and embroider 4 cross-straps on the front of the foot to form Luffy’s traditional sandals.
- Rnds 10–11: sc 12 (12)
- Rnds 12–13: Switch to White Yarn, sc 12 (12)
- Rnds 14–19: Switch to Blue Yarn (shorts), sc 12 (12)
Fasten off the first leg. Do not cut yarn on the second leg as we will join them together!
Step 4: Joining the Body & Red Vest

Joining Legs & Body (Blue & Beige Yarn):
- Align both legs facing forward. Join the legs at the inner stitches with continuous single crochet.
- Rnds 1–3: (In Blue) sc 24 around both legs (24)
- Rnds 4–7: (In Beige skin color) sc 24 (24). Stuff the legs firmly!
- Rnd 8: sc 3, dec, [ sc 6, dec ] x 2, sc 3 (21)
- Rnd 9: [ dec, sc 5 ] x 3 (18)
- Rnd 10: sc 2, dec, [ sc 4, dec ] x 2, sc 2 (15)
- Rnd 11: [ dec, sc 3 ] x 3 (12)
- Rnd 12: FLO sc 12 (12)
- Rnd 13: [ sc, inc ] x 6 (18). Fasten off leaving a tail for sewing.
Crocheting the Red Shirt (Vest):
- In Red Yarn: Ch 31.
- Rows 2–6: Starting in 2nd ch from hook, sc 30, ch 1, turn (30).
- Row 7: dec 3, ch 8 (armhole), skip 4, sc 1, dec 4, sc 1, ch 8, skip 4, dec 3, ch 1, turn.
- Row 8: sc across the row to finish. Glue small yellow felt circles as vest buttons!
Step 5: Crocheting the Iconic Straw Hat

In Yellow Yarn:
- Rnd 1: MR 6 sc (6)
- Rnd 2: [ inc ] x 6 (12)
- Rnd 3: [ inc, sc ] x 6 (18)
- Rnd 4: sc, inc, [ sc 2, inc ] x 5, sc (24)
- Rnd 5: [ inc, sc 3 ] x 6 (30)
- Rnd 6: sc 2, inc, [ sc 4, inc ] x 5, sc 2 (36)
- Rnd 7: [ inc, sc 11 ] x 3 (39)
- Rnds 8–11: sc 39 (39)
- Rnds 12–13: Switch to Red Yarn for the hatband, sc 39 (39)
- Rnd 14: Switch back to Yellow Yarn, FLO sc 39 (39)
- Rnd 15: sl st, [ inc, sc ] repeated to end of round
- Rnd 16: [ inc, sc 3 ] repeated to end of round
- Rnd 17: BLO sc around to prevent brim curling. Fasten off.
Step 6: Hair Cap & Final Assembly

Hair Cap (Black Yarn): Follow the same crown instructions as Rnds 1–12 of the head. Position the hair cap onto the head with a slight side part and stitch securely in place. Add small spiky black yarn strands along the front hairline for Luffy’s iconic spiky fringe.
Final Assembly:
- Sew the head onto the body matching the 18 stitches on both neck openings.
- Position the arms at the sides under the shirt and stitch securely to the torso.
- Put on the red vest and place the straw hat atop his head or resting on his back.
Frequently Asked Questions
What size is the finished Luffy doll?
When made with DK weight yarn and a 3.0mm crochet hook, the finished amigurumi Luffy doll stands approximately 12–15 cm (5–6 inches) tall—perfect for keychains or desk decor!
Can I use different yarn weights?
Yes! Using worsted weight yarn with a 3.5mm or 4.0mm hook will result in a larger plushie, while using fine lace yarn will produce a micro-amigurumi version.
How do I keep the straw hat brim flat?
Crocheting the final round of the hat brim in the Back Loop Only (BLO) keeps the edge from curling upwards, giving it a crisp, realistic sun-hat outline.
Conclusion
Crafting your own handmade crochet Luffy doll is a wonderfully rewarding project that brings your favorite anime character to life stitch by stitch. By following a clear, step-by-step pattern and taking your time with the shaping and assembly details, you can create a stunning amigurumi masterpiece that makes an incredible gift, display piece, or collectible.
Visit thenextrecipes.com for more inspiring crochet patterns, fiber art guides, and creative DIY projects! What character or design would you like us to cover next? Leave a comment below sharing your thoughts!
2 Comments