
Ginger Doll Crochet Amigurumi Pattern – Full Step-by-Step English Guide
Introducing the Ginger Doll crochet amigurumi pattern — a charming woodland fairy doll with flowing red curls, a white long-sleeve blouse, blue overalls with a toadstool mushroom appliqué, lace-up sneakers, a matching beret hat, and the most adorable mushroom house bag you’ve ever seen!
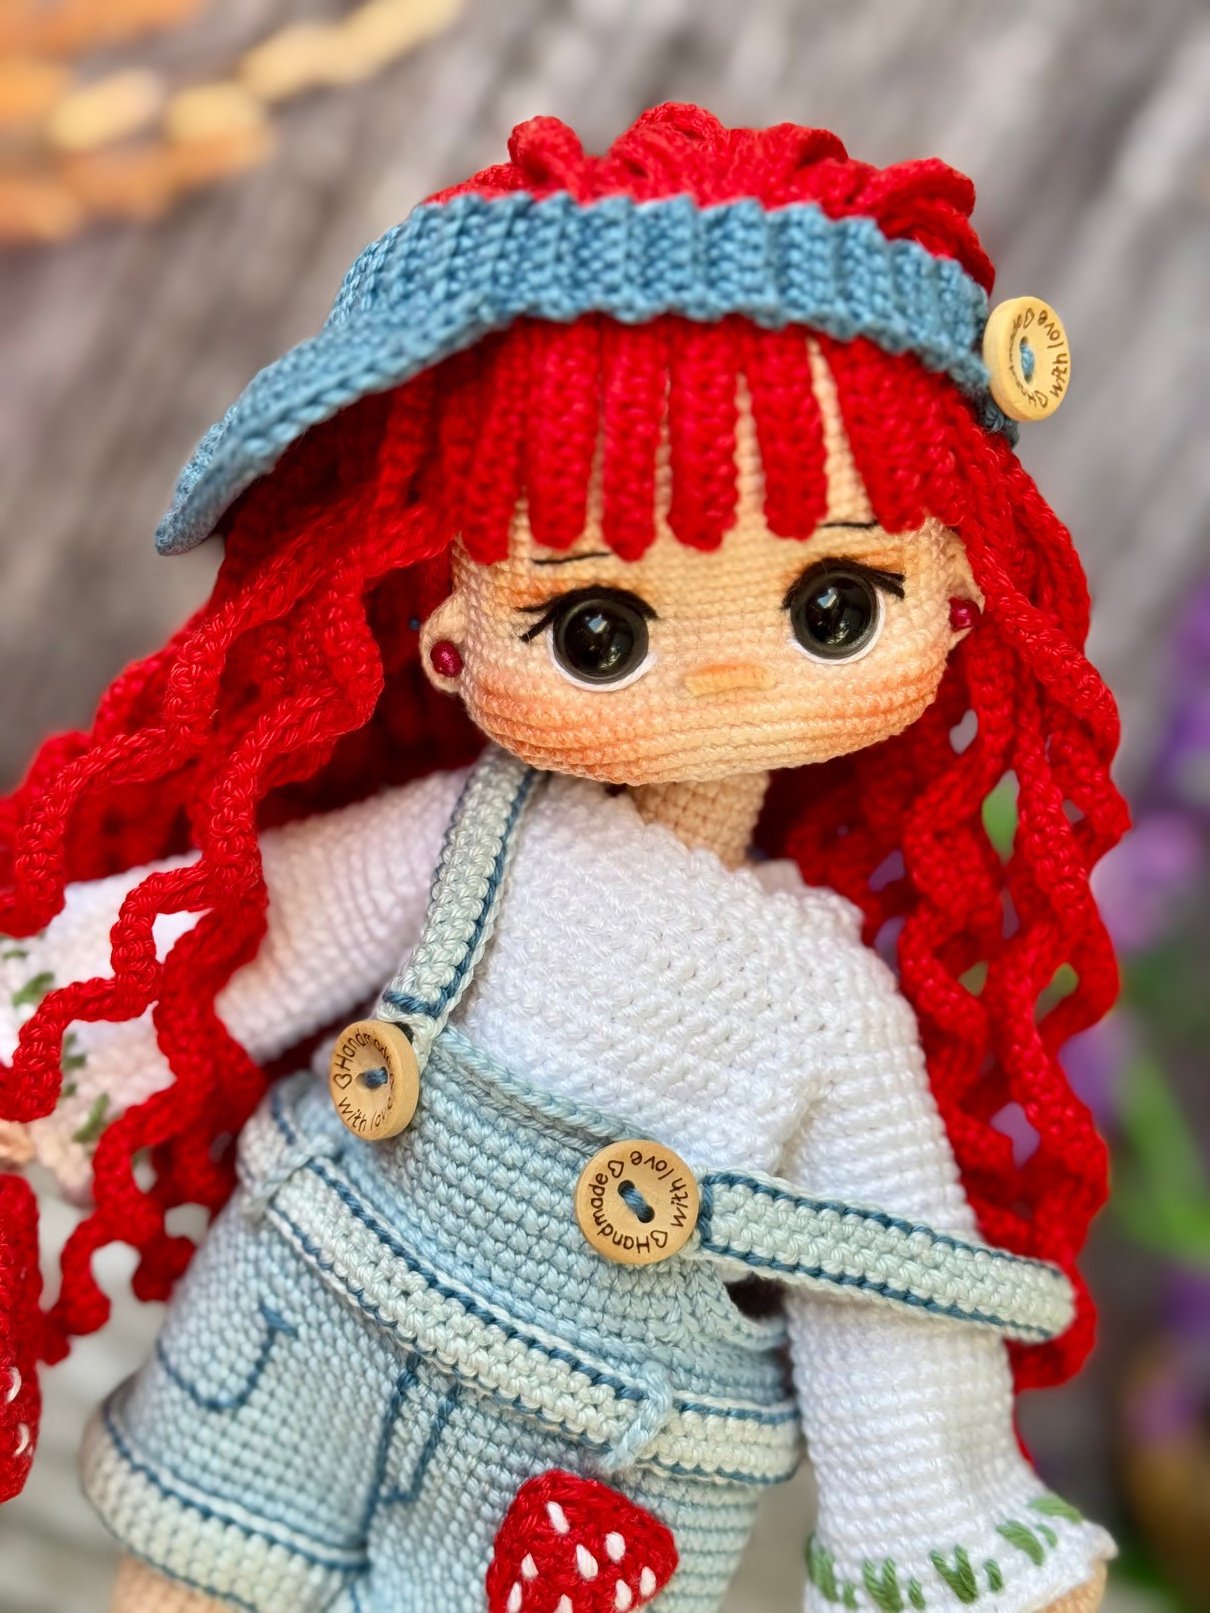
Ginger is worked almost entirely with a 2.00 mm hook using Catania cotton and Gazzal Giza yarn for a beautifully smooth, detailed finish. She has a wire armature in her body and arms so she can stand on her own and strike fun poses.

💡 Tip: I used the cross single crochet technique throughout, but regular sc works perfectly too. Stuff firmly every 7–8 rounds to avoid uneven shaping. If you swap yarns, keep the thickness consistent so clothing fits correctly.
Materials & Tools for Ginger Doll Crochet Amigurumi Pattern
Yarn
- Catania TR263 — Skin color (2 skeins — body, head, arms, legs)
- Gazzal Giza 2450 — White (1 skein — blouse, bag base)
- Gazzal Giza 2473 — Light Blue (1 skein — overalls detail, shoes, bag top, straps)
- Gazzal Giza 2466 — Red (3 skeins — feet, hair, mushroom, bag)
- Gazzal Giza 2474 — Blue (1 skein — overalls body, bag door)
- Gazzal Giza 2479 — Dark Blue (1 skein — shoes, hat)
- Small amounts: black and white yarn (eye embroidery), green yarn (grass embroidery)
Other Supplies
- 2.00 mm crochet hook (body and bag)
- 2.20 mm crochet hook (clothing, shoes, hat, hair)
- 12 mm safety eyes (× 2)
- 2.5 mm electrical / craft wire — for arms and body armature
- 2 buttons for the blouse, 2 buttons for the overalls, 1 button for the hat
- Wooden beads for bag closure (× 2)
- Soft pastel chalk or blush makeup (for cheeks and mouth)
- Polyester fiberfill stuffing
- Tapestry needle and scissors
- Stitch markers
Abbreviations
| Abbreviation | Meaning |
|---|---|
| mr | Magic Ring |
| sc | Single Crochet |
| hdc | Half Double Crochet |
| dc | Double Crochet |
| tr | Treble Crochet |
| ch | Chain |
| inc | Increase (2 sc in one stitch) |
| dec | Invisible Decrease |
| w | 3 sc in the same stitch |
| M | Decrease 3 stitches together |
| slst | Slip Stitch |
| flo | Front Loop Only |
| blo | Back Loop Only |
| hdc-inc | Half Double Crochet Increase |
| dc-inc / dc-dec | Double Crochet Increase / Decrease |
| esc | Extended single crochet (pull off hook in two movements without wrapping) |
| escw | 3 esc in the same stitch |
| * | Repeat the number of times stated |
Step 1: Head
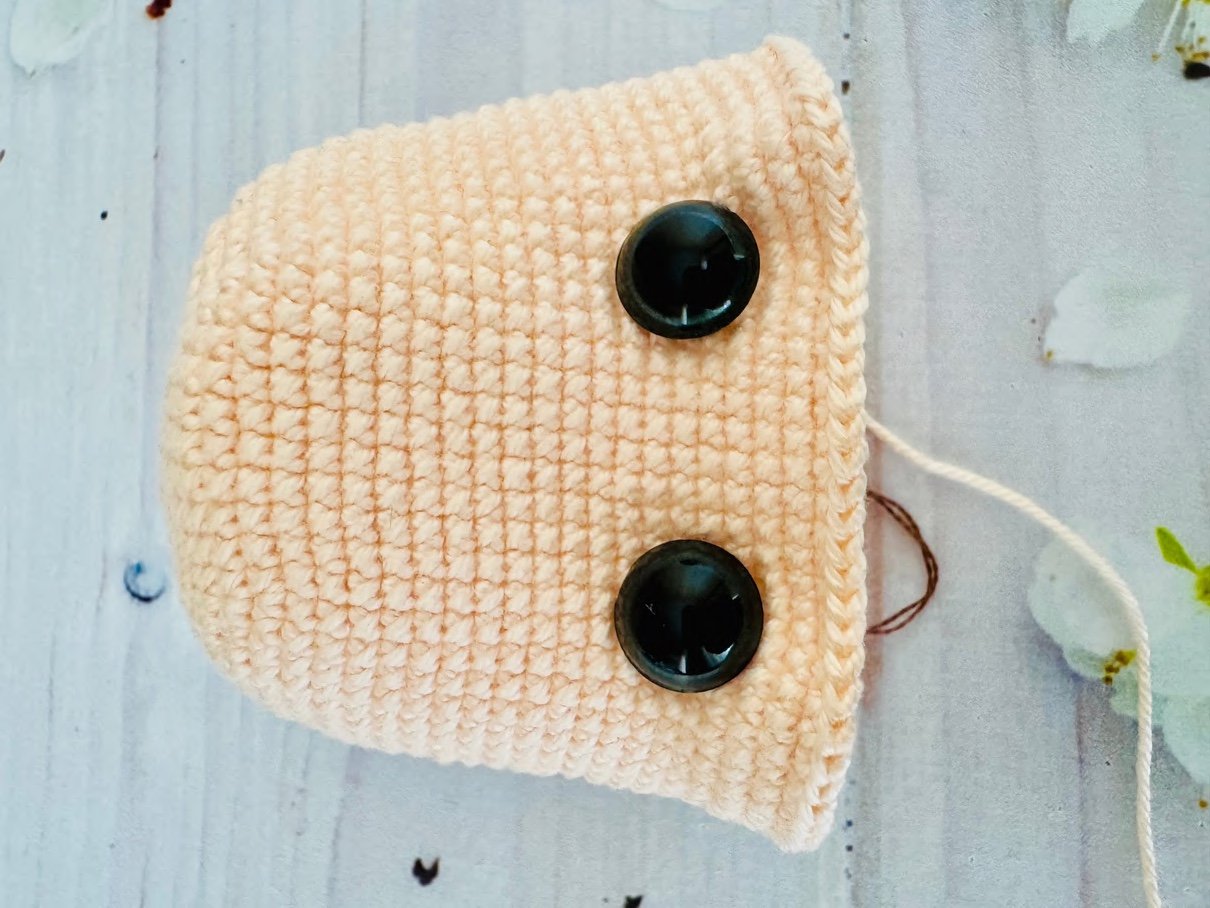
Yarn: Catania TR263 (skin) — 2.00 mm hook. Work in continuous spiral rounds.
- Rnd 1: MR 6 sc
- Rnd 2: (inc) × 6 = 12 sc
- Rnd 3: (1 sc, 1 inc) × 6 = 18 sc
- Rnd 4: (2 sc, 1 inc) × 6 = 24 sc
- Rnd 5: (3 sc, 1 inc) × 6 = 30 sc
- Rnd 6: (4 sc, 1 inc) × 6 = 36 sc
- Rnd 7: (5 sc, 1 inc) × 6 = 42 sc
- Rnd 8: (6 sc, 1 inc) × 6 = 48 sc
- Rnd 9: (7 sc, 1 inc) × 6 = 54 sc
- Rnd 10: (8 sc, 1 inc) × 6 = 60 sc
- Rnd 11: (9 sc, 1 inc) × 6 = 66 sc
- Rnds 12–23: 66 sc (12 rounds)
- Rnd 24 (eye holes): 31 sc, ch 1 skip 1, 10 sc, ch 1 skip 1, 23 sc
- Rnd 25: 31 sc, 1 sc into the chain, 10 sc, 1 sc into the chain, 23 sc = 66 sc
- Rnd 26 (cheek expansion): 26 sc, 6 inc, 10 sc, 6 inc, 18 sc = 78 sc
- Rnds 27–29: 78 sc (3 rounds) — insert safety eyes into the Rnd 24 gaps after this round
- Rnd 30: (11 sc, 1 dec) × 6 = 72 sc
- Rnd 31: 5 sc, 1 dec, (10 sc, 1 dec) × 5, 5 sc = 66 sc
- Rnd 32: (9 sc, 1 dec) × 6 = 60 sc
- Rnd 33: 4 sc, 1 dec, (8 sc, 1 dec) × 5, 4 sc = 54 sc
- Rnd 34: (7 sc, 1 dec) × 6 = 48 sc
- Rnd 35: 3 sc, 1 dec, (6 sc, 1 dec) × 5, 3 sc = 42 sc
- Rnd 36: (5 sc, 1 dec) × 6 = 36 sc
- Rnd 37: 2 sc, 1 dec, (4 sc, 1 dec) × 5, 2 sc = 30 sc
- Rnd 38: (3 sc, 1 dec) × 6 = 24 sc
- Rnd 39: 1 sc, 1 dec, (2 sc, 1 dec) × 5, 1 sc = 18 sc
Stuff firmly. Fasten off leaving a long tail for sewing to the body.
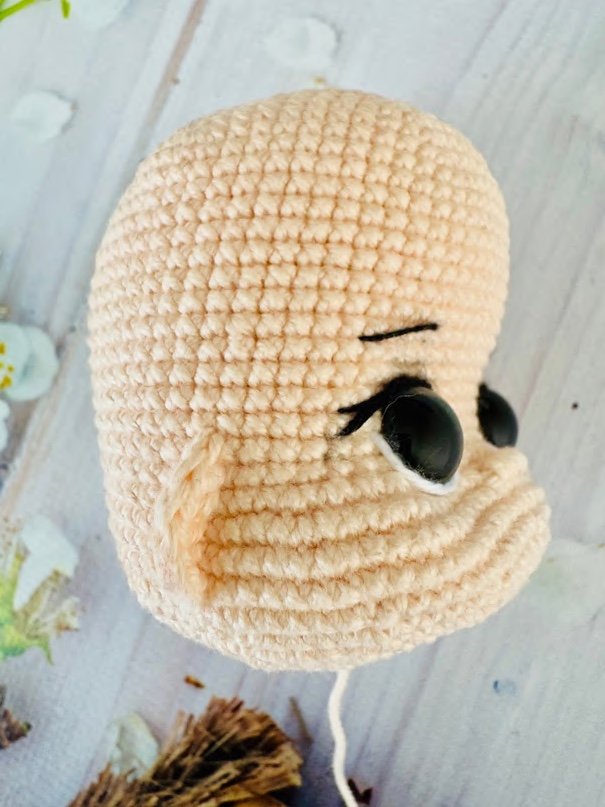
Face Details
- Eye pulling: Insert needle from the back of the head, pull out from the upper inner corner of each eye, then reinsert from the bottom and pull through the back. Repeat for both eyes symmetrically.
- Ears: Count 4 sc from the lowest eyelash. Crochet: 1 sc, 1 dc, 2 tr, 1 dc, 1 sc downward. Mirror for the second ear (upward).
- Eyebrows: Embroider over 4 sc in length, 9 sc gap between them, 4 rounds above the last eyelash.
- Nose: Embroider using the wrapping method, 1 row below the eye, over 4 sc.
- Mouth & cheeks: Color with soft pastel chalk, or embroider 4 rows below the nose over 2 sc.
Step 2: Arms (Make 2)
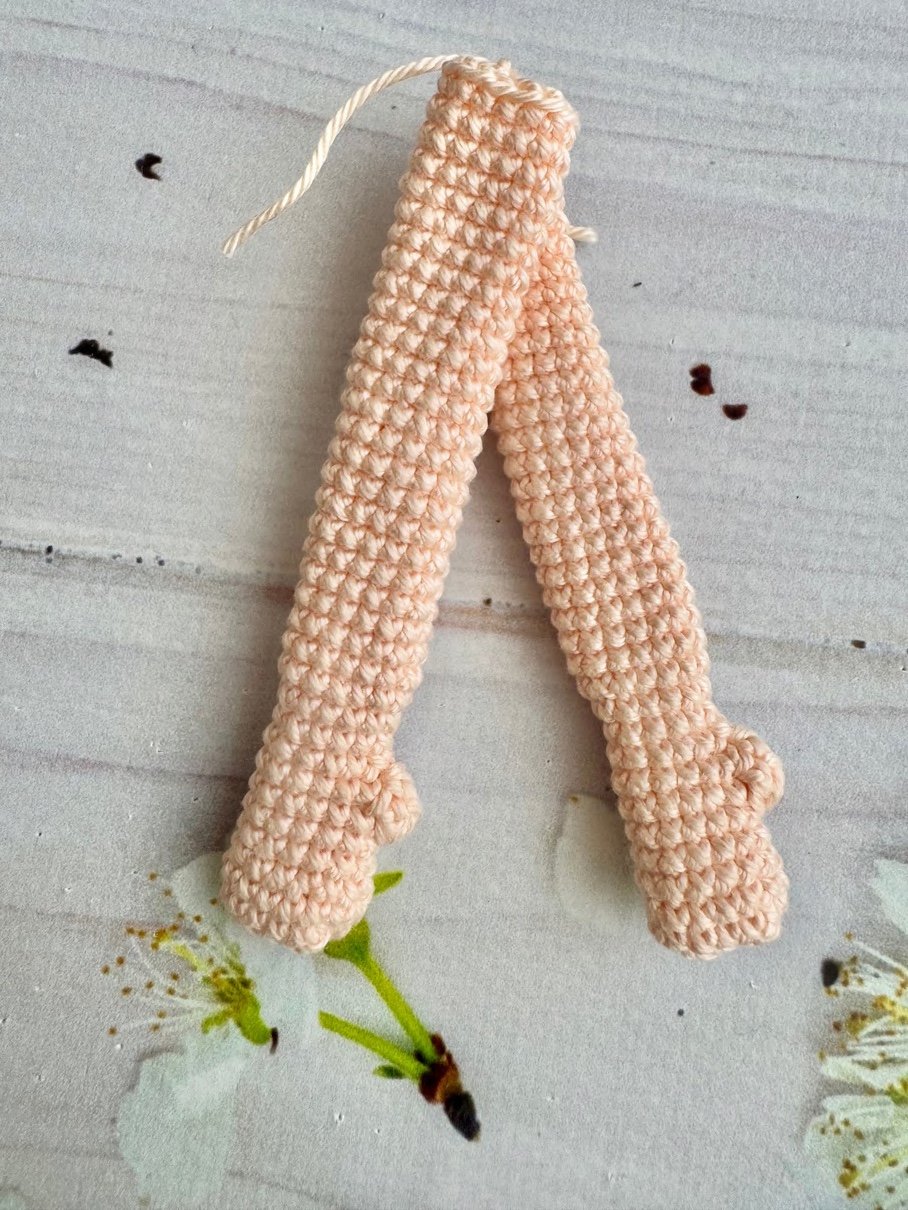
Yarn: Catania TR263 (skin) — 2.00 mm hook.
- Rnd 1: Ch 6, turn. From the 2nd ch: 4 sc, 3 sc in same stitch (continue other side of chain) 3 sc, 1 inc = 12 sc. Place stitch marker here.
- Rnd 2: 5 sc, 1 inc, 6 sc = 13 sc
- Rnds 3–6: 13 sc (4 rounds)
- Rnd 7: 3 tr in the same stitch (thumb), 12 sc
- Rnd 8: M (decrease 3 together), 12 sc = 13 sc
- Rnd 9: 1 sc, 1 dec, 4 sc, 1 dec, 4 sc = 11 sc
- Rnd 10: 11 sc
- Rnd 11: 1 inc, 5 sc, 1 inc, 4 sc = 13 sc
- Rnd 12: 1 sc, 1 inc, 11 sc = 14 sc
- Rnds 13–36: 14 sc (24 rounds)
Ch 1 and fasten off. Insert wire before stuffing lightly. Make 2.
Step 3: Feet & Legs (Make 2)
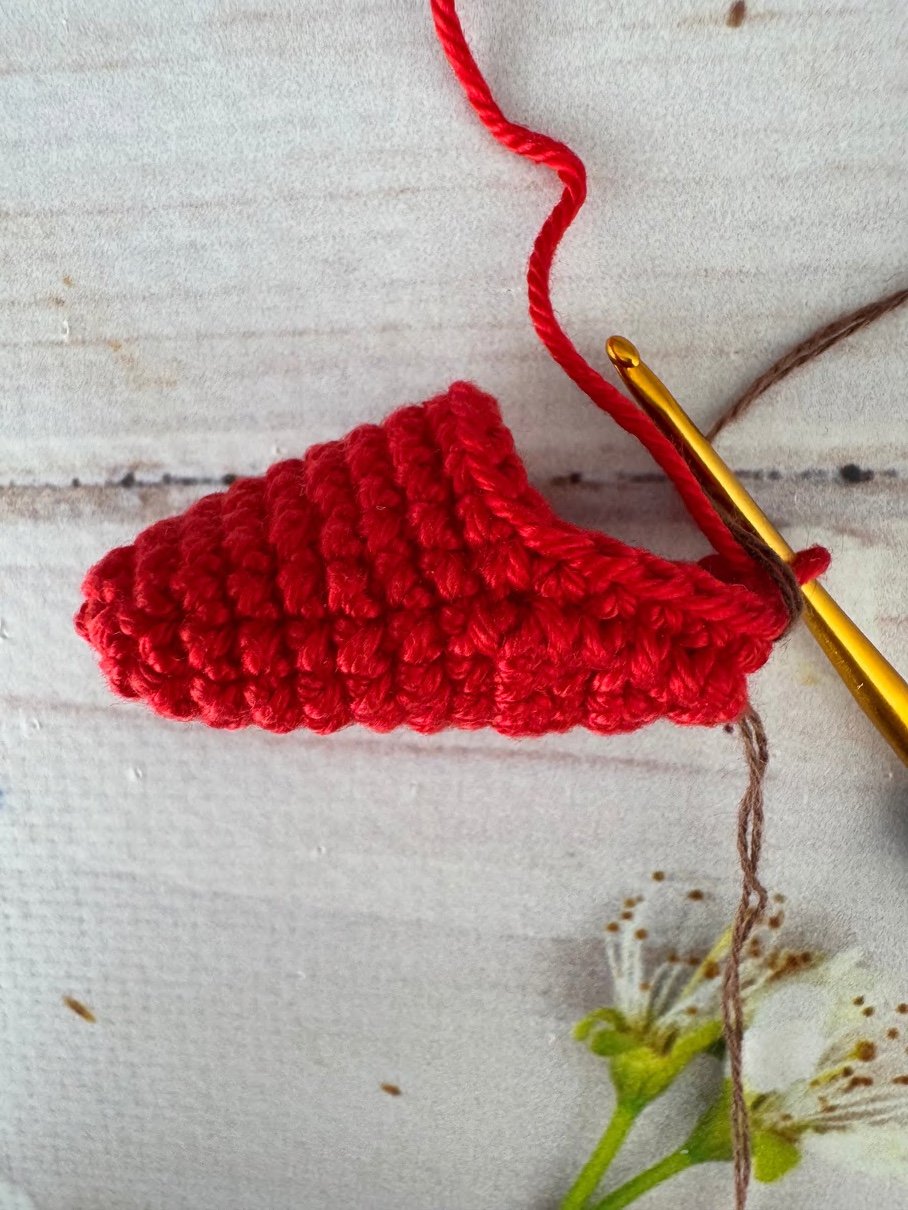
Yarn: Start with Red (Gazzal Giza 2466), switch to skin at Rnd 27 — 2.00 mm hook.
- Rnd 1: Ch 9. From 2nd ch: 7 sc, 3 sc in same st, (other side) 6 sc, 1 inc = 18 sc. Place stitch marker.
- Rnd 2: 8 sc, 1 inc, 9 sc = 19 sc
- Rnd 3: 1 inc, 18 sc = 20 sc
- Rnds 4–9: 20 sc (6 rounds) — then crochet the sole: ch 1, turn; 8 sc, ch 1 turn; skip 1, 7 sc, ch 1 turn; skip 1, 6 sc, ch 1 turn; skip 1, 5 sc, ch 1 turn; skip 1, 4 sc, ch 1 turn; skip 1, 2 sc. New starting point.
- Rnd 10: 1 sc, continue down 5 sc (side), 12 sc (front), 5 sc (side), 2 sc = 25 sc (ankle formed)
- Rnd 11: 6 sc, 1 dec, 8 sc, 1 dec, 4 sc, 1 dec, 1 sc = 22 sc
- Rnd 12: 1 sc, 1 dec, 3 sc, 1 dec, 6 sc, 1 dec, 3 sc, 1 dec, 1 sc = 18 sc
- Rnds 13–16: 18 sc (4 rounds)
- Rnds 17–26: Gradual increases — 20, 20, 21, 21, 22, 22, 23, 24, 24, 25 sc
- Rnd 27 (switch to skin, BLO): 25 sc — then with red yarn crochet 25 slst over Rnd 26, cut red yarn.
- Rnds 28–33: 25–26 sc increasing gradually
- Rnds 34–43: Shape knee and thigh — gradual decreases then increases to 28 sc
- Rnds 44–52: 28 sc (9 rounds)
- Rnd 53 (first leg): 26 sc, fasten off.
- Rnd 53–54 (second leg): Complete 28 sc on Rnd 53, then 12 sc on Rnd 54. Do not fasten off — continue with the body.
Step 4: Body
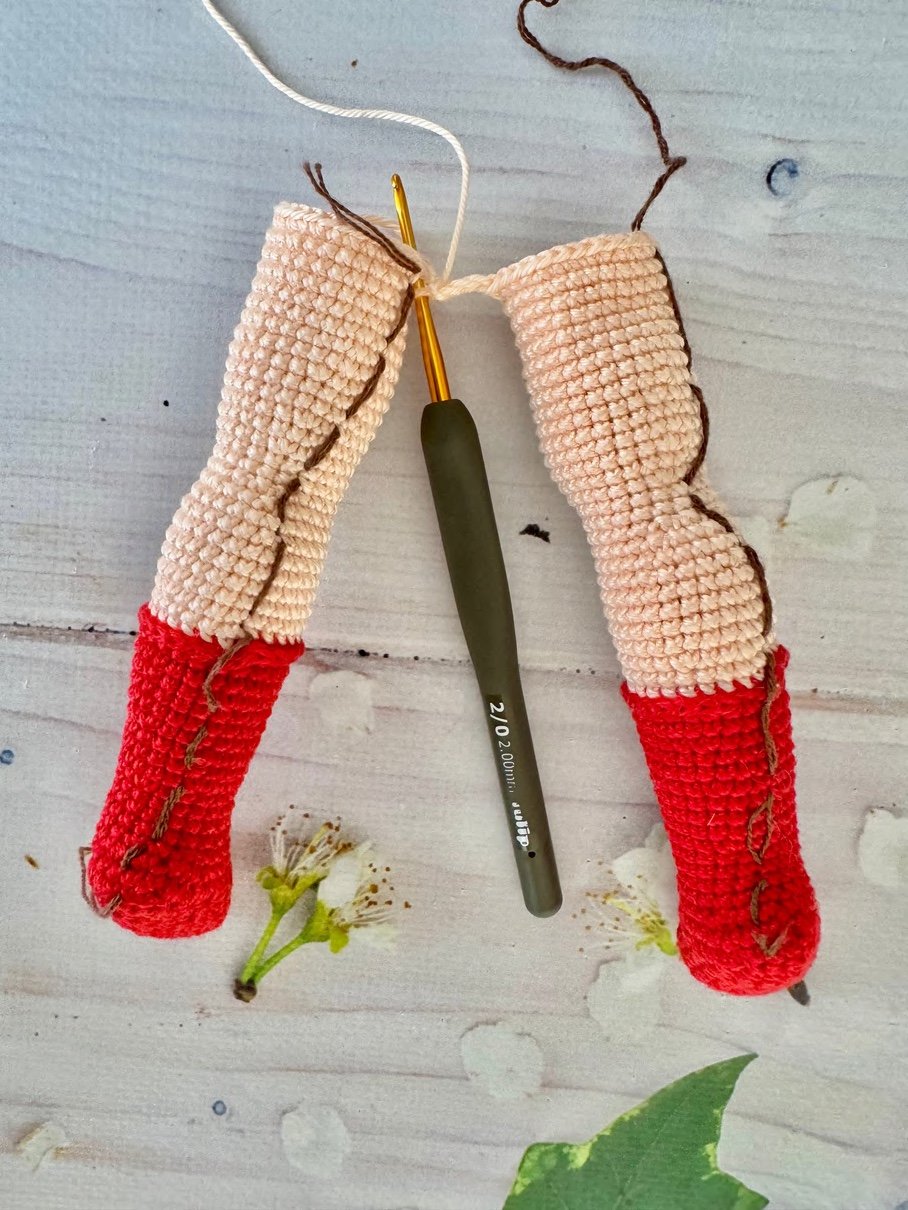
Yarn: Catania TR263 (skin) — 2.00 mm hook. From the second leg, ch 4 and join to the first leg with the backs facing you.
- Rnd 1: 28 sc (first leg), 4 sc over chain, 28 sc (second leg), 4 sc over chain = 64 sc. Place stitch marker at the back.
- Rnds 2–11: 64 sc (10 rounds)
- Rnd 12: (14 sc, 1 dec) × 4 = 60 sc
- Rnd 13: 60 sc
- Rnd 14: (8 sc, 1 dec) × 6 = 54 sc
- Rnd 15: 54 sc
- Rnd 16: (7 sc, 1 dec) × 6 = 48 sc
- Rnds 17–31: 48 sc (15 rounds) — do not fasten off; continue with arm joining.
Arm Joining
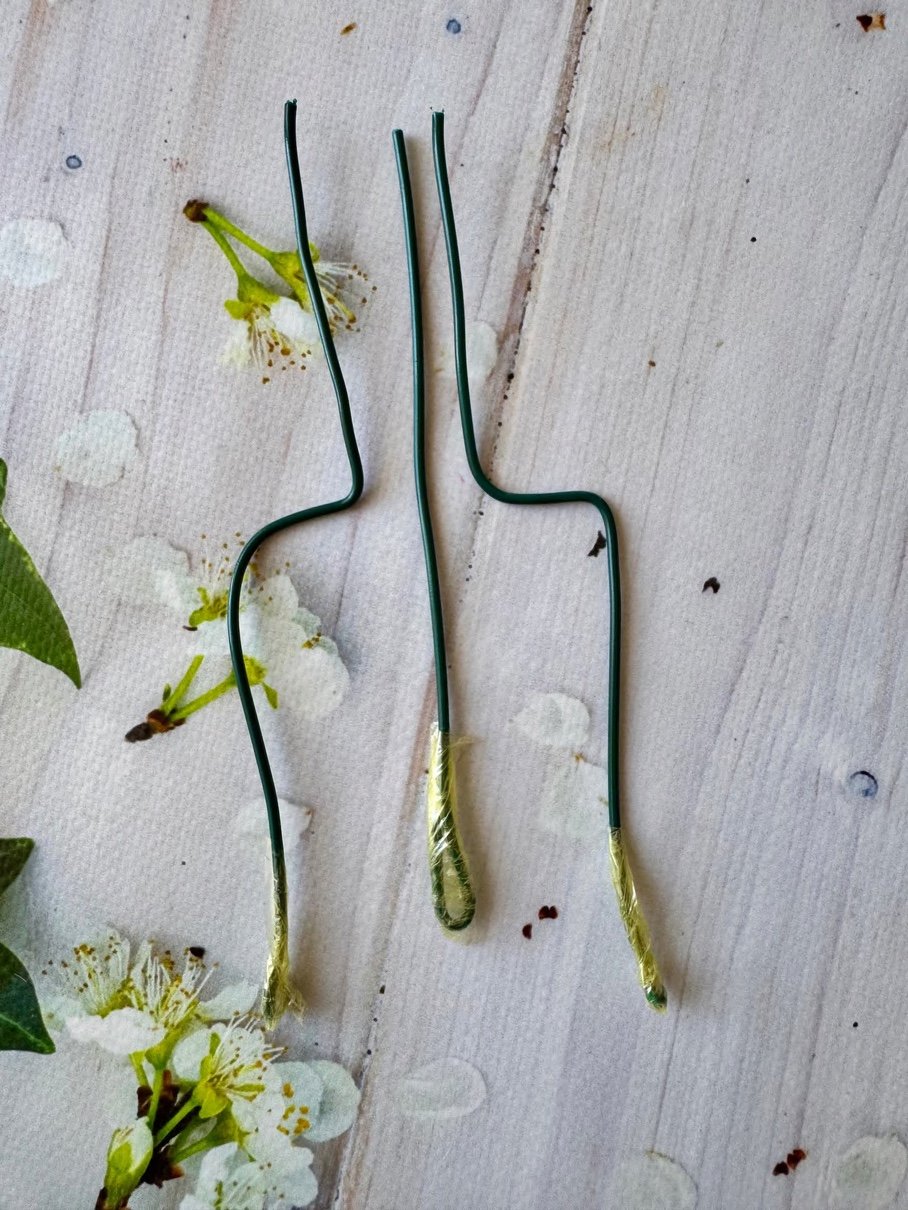
- Rnd 1: 11 sc, 3 sc together with arm, 21 sc, 3 sc together with arm, 10 sc = 48 sc
- Rnd 2: 11 sc, 11 sc over arm, 21 sc, 11 sc over arm, 10 sc = 64 sc
- Rnd 3: 10 sc, 1 dec, 9 sc, 1 dec, 19 sc, 1 dec, 9 sc, 1 dec, 9 sc = 60 sc
- Rnd 4: (8 sc, 1 dec) × 6 = 54 sc — insert wire into body and arms now
- Rnd 5: (7 sc, 1 dec) × 6 = 48 sc
- Rnd 6: 3 sc, 1 dec, (6 sc, 1 dec) × 5, 3 sc = 42 sc
- Rnd 7: (5 sc, 1 dec) × 6 = 36 sc
- Rnd 8: 2 sc, 1 dec, (4 sc, 1 dec) × 5, 2 sc = 30 sc
- Rnd 9: (3 sc, 1 dec) × 6 = 24 sc
- Rnd 10: 1 sc, 1 dec, (2 sc, 1 dec) × 5, 1 sc = 18 sc
- Rnds 11–16: 18 sc (6 rounds — neck tube). Fasten off.
Stuff the body firmly. Sew the head to the neck opening.
Step 5: Red Wig & Hair

Yarn: Red (Gazzal Giza 2466) — 2.20 mm hook.
Hair Cap
- Rnd 1: MR 6 sc
- Rnd 2: 6 inc = 12 sc
- Rnd 3: (1 sc, 1 inc) × 6 = 18 sc
- Rnd 4: (2 sc, 1 inc) × 6 = 24 sc
- Rnd 5: (3 sc, 1 inc) × 6 = 30 sc
- Rnd 6 (FLO): (4 sc, 1 inc) × 6 = 36 sc
- Rnd 7: (5 sc, 1 inc) × 6 = 42 sc
- Rnd 8: (6 sc, 1 inc) × 6 = 48 sc
- Rnd 9: (7 sc, 1 inc) × 6 = 54 sc
- Rnd 10: (8 sc, 1 inc) × 6 = 60 sc
- Rnd 11 (FLO): 60 sc — do not fasten off, continue with bangs.
Bangs (7 pieces)
(Ch 13, turn. From 2nd ch: 12 hdc, skip 1 sc, slst into next stitch) × 7
Long Hair Strands
Ch 66, turn. From 2nd ch: 65 sc, slst into next stitch, slst into next stitch — continue slst to end of round.
Turn the wig inside out, ch 2. Attach yarn to the BLO of the FLOs from Rnd 11 and repeat the long strand row. Then attach yarn to the BLO of the FLOs from Rnd 6 and repeat the long strand row again.
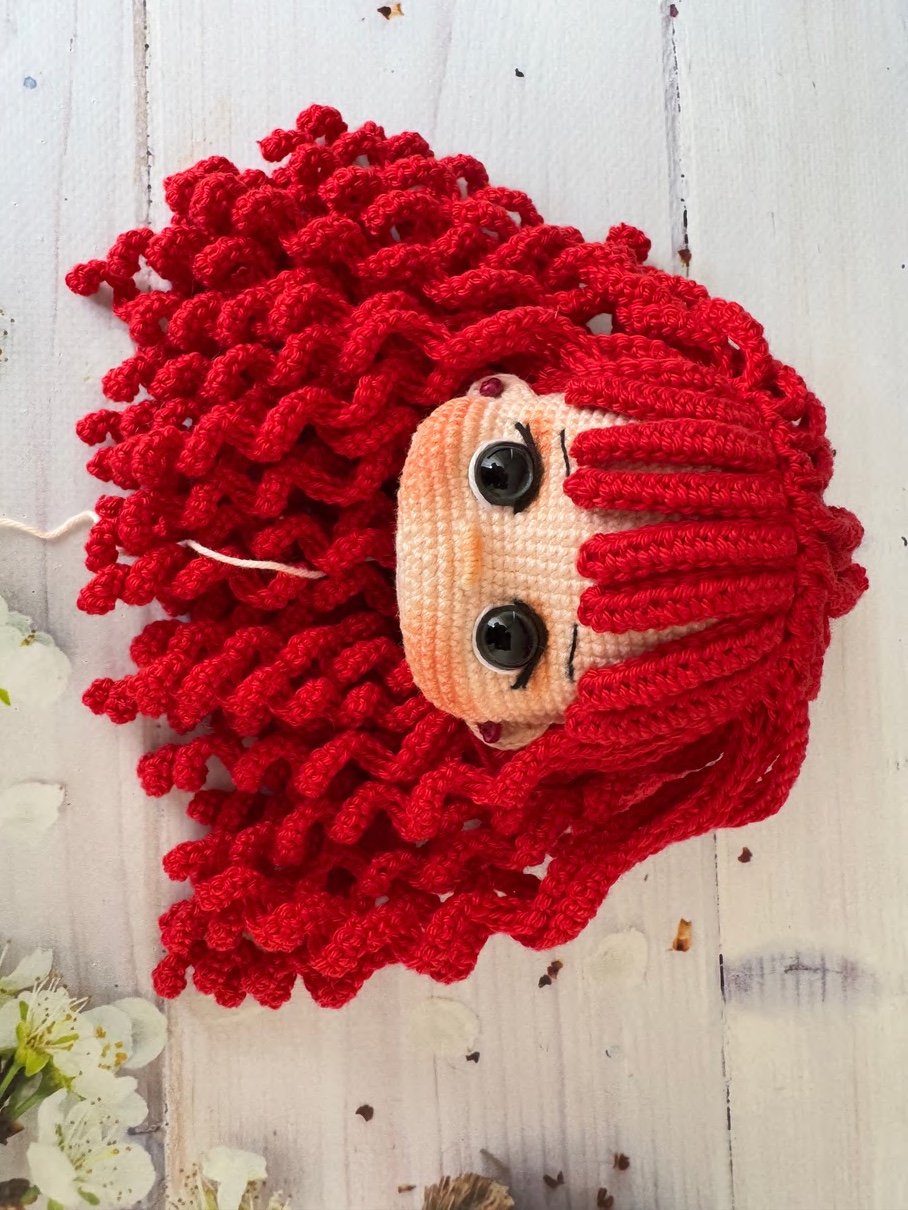
Sew the wig onto the head using the reference photos as a guide. The wig should sit naturally with the bangs framing the forehead.
Step 6: White Blouse
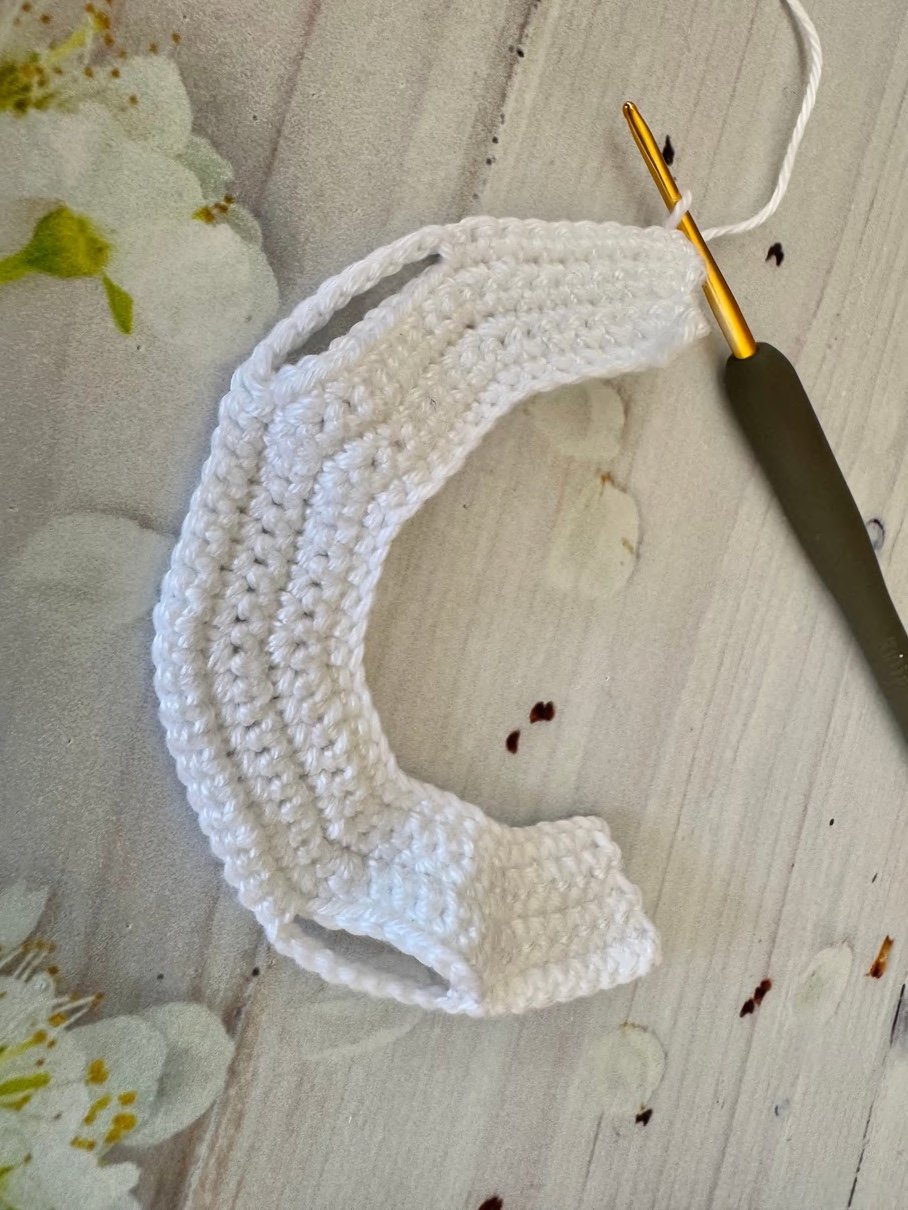
Yarn: White (Gazzal Giza 2450) — 2.20 mm hook. Work in rows; ch 1 at end of each row and turn.
- Row 1: Ch 42, turn. Skip 6 ch (buttonhole). From 7th ch: 36 sc.
- Row 2: 36 sc
- Row 3: (5 sc, 1 inc) × 6 = 42 sc
- Row 4: (6 sc, 1 inc) × 6 = 48 sc
- Row 5: (7 sc, 1 inc) × 6 = 54 sc
- Row 6: (8 sc, 1 inc) × 6 = 60 sc
- Row 7 (sleeve holes): 10 sc, ch 8 skip 10, 20 sc, ch 8 skip 10, 10 sc
- Row 8: 10 sc, 8 sc over chain, 20 sc, 8 sc over chain, 10 sc = 56 sc
- Rows 9–10: 56 sc — ch 6 and turn (second buttonhole)
- Rows 11–15: 56 sc — ch 1 and fasten off
Sleeves (work 2)
Attach yarn from the back of the armhole opening. Pick up 21 sc — place stitch marker.
- Rows 2–6: 21 sc (5 rows)
- Row 7: (6 sc, 1 inc) × 3 = 24 sc
- Rows 8–12: 24 sc (5 rows)
- Row 13: (7 sc, 1 inc) × 3 = 27 sc
- Rows 14–18: 27 sc (5 rows)
- Row 19: (8 sc, 1 inc) × 3 = 30 sc
- Rows 20–23: 30 sc (4 rows)
- Row 24: Ch 2, 3 sc — repeat to end (picot/lace edge)
With green yarn, embroider a grass border along the sleeve edge using a needle. At the neckline: attach yarn, 2 sc, ch 2 — repeat to end for a simple neckline edging. Sew 2 buttons to the back.
Step 7: Blue Overalls
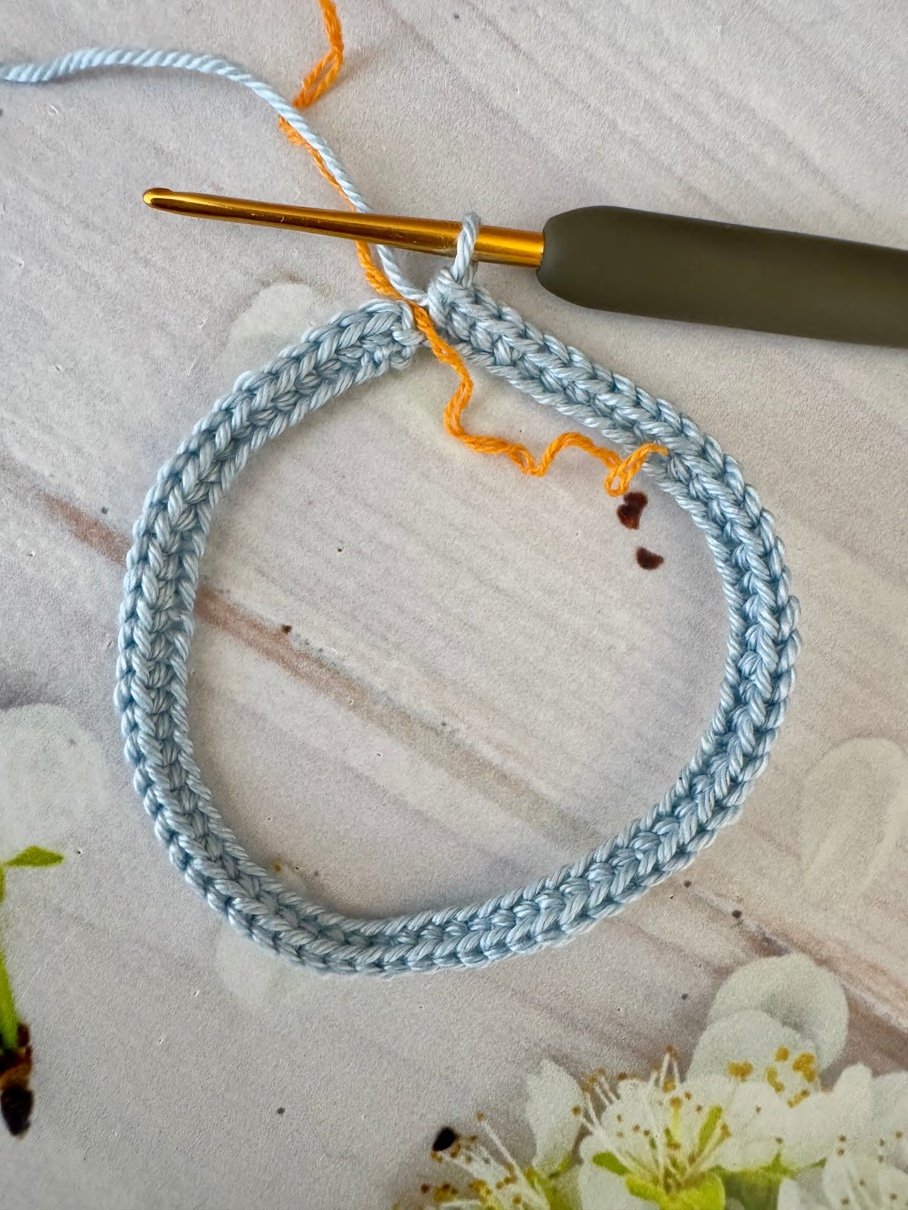
Yarn: Blue (Gazzal Giza 2474) — 2.20 mm hook.
- Rnd 1: Ch 70, join with slst, ch 1. Work 70 sc — place stitch marker.
- Rnds 2–15: 70 sc (14 rounds) — then form the legs.
First Leg
- Rnd 1: Work 35 sc, ch 6, join with 1 sc to first stitch.
- Rnd 2: 34 sc, 6 sc over chain, 1 sc = 41 sc. New starting point.
- Rnds 3–7: 41 sc (5 rounds)
- Switch to Light Blue (Gazzal Giza 2473):
- Rnd 8 (FLO): (7 sc, inc) × 5, 1 sc = 46 sc
- Rnds 9–11: 46 sc — slst, ch 1, fasten off.
Second Leg
Attach blue yarn at the stitch right next to where the first leg ended (from the back).
- Rnd 1: 1 sc, 6 sc over chain (BLO of remaining chain), 34 sc = 41 sc.
- Work Rnds 3–11 the same as the first leg.

Belt Loops (Make 4)
From the starting point of Rnd 1, count 11 sc and attach yarn at the 12th stitch. Ch 8, secure the chain 3 rows down. Repeat at intervals of 16 sc, 18 sc, and 16 sc for the remaining 3 loops (2 front, 2 back).
Bib Front
- Count 26 sc from the waistband start. Attach yarn at the 27th stitch. Work 21 sc, ch 1, fasten off.
- Re-attach from right edge each row, progressively narrowing: 20, 18, 17, 15, 14 sc.
- Work sc all around the bib piece and waistband: 75 sc total. Join with slst.
- Rnd 2 (FLO): 75 slst. Join.
- Rnd 3 (BLO of slsts): 75 sc. Fasten off.
Belt & Straps
Belt: With light blue yarn, ch 81. 79 sc, 3 sc in same st, 79 sc on other side, ch 7 (buttonhole), join. Embroider with dark blue yarn using surface slip stitch.
Straps (× 2): Ch 46. 44 sc, 3 sc in same st, 44 sc on other side, ch 7 (buttonhole), join. Embroider with same machine stitch technique. Thread belt through loops. Sew straps to back. Attach 2 buttons at front bib.

Mushroom Appliqué
Cap (Red): Ch 3. Build up: 3 sc → 4 → 5 → 6 sc. Then work sc around the whole piece and join. Embroider white dots with white yarn.
Stem (White): Attach white yarn to BLO of base. 4 sc for 4 rows. Fasten off with long tail. Sew mushroom onto the shorts. Add green grass embroidery underneath.
Fold up the light blue cuff at the leg bottoms. Embroider the cuff edge, pocket, and zipper details using dark blue yarn with the surface slip stitch (machine stitch) technique.
Step 8: Shoes (Make 2)
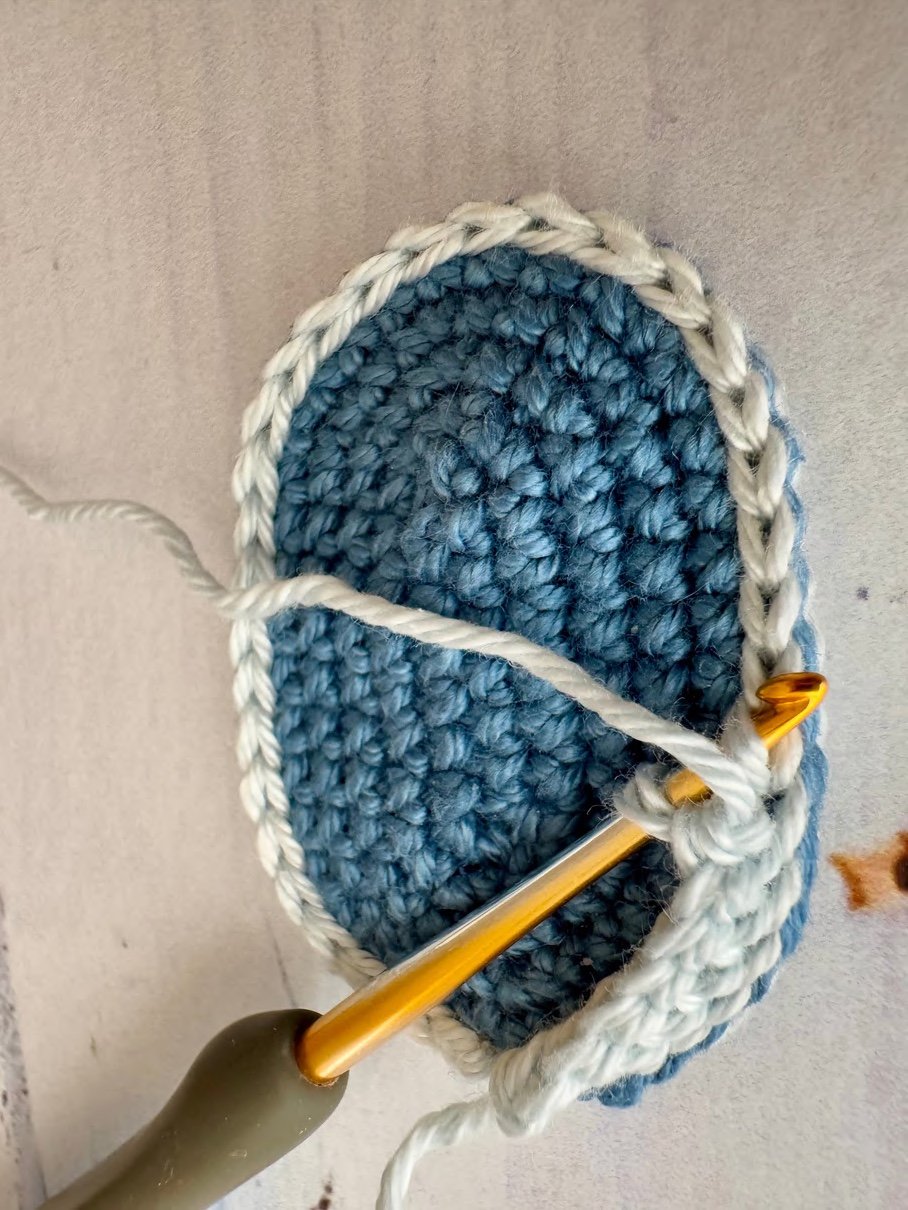
Yarn: Light Blue (2473) and Dark Blue (2479) — 2.20 mm hook. Make 2 soles: one light blue, one dark blue. Layer dark blue on top and join with 36 slst using light blue.
- Sole Rnds 1–5: Build oval from ch 9 up to 36 sc (standard oval increases)
- Rnd 6: Attach light blue to FLO of slsts. Work 36 sc in reverse direction (creates inside-out effect for rolled edge).
- Rnd 7: 36 sc in light blue, cut yarn. Continue in normal direction from now.
- Rnd 8 (dark blue, BLO): 36 sc
- Rnds 9–10: 36 sc (2 rounds)
- Rnd 11: 12 sc, 7 dec, 10 sc = 29 sc
- Rnd 12: 12 sc, 3 dec, 11 sc = 26 sc
- Rnd 13: 26 sc
- Rnd 14: 8 slst, 1 sc, 10 hdc, 1 sc, 6 slst — ch 1, fasten off.
With light blue yarn, embroider shoelaces using a needle. Add back-heel stitching with the surface slip stitch technique.
Step 9: Beret Hat
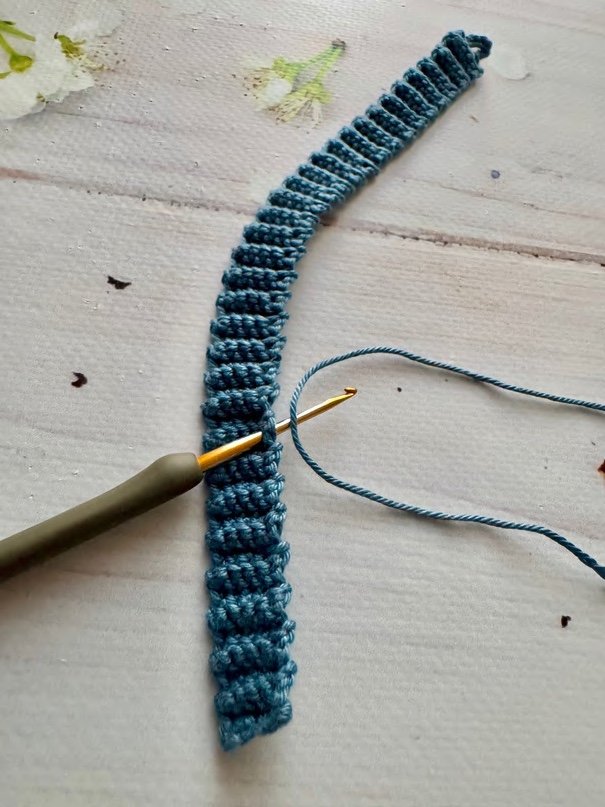
Yarn: Dark Blue (Gazzal Giza 2479) — 2.20 mm hook. Work all rows in BLO. Ch 1 and turn at end of each row.
- Row 1: Ch 6, from 2nd ch: 5 sc
- Rows 2–62: 5 sc (61 rows)
- Row 63: 2 sc, ch 6 (buttonhole), skip 1, 2 sc — fasten off.
Brim (worked in normal stitches, not BLO)
- Attach yarn at row 16. Work 32 sc, ch 1, turn.
- Row 2: 12 sc, inc 2, 4 sc, inc 2, 12 sc = 36 sc
- Row 3: 12 sc, inc, 10 sc, inc, 12 sc = 38 sc
- Row 4: Sk 1, 11 sc, 3 inc, 1 sc, inc, 4 sc, inc, 1 sc, 3 inc, 10 sc, sk 1, 1 sc = 44 sc
- Row 5: Sk 1, 10 sc, inc, 20 sc, inc, 9 sc, sk 1, 1 sc = 44 sc
- Rows 6–10: Decrease 2 sts each row (sk 1 each end) down to 34 sc
- Brim edging: Attach yarn. 8 sc (side), 34 slst (front brim), 8 sc (other side), fasten off.
Sew button opposite the buttonhole. The hat rolls and folds in place on Ginger’s head.
Step 10: Mushroom House Bag
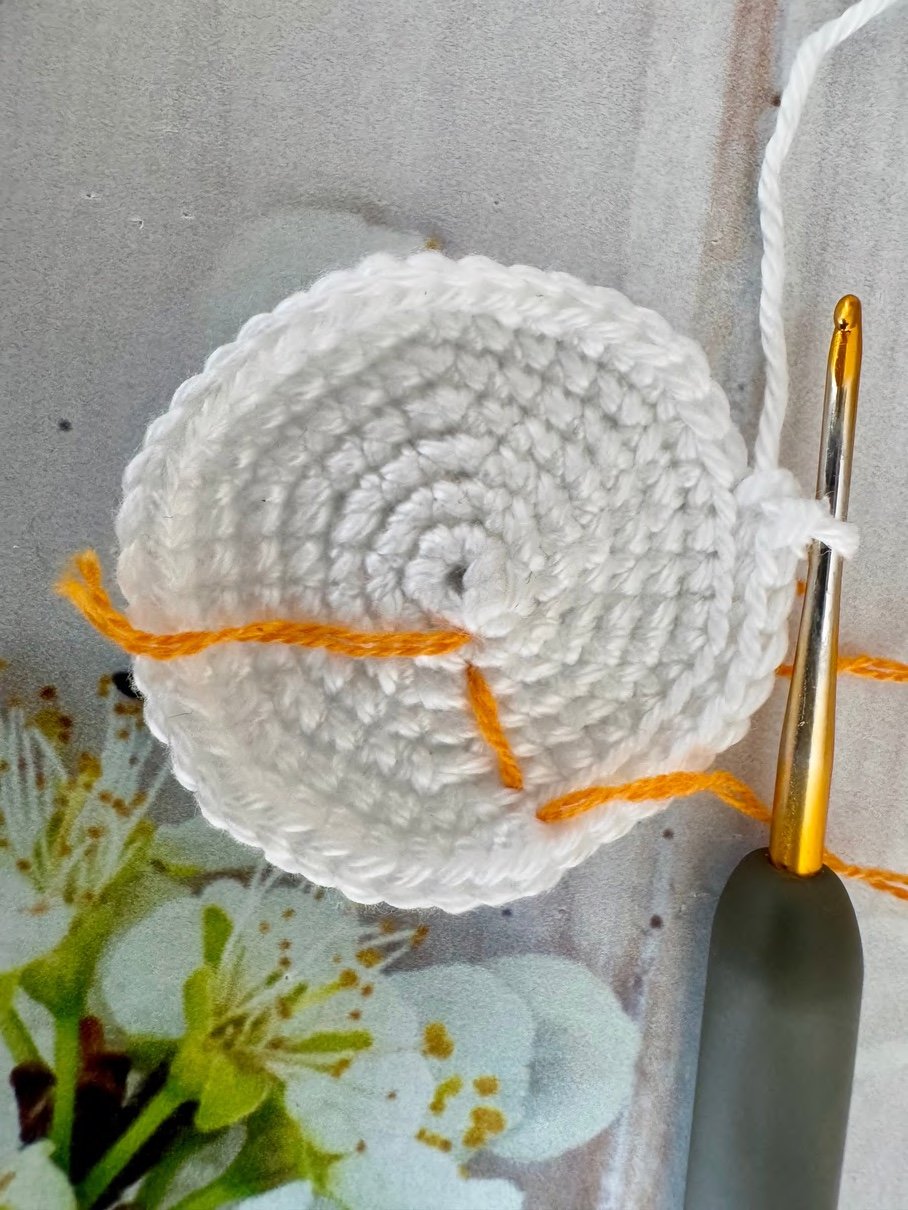
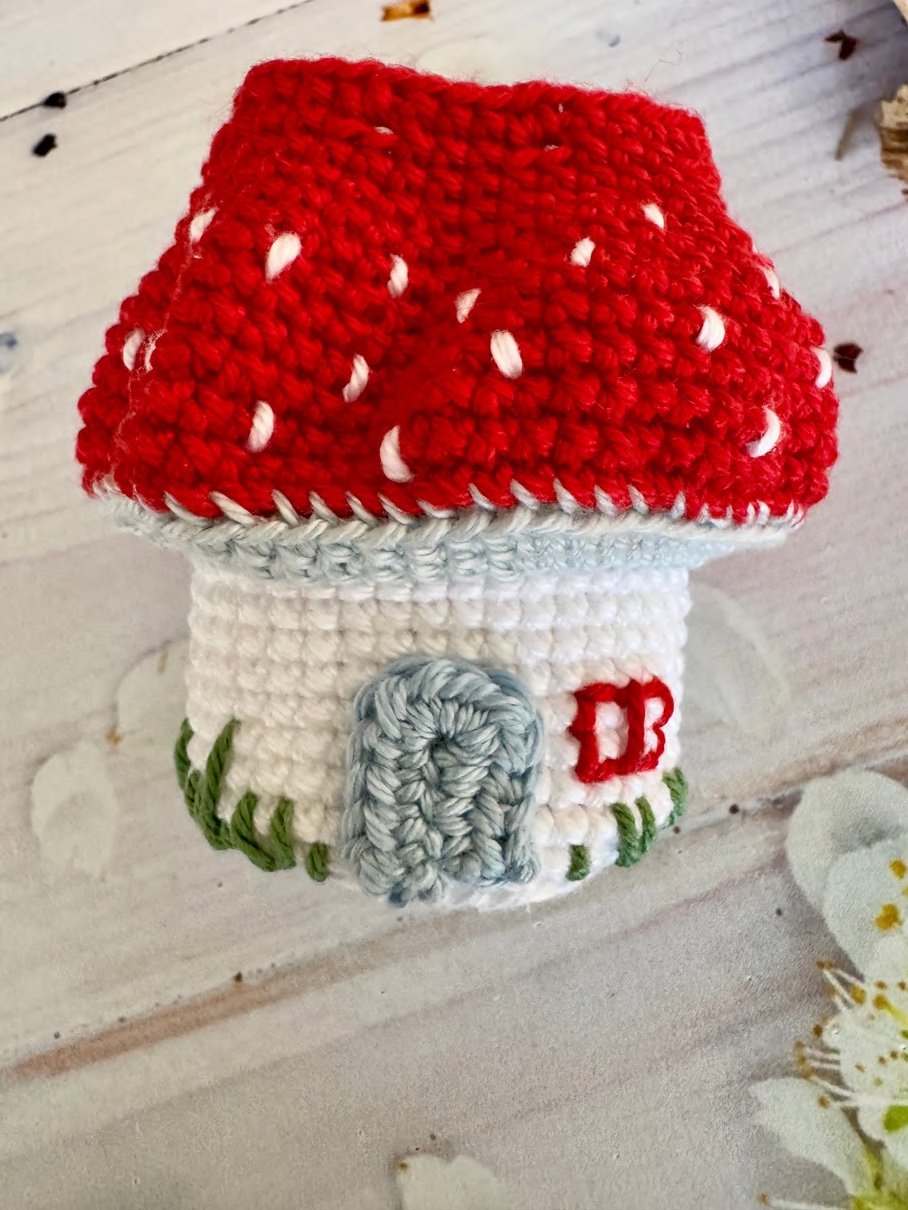
Yarn: White base, light blue middle, red top — 2.00 mm hook.
- Rnds 1–7: MR, build from 6 sc up to 42 sc (standard magic ring increases)
- Rnd 8 (BLO): 42 sc
- Rnds 9–16: 42 sc (8 rounds)
- Rnd 17 (BLO): 42 sc — ch 1, fasten off white.
- Rnd 18 (FLO of Rnd 17, light blue): (6 sc, inc) × 6 = 48 sc
- Rnds 19–20: Continue increasing to 54 then 60 sc
- Rnd 21 (switch to Red, BLO): (4 sc, inc) × 12 = 72 sc
- Rnds 22–23: 72 sc
- Rnds 24–31: Gradual decreases to 40 sc
- Rnd 32: 2 sc, ch 2 skip 2, (3 sc, ch 2 skip 2) × 7, 1 sc (creates drawstring holes)
- Rnd 33: Work 2 sc into each chain space = 40 sc — slst, ch 1, fasten off.
Door
With blue yarn: Ch 6. From 3rd ch: 3 hdc, 6 hdc in same stitch, other side 3 hdc = 12 hdc. Leave long tail and sew to the white body as shown. Embroider a window and grass with needle.
Polka Dots
Embroider white dots scattered across the red upper part of the bag.
Straps (Make 2)
With light blue: Ch 55. From 3rd ch: 53 hdc. Leave long tail. Sew to back of bag.
Closure
With red: Ch 65. Thread through the Rnd 32 spaces. Attach wooden beads to ends with small knots.
Final Assembly
- Sew the stuffed head to the body neck, with wire support in the neck.
- Dress Ginger in the white blouse first — slide arms through the sleeves.
- Put on the blue overalls — fasten the front straps with buttons.
- Slide the shoes onto the feet.
- Sew the red wig onto the head with the bangs framing the forehead.
- Place the dark blue beret on the head at a slight angle and button it.
- Apply soft pastel blush to the cheeks and mouth area.
- Thread the belt through the overall loops and fasten at the back.
- Hang the mushroom house bag over one arm.
- Weave in all ends — Ginger is ready to explore the woods!
Frequently Asked Questions
How tall is the finished Ginger Doll?
Made with 2.00 mm hook and the recommended yarns, Ginger stands approximately 30–35 cm (12–14 inches) tall — a large, detailed amigurumi doll.
Why are there two different hook sizes?
The 2.00 mm hook gives a tighter fabric for the body and bag, keeping stuffing from showing through. The 2.20 mm hook is used for clothing so the garments have a little more drape and fit comfortably over the stuffed body.
Do I need to use wire?
Wire in the body and arms lets Ginger stand independently and makes her arms poseable. For a softer toy (for young children), omit the wire and stuff firmly — she will still look gorgeous, just not pose-able.
Is the cross single crochet necessary?
No — the designer used the cross sc technique but regular sc works perfectly. The fabric texture will look slightly different but the shaping will be identical.
Conclusion
Crafting your own handmade Ginger Doll crochet amigurumi pattern is a wonderfully rewarding and creative adventure for any fiber artist. From stitching her charming character details and warm styling to assembling a durable, poseable amigurumi form, every step allows you to showcase your crochet skills. Whether you are creating this delightful doll as a cherished keepsake, a special gift, or a unique addition to your handmade collection, your finished Ginger Doll will bring warmth, personality, and charm to anyone who sees her. Grab your hook, choose your favorite yarn shades, and enjoy bringing this adorable character to life!



One Comment